Rhea is s software tool for Windows (Linux support coming soon!) to manage and exercise Numato Lab’s popular GPIO and Relay modules. Rhea supports most GPIO/Relay devices with USB, Ethernet or WiFi interface. This software tool is designed to provide an out-of-the-box experience when working with Numato Lab’s GPIO and Relay Modules. While the powerful commandline like interface provided by these devices offer very quick and easy setup and use by taking advantage existing software such as Teraterm, PuTTY, HyperTerminal or your own custom script/program, Rhea goes one step further by offering a full fledged GUI that looks great and works out of the box. Rhea makes it easier to use Numato Lab’s GPIO/Relay Modules without needing to learn the commands or other specifics and can be used for basic automation and other tasks. A complete list of devices supported by Rhea can be found below.
- All USB GPIO Modules
- All Ethernet GPIO Modules
- All WiFi GPIO Modules
- All USB Relay Modules
- All Ethernet Relay Modules
- All WiFi Relay Modules
Installing Rhea
Please visit the Rhea product page and download the installer for your operating system. Extract the zip file and run the installer. Follow the steps as prompted by the installer to complete installation. Check your operating system’s program menu for Rhea icon. Click the Rhea icon to launch the application.
A first look at Rhea User Interface
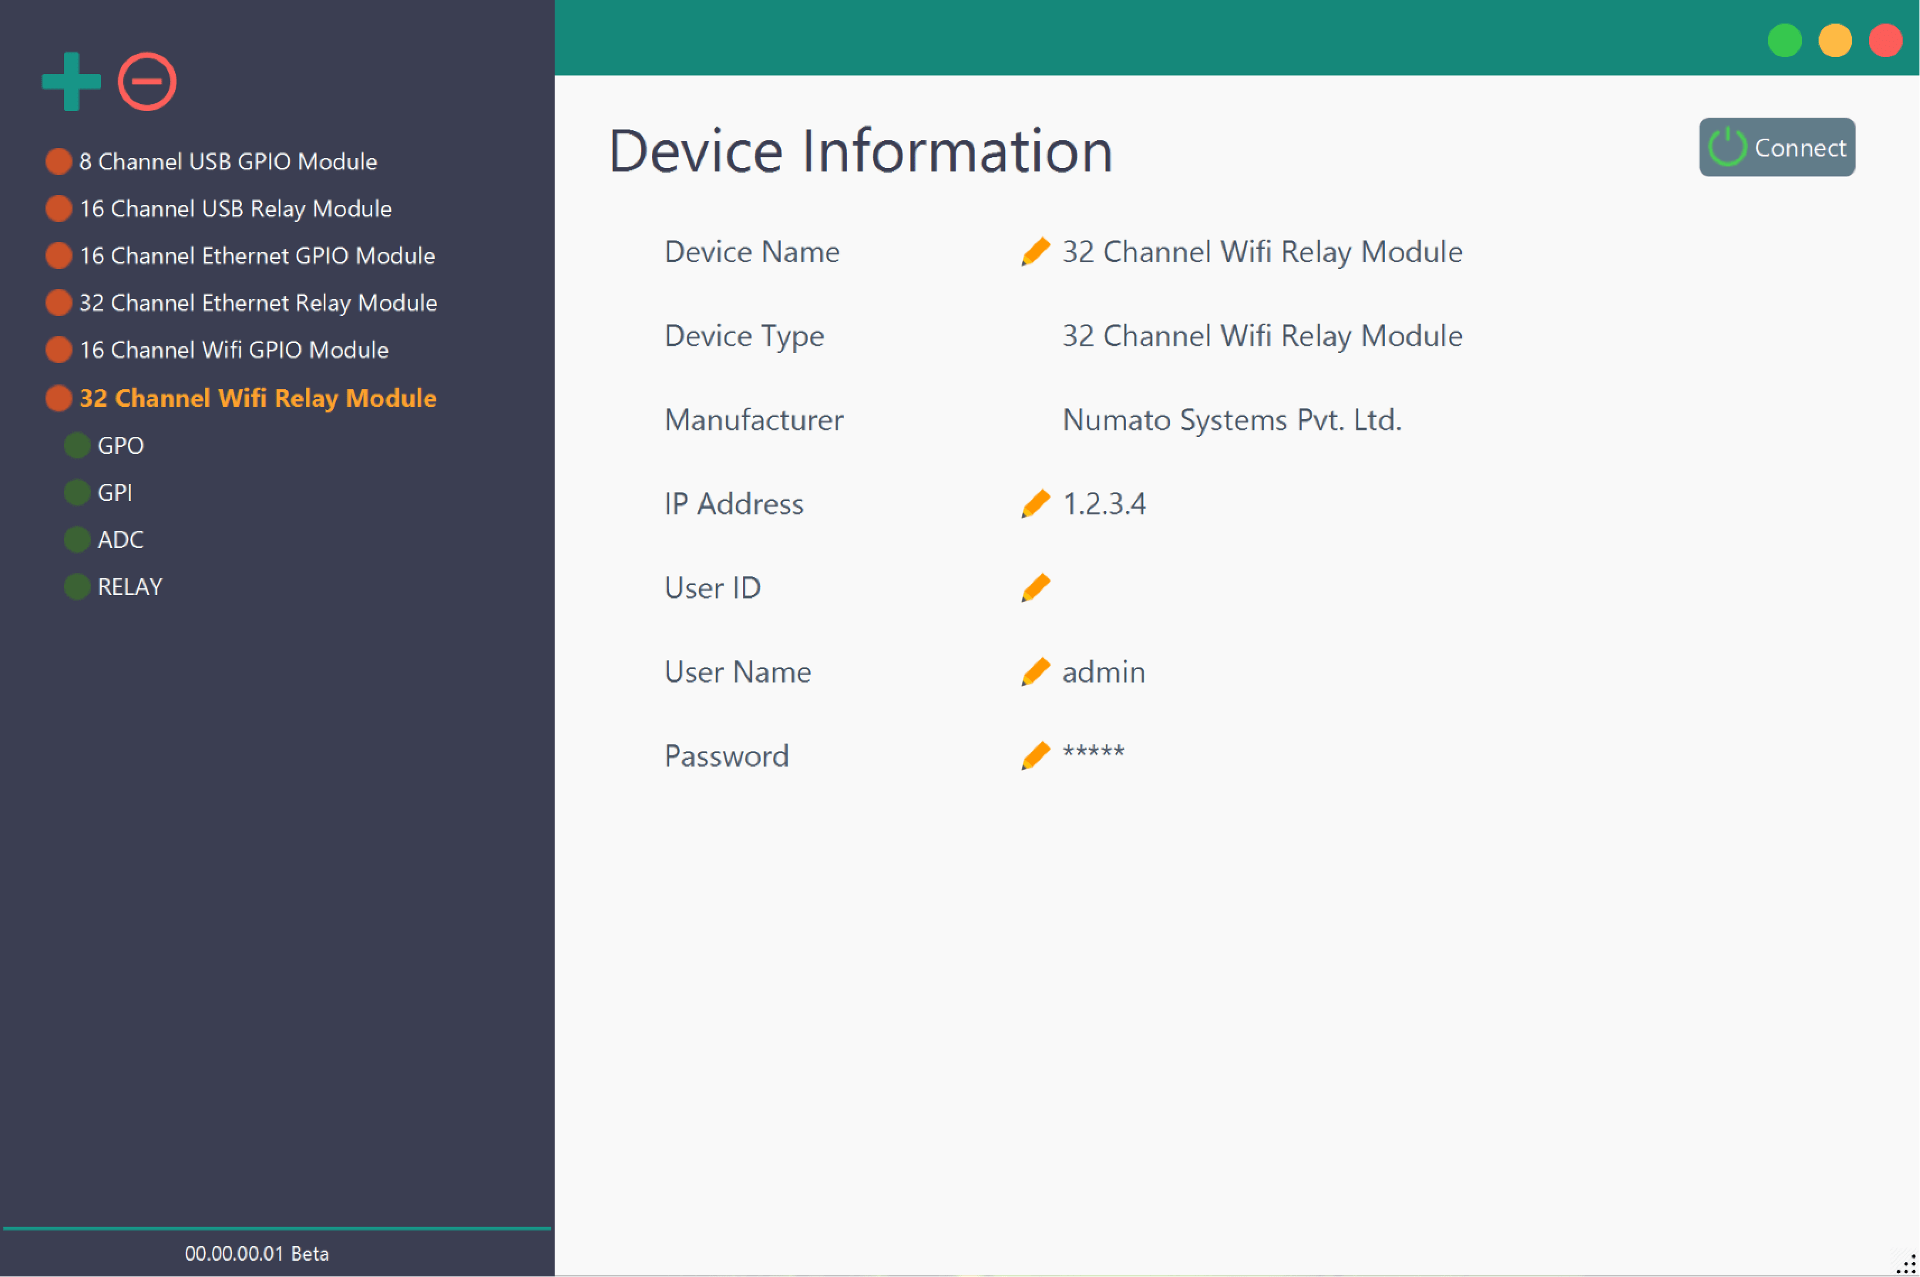
Rhea’s user interface is designed to be intuitive and easy to use even for users who does not have any existing knowledge of commands or other technical details. Rhea’s design emphasis on minimalism and least barriers to get a device working. As shown in the picture below, the main User Interface of Rhea has three components. A set of controls to add, remove and manage devices, A tree structure that lists all available devices and a larger general purpose area that displays information and details depending on the object selected in the device tree on the left.
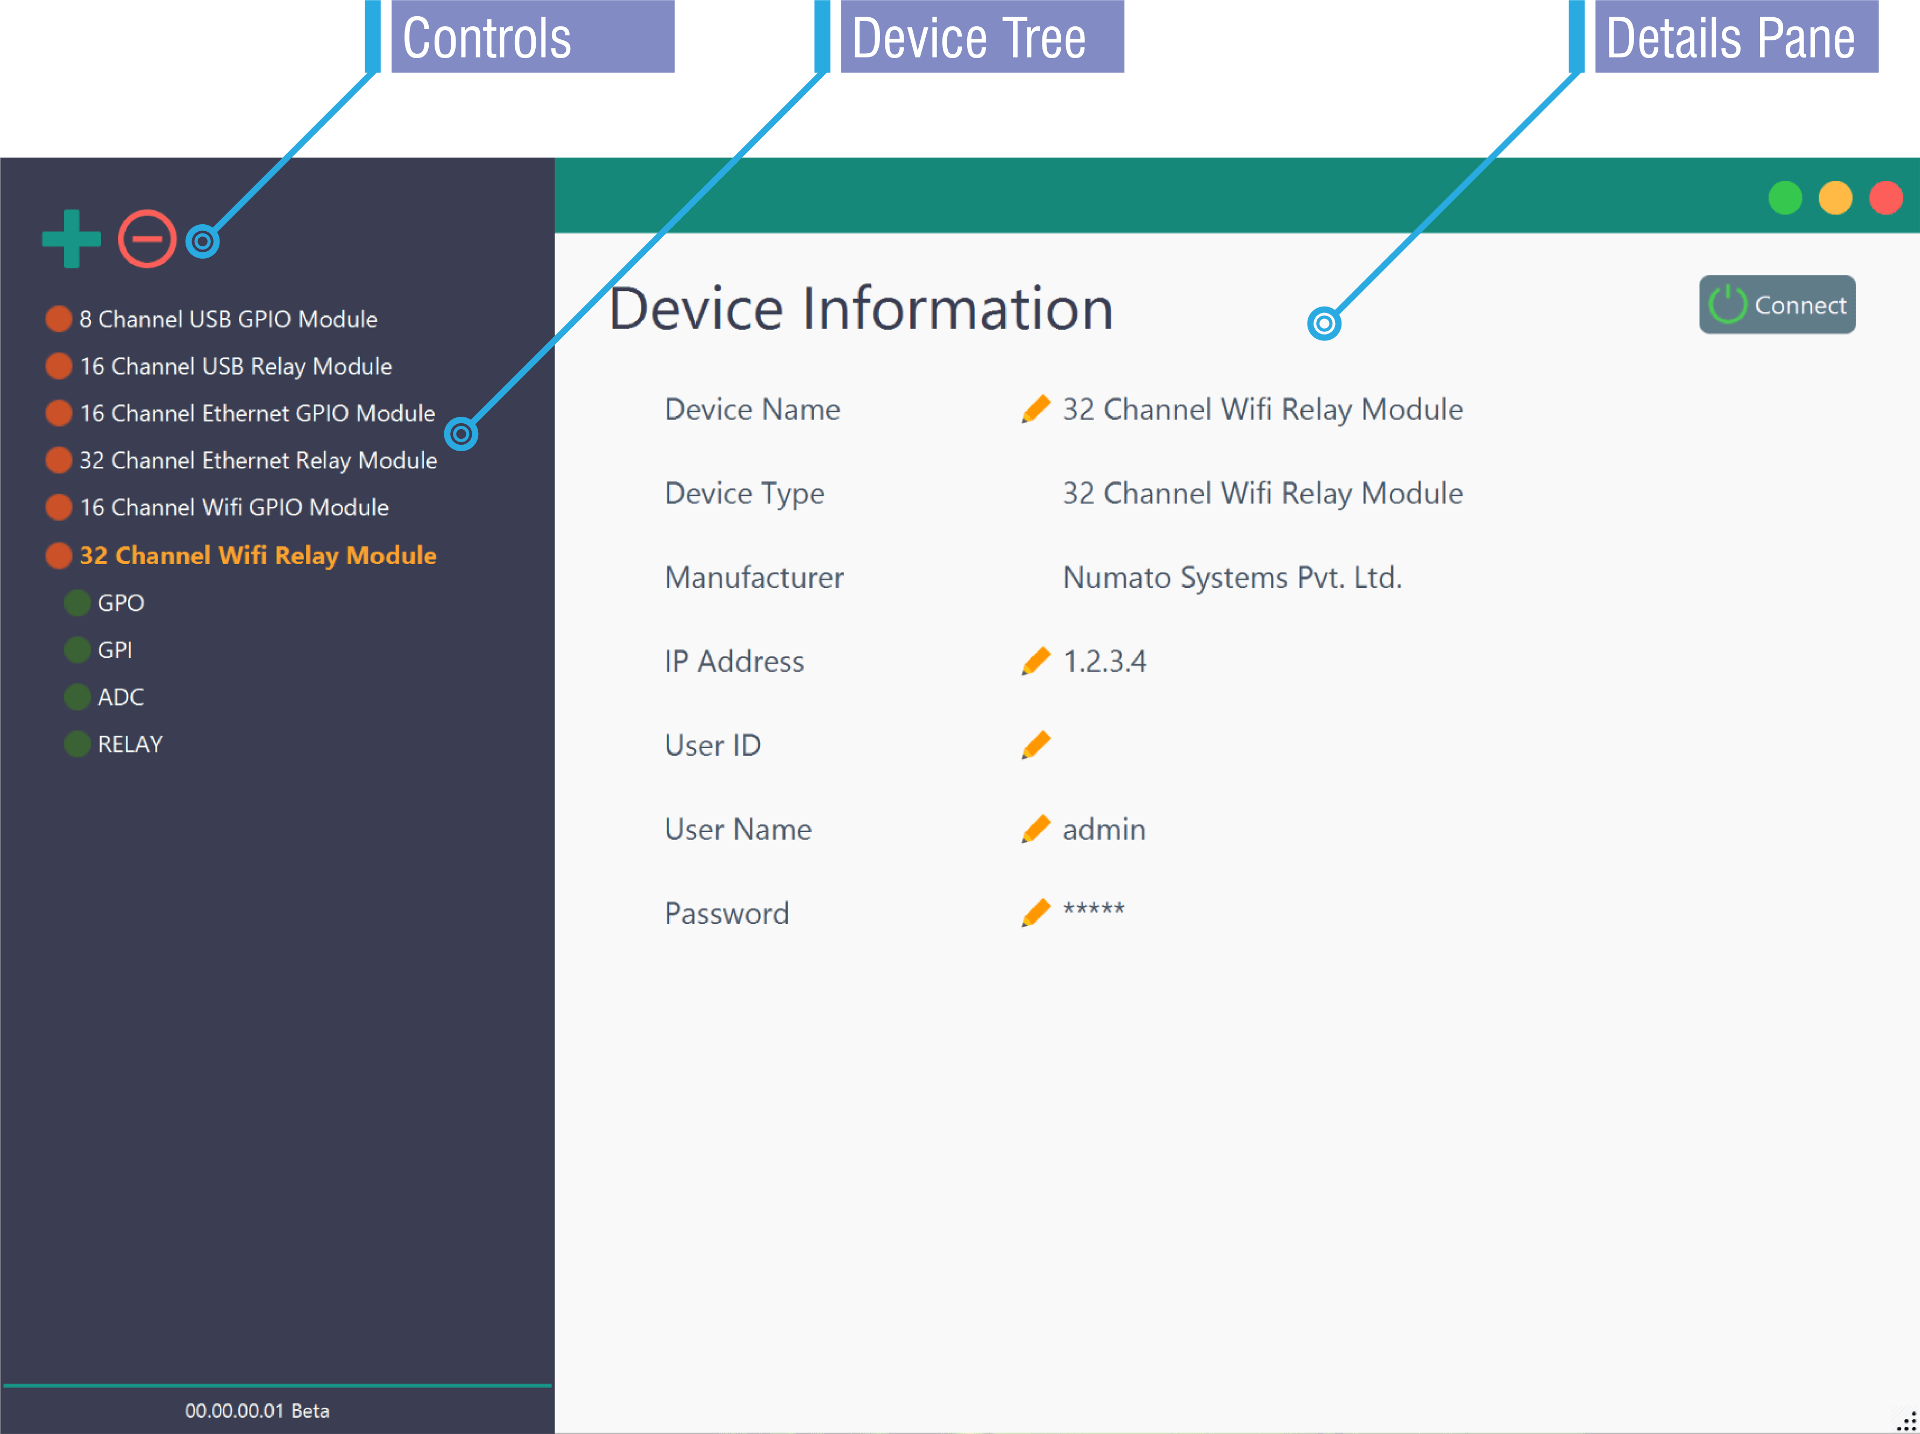
Clicking on “Add Device” button will allow new devices to be added to the device list. Clicking on the “Remove Device” button will remove the selected device from the list. Selecting a device in the device list will display the device information in the details pane. Some of the device information can be edited. Selecting any of the feature object such as Relay, GPO listed under a device tree will display a list of such objects in the details pane where user can interact with such objects.
How to add/remove a device
To add a new device to Rhea, click on the Add (+) button on the controls box. A window will pop up with a list of devices that are currently supported by Rhea. To select a device, select one of the supported interface such as USB, Ethernet or WiFi from the Interface list box. Once an interface is selected, the Device Type list box will be selected with all supported devices that supports the selected interface. Select a device from the Device Type list box and enter the COM port address or IP corresponding to the device. Finally, click the save button to add the device to the device tree. Optionally, a friendly name can be assigned to the device to identify different devices. The video below shows how to add a new device to Rhea.
To remove a device, simply select the device in the device tree and click the Remove Device (-) button.
A simple Exercise – Turn a relay ON
Let’s see how to accomplish a simple task of turning ON a Relay on an 8 Channel USB Relay Module. The steps and video below will walk you through the steps..
- Open the Windows Device Manager and find the port number (COM3, COM4 etc..) of the device in question.
- Then click the “Add Device” button on Rhea and add 8 Channel USB Relay Module. Make sure to use the port number/name of the device found out from the Device manager.
- Once the device is added, click on the device and again click the “Connect” button on the “Device Information” pane.
- Click on the “Relay” object under the newly added device to display “Relay Control” pane.
- Click on the “Add Relays” button in Relay Control pane. This will display a popup window with a list of all available relays on the selected product.
- Select one or more relays and click “Add” button. The selected relays will be listed in the list on the Relay Control pane.
- Click on the button corresponding to individual relay to turn the relay ON/OFF. These buttons are toggle buttons at will invert the state of relays at each click.

Is that all?
No! Rhea has much more to offer. Rhea has several more features that makes working with Numato Lab GPIO and Relay modules a great experience. Please visit our KnowledgeBase for more articles on working with Rhea.
Hi,
July 6, 2018 at 7:14 pmWhen I double-click on the Rhea icon to start it, an error shows up on the screen. It appears in a “Java Virtual Machine Launcher” pop-up window and the error message is “Could not find the main class: rhea.Rhea. Program will exit”. The program exit when clicking on the ‘OK’ button.
I have the 8 channel board and have installed Rhea according to instructions and added the 8 relays. However, clicking the OFF/ON does not actually toggle any of the relays although the button indicates that it has. I’ve tried TeraTerm and the relays function as expected. What might I be doing wrong?
July 16, 2018 at 7:05 pm