Introduction
This article will show how to run Linux on Waxwing Spartan 6 Development Board. The Waxwing board features on-board Ethernet port, so this article will additionally demonstrate running Dropbear SSH server and Lighttpd Linux web server in the Linux on Waxwing board using Ethernet interface.
Dropbear SSH is a small SSH server and client software. It is useful for embedded type Linux/Unix systems with low memory footprint and processor resources. In this article, Dropbear SSH server is used to login to Linux running on Waxwing from a different host system using SSH.
Lighttpd is a web server and it supports Microsoft Windows and Unix/Linux operating systems. It is an open source, fast, secure and efficient web server. It is a very light web server with small memory footprint making it suitable for embedded applications where memory and processing capacity is limited. In this article, lighttpd will be used to serve a default web page when users navigate to it.
Structure:
This article is structured into 4 sections.
- Section I: Creating the Microblaze based design for Waxwing
- Section II: Generating Device Tree
- Section III: Building Linux Image
- Section IV: Running Linux on Waxwing
Prerequisites
- Hardware
- Waxwing Spartan 6 FPGA Development Board
- Xilinx Platform Cable USB II JTAG debugger
- DC Power Supply (Optional)
- Ethernet cable
- Software
- Xilinx Platform Studio installed on either Windows or Linux System
- Linux system (author used Ubuntu 14.04 64-bit on a virtual machine)
Creating the Microblaze based design for Waxwing
The following steps will walk you through the process of creating a hardware design in Xilinx Platform Studio (XPS). The hardware design features Xilinx Microblaze and AXI Ethernetlite IP core as major components.
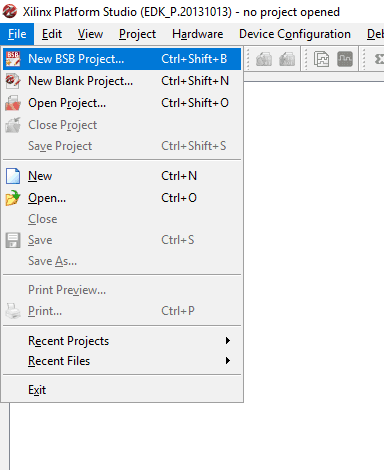
Step 1: The XPS Base System Builder (BSB) is needed to create a new project. Download the BSB Wizard files from here and copy to the directory “C:\Xilinx\xx.xx\ISE_DS\EDK\board”. Once extracted, the complete path to the file should look like “C:\Xilinx\xx.xx\ISE_DS\EDK\board\NumatoLab\ipxact\WaxwingDevBoardLX45_V3\data”. Go to All Programs > Xilinx Design Tools > EDK and start the Xilinx Platform Studio. Select the “New BSB Project…” from “File” menu or press Ctrl+Shift+B to create a new XPS project as shown below.
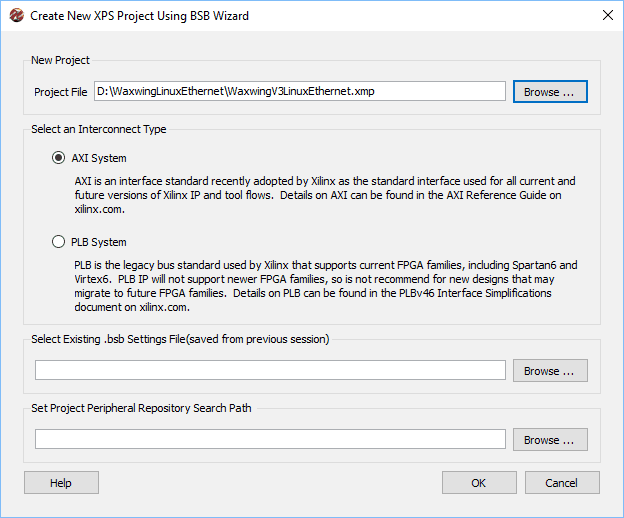
Step 2: “Create New XPS Project Using BSB Wizard” dialog will open. Browse to a convenient project location and enter the project name (Here the project name is WaxwingV3LinuxEthernet as shown below). Click “OK” to proceed.
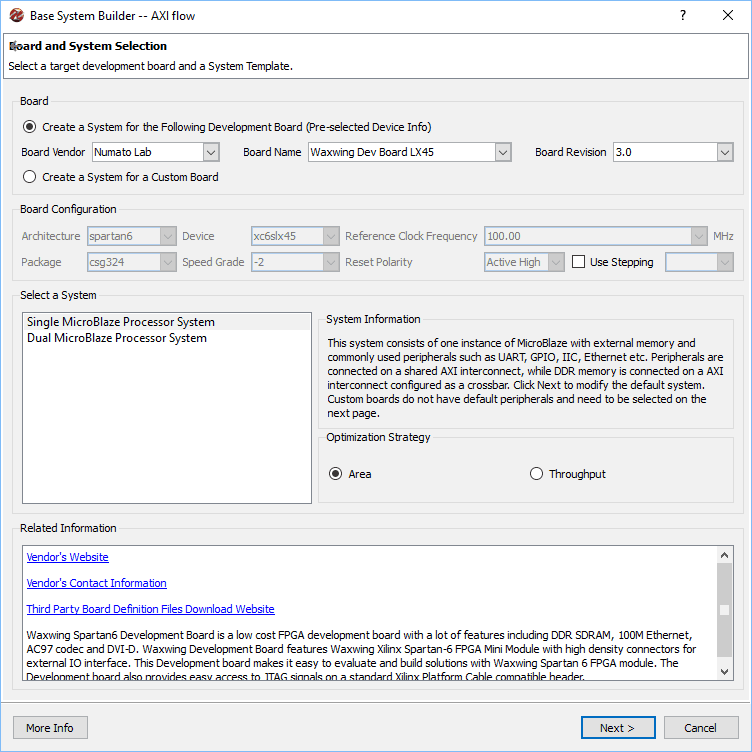
Step 3: The “Base System Builder — AXI flow” dialog will open. Under the “Board” tab, select Board Vendor, Board Name and Board Revision (Numato Lab, Waxwing Dev Board LX45 and 3.0) as shown below. Click “Next” to proceed.
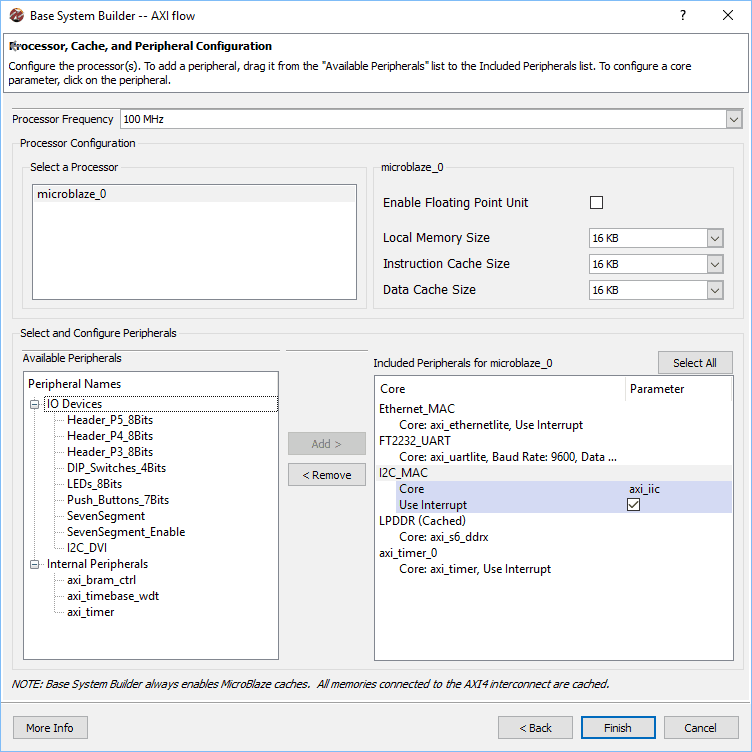
In “Processor, Cache, and Peripheral Configuration” tab, Select Microblaze memory size as 16 KB and include the peripherals required for this project (Ethernet_MAC, FT2232_UART, I2C_MAC, LPDDR, and axi_timer_0) as shown in the below image. Click “Finish”. The XPS project is created with the selected settings.
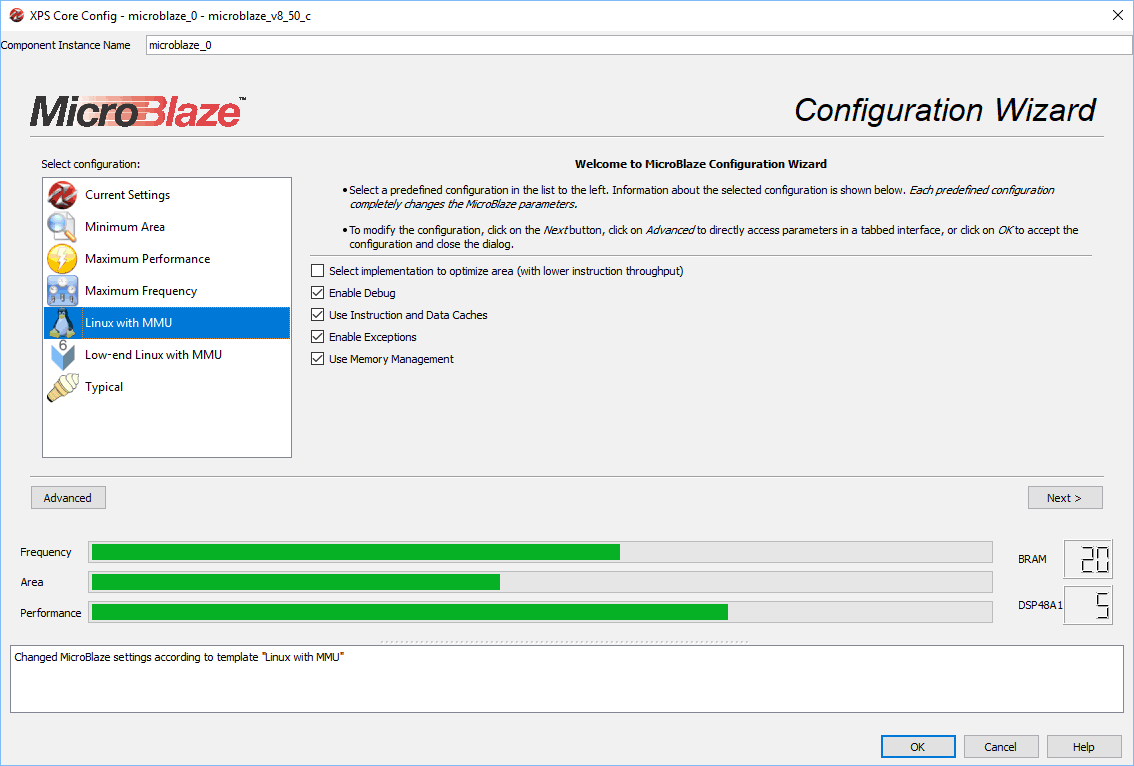
Step 4: Double-click on “microblaze_0”, choose “Linux with MMU” to run Linux on our board as shown in the image below. Click “OK”.
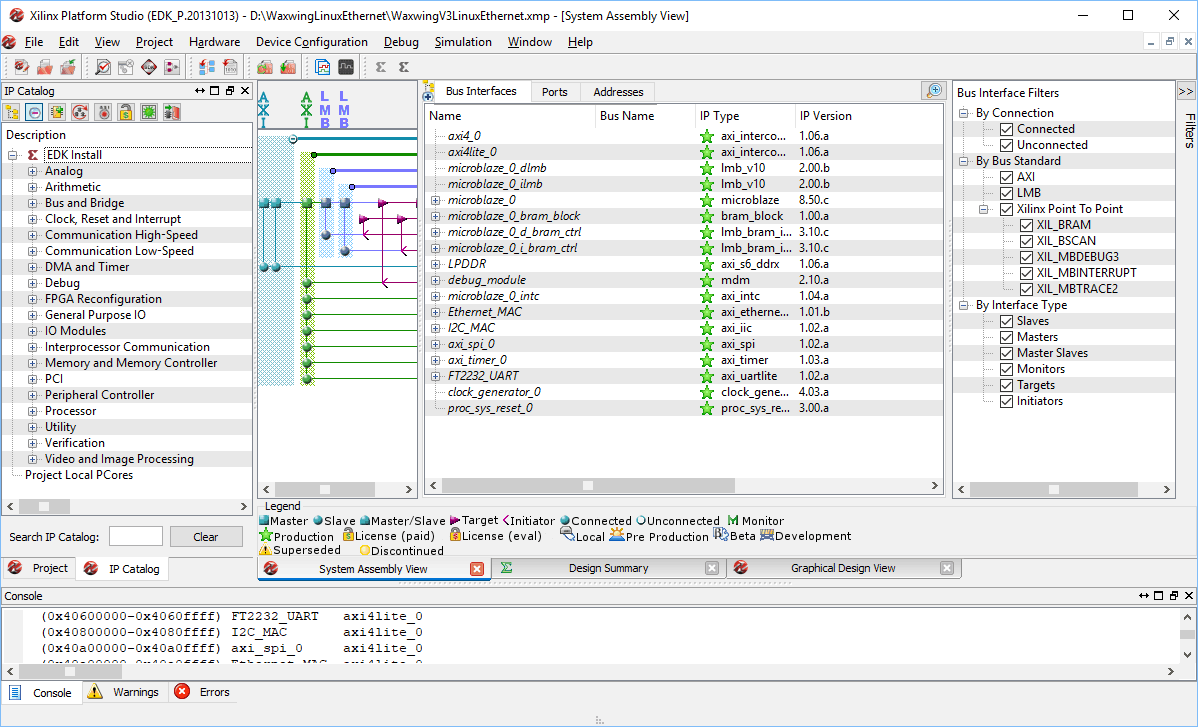
Double-click on “FT2232_UART” and change the “UART Lite Baud Rate” to “115200” and click “OK”. Add “AXI SPI Interface” IP Core from “IP Catalog”. XPS Core Config window will open, change the parameters “Include both Receiver and Transmitter FIFOs” to FALSE and “Ratio of AXI Clock Frequency To SCK Frequency” to 2 and click “OK”. After adding AXI SPI IP, if everything went well, you will be presented with the following window.
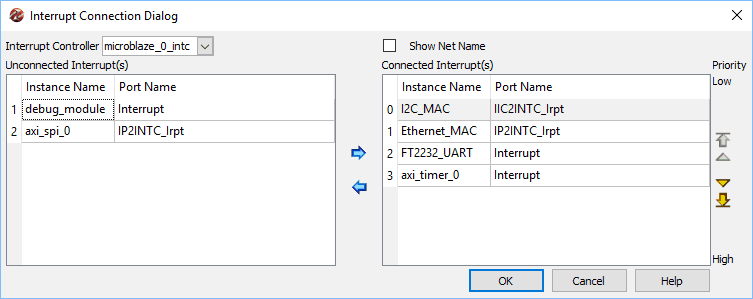
Go to “Ports” tab in the “System Assembly View”, click on “Open Interrupt Control Dialog” and add the interrupts as shown in the below image.
Step 5: Open ucf constraint file and replace with the following
#
# pin constraints
#
NET CLK_100MHZ LOC = "V10" | IOSTANDARD = "LVCMOS33";
NET "CLK_100MHZ" TNM_NET = sys_clk_pin;
TIMESPEC TS_sys_clk_pin = PERIOD sys_clk_pin 100000 kHz;

NET "RESET"                LOC = A11 | IOSTANDARD = LVCMOS33 | DRIVE = 8 | SLEW = FAST | PULLDOWN;
############################################ Ethernet ###############################################
NET Ethernet_MAC_COL       LOC = "U16" | IOSTANDARD = "LVCMOS33";
NET Ethernet_MAC_CRS       LOC = "P17" | IOSTANDARD = "LVCMOS33";
NET Ethernet_MAC_MDC       LOC = "T18" | IOSTANDARD = "LVCMOS33";
NET Ethernet_MAC_MDIO      LOC = "V16" | IOSTANDARD = "LVCMOS33";
NET Ethernet_MAC_PHY_RST_N LOC = "P18" | IOSTANDARD = "LVCMOS33";
NET Ethernet_MAC_RXD[0]    LOC = "U17" | IOSTANDARD = "LVCMOS33";
NET Ethernet_MAC_RXD[1]    LOC = "U18" | IOSTANDARD = "LVCMOS33";
NET Ethernet_MAC_RXD[2]    LOC = "M18" | IOSTANDARD = "LVCMOS33";
NET Ethernet_MAC_RXD[3]    LOC = "M16" | IOSTANDARD = "LVCMOS33";
NET Ethernet_MAC_RX_CLK    LOC = "T10" | IOSTANDARD = "LVCMOS33";
NET Ethernet_MAC_RX_DV     LOC = "N14" | IOSTANDARD = "LVCMOS33";
NET Ethernet_MAC_RX_ER     LOC = "P16" | IOSTANDARD = "LVCMOS33";
NET Ethernet_MAC_TXD[0]    LOC = "N16" | IOSTANDARD = "LVCMOS33";
NET Ethernet_MAC_TXD[1]    LOC = "N15" | IOSTANDARD = "LVCMOS33";
NET Ethernet_MAC_TXD[2]    LOC = "V12" | IOSTANDARD = "LVCMOS33";
NET Ethernet_MAC_TXD[3]    LOC = "T12" | IOSTANDARD = "LVCMOS33";
NET Ethernet_MAC_TX_CLK    LOC = "R10" | IOSTANDARD = "LVCMOS33";
NET Ethernet_MAC_TX_EN     LOC = "M14" | IOSTANDARD = "LVCMOS33";
############################################ I2C MAC ###############################################
NET I2C_MAC_SCL            LOC = "L12" | IOSTANDARD = "LVCMOS33";
NET I2C_MAC_SDA            LOC = "L13" | IOSTANDARD = "LVCMOS33";
############################################ FT2232 UART ###########################################
NET uart1_sin              LOC = "N11" | IOSTANDARD = "LVCMOS33";
NET uart1_sout             LOC = "M11" | IOSTANDARD = "LVCMOS33";
############################################ SPI Flash #############################################
NET axi_spi_0_MOSI_pin     LOC = "T13" | IOSTANDARD = LVCMOS33 | SLEW = FAST | DRIVE = 8 ;#MOSI
NET axi_spi_0_MISO_pin     LOC = "R13" | IOSTANDARD = LVCMOS33 | SLEW = FAST | DRIVE = 8 ;#MISO
NET axi_spi_0_SCK_pin      LOC = "R15" | IOSTANDARD = LVCMOS33 | SLEW = FAST | DRIVE = 8 ;
NET axi_spi_0_SS_pin       LOC = "V3"  | IOSTANDARD = LVCMOS33 | SLEW = FAST | DRIVE = 8 ;
Step 6: Go to “Hardware” tab and click “Generate Bitstream” to generate the bitstream. Once the bitstream is generated successfully, we will launch the Xilinx SDK later in next section.
Generating Device Tree
Download the device-tree-xlnx repository from the Xilinx’s Github account: https://github.com/Xilinx/device-tree-xlnx. Extract the downloaded zip file to your SDK workspace. In case of the author, the directory structure was “D:\WaxwingLinuxEthernet\SDK\device-tree-xlnx”.
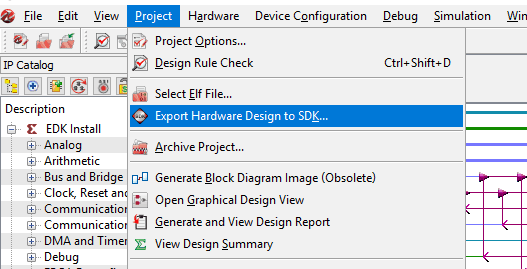
Step 1: Go to “Project” tab in XPS and click “Export Hardware Design to SDK…”. The “Export to SDK/Launch SDK” dialog will open. Select the “Include bitstream and BMM file” and click “Export & Launch SDK”.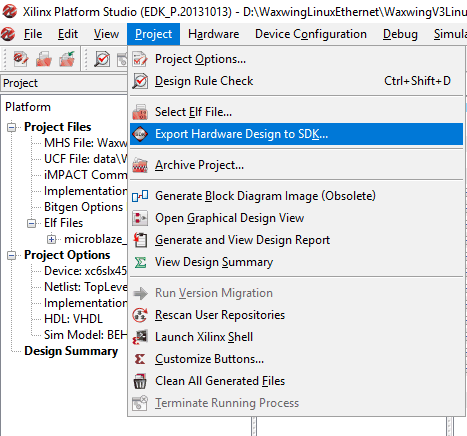
In the “Workspace Launcher”, browse to the SDK workspace location and click “OK”. This opens the Xilinx SDK.
Step 2: In SDK, go to Xilinx Tools -> Repositories.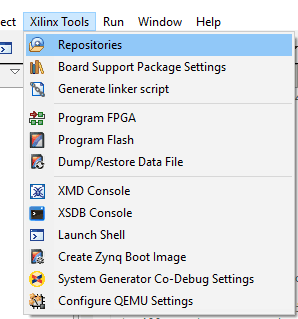
In the Preferences window, we have a section named “Local Repositories”. Select “New” and select the device tree folder which you had downloaded and extracted to SDK workspace. The final result should look like in the below image.
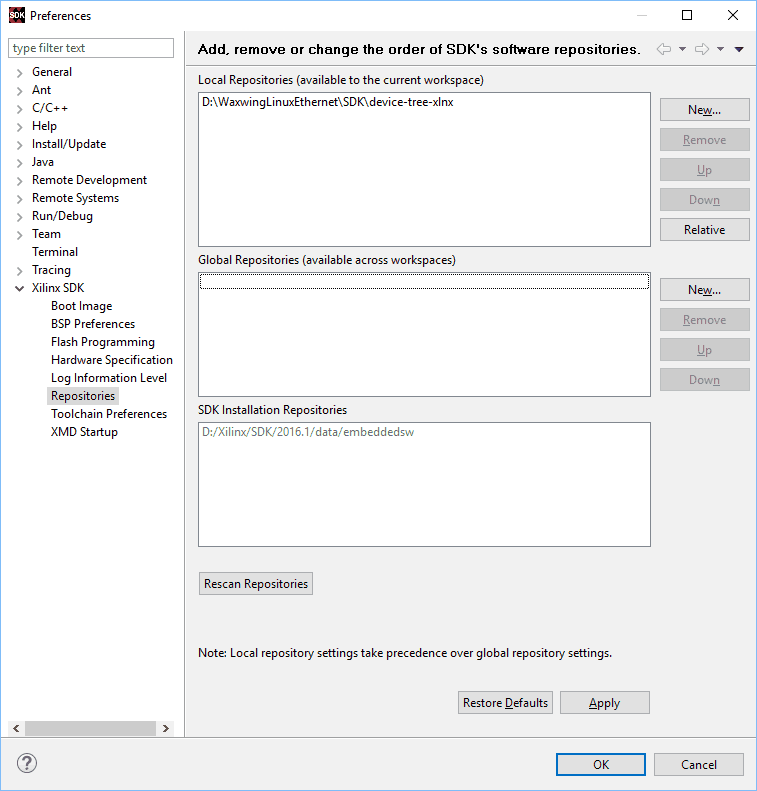
Click “OK” to proceed.
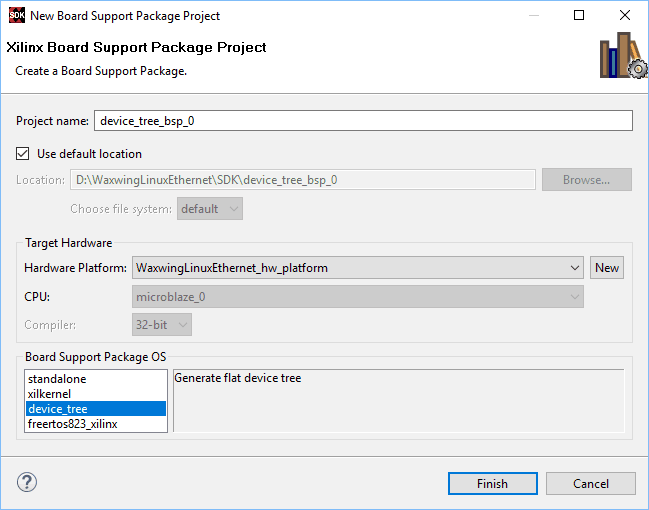
Step 3: Go to File -> New -> Board Support Package. “New Board Support Package Project” configuration window will open. Select the “device_tree” under “Board Support Package OS” and click “Finish”. The “Board Support Package Settings” dialog will open. Click “OK” to continue.
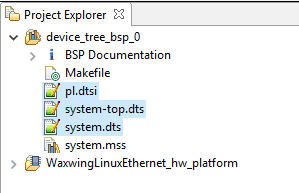
This should generate the system-top.dts, system.dts along with the pl.dtsi file as shown below.
Step 4: We have to merge these .dtsi and .dts files. Open these files in some text editor (Notepad++ etc…) and copy the system-top.dts contents and paste them in the .dtsi file just after the line “model = “Xilinx MicroBlaze”;”. Don’t forget to add the /dts-v1/; at the top of the .dtsi file. The content of the .dtsi file after adding system-top.dts contents should look like this:

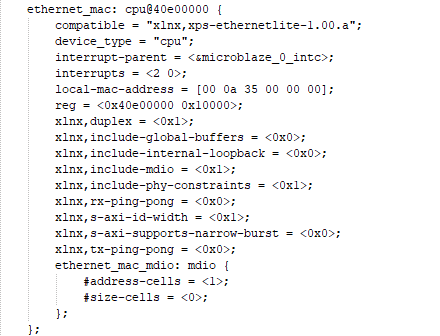
Copy the local mac address from system.dts and paste it in the .dtsi file “ethernet_mac” section as shown below.
Save this modified file as “waxwinglx45.dts” and copy this file to your Linux system.
Building Linux Image
A Linux system is needed for performing the next steps. In this case, the author used Ubuntu 14.04 64-bit inside a virtual machine.
Step 1: On a clean Ubuntu 14.04 installation, you will need a few packages to make Buildroot work. Run the following command to install those:
sudo apt-get install build-essential bison flex gettext libncurses5-dev texinfo autoconf automake libtool
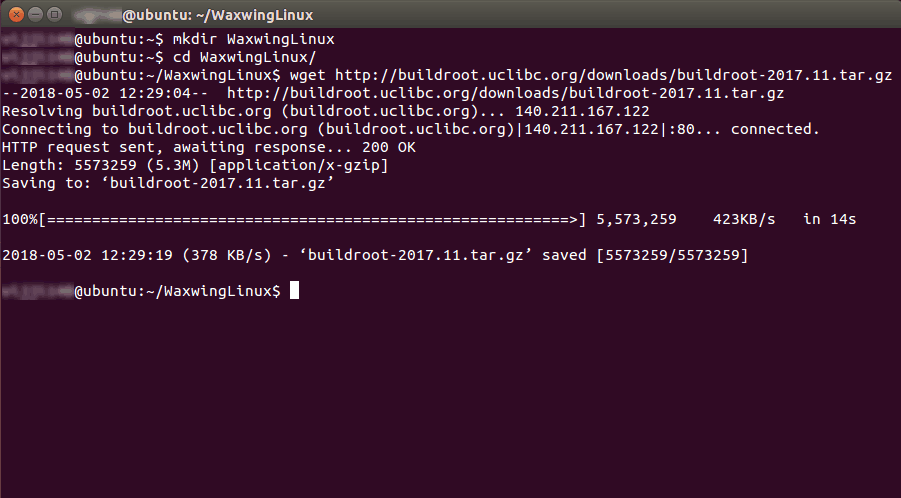
Step 2: Create a convenient folder for this project and change the directory (cd) to that folder. In this article, the author created “WaxwingLinux” folder inside “home” directory. Download the buildroot to the created folder, either manually or using the following command:
wget http://buildroot.uclibc.org/downloads/buildroot-2017.11.tar.gz
You can use the latest buildroot instead of the above. Extract the downloaded tarball buildroot archive by using the following command:
tar -xvf buildroot-2017.11.tar.gz
All files should be extracted to the folder “buildroot-2017.11”
Step 3: Download the zip archive containing buildroot config file, kernel defconfig file and device tree file from here. Place the downloaded Linux kernel config file named “waxwing_defconfig” and “waxwinglx45.dts” file inside the buildroot-2017.11/board/numato/waxwing directory. You will need to create the “numato” and “waxwing” directories. Place the buildroot config file “numato_waxwing_defconfig” under the buildroot-2017.11/configs directory. Please note the kernel base address is set to 0xa4000000 in the Linux kernel defconfig file. Please change it appropriately if the LPDDR base address is different in your XPS project.
After setting up buildroot as mentioned above, execute the following commands in the buildroot root directory:
make numato_waxwing_defconfig
This will create a .config file for buildroot. Next, type:
make
This command will build the kernel and its file system. This downloads the kernel sources and lots of other tools from internet. It will take some time to finish building the kernel image, from 30 minutes to over an hour, or even more, depending on your machine’s capabilities and your internet speed.
Upon completion, a “simpleImage.waxwinglx45” linux image is available in the directory “buildroot-2017.11/output/images/”. This is the Linux kernel with a root file system (initramfs) attached to it.
Step 4: We need to add the dropbear and lighttpd packages to the buildroot image to work with the web server. To add these packages to the buildroot image run the following command:
make menuconfig
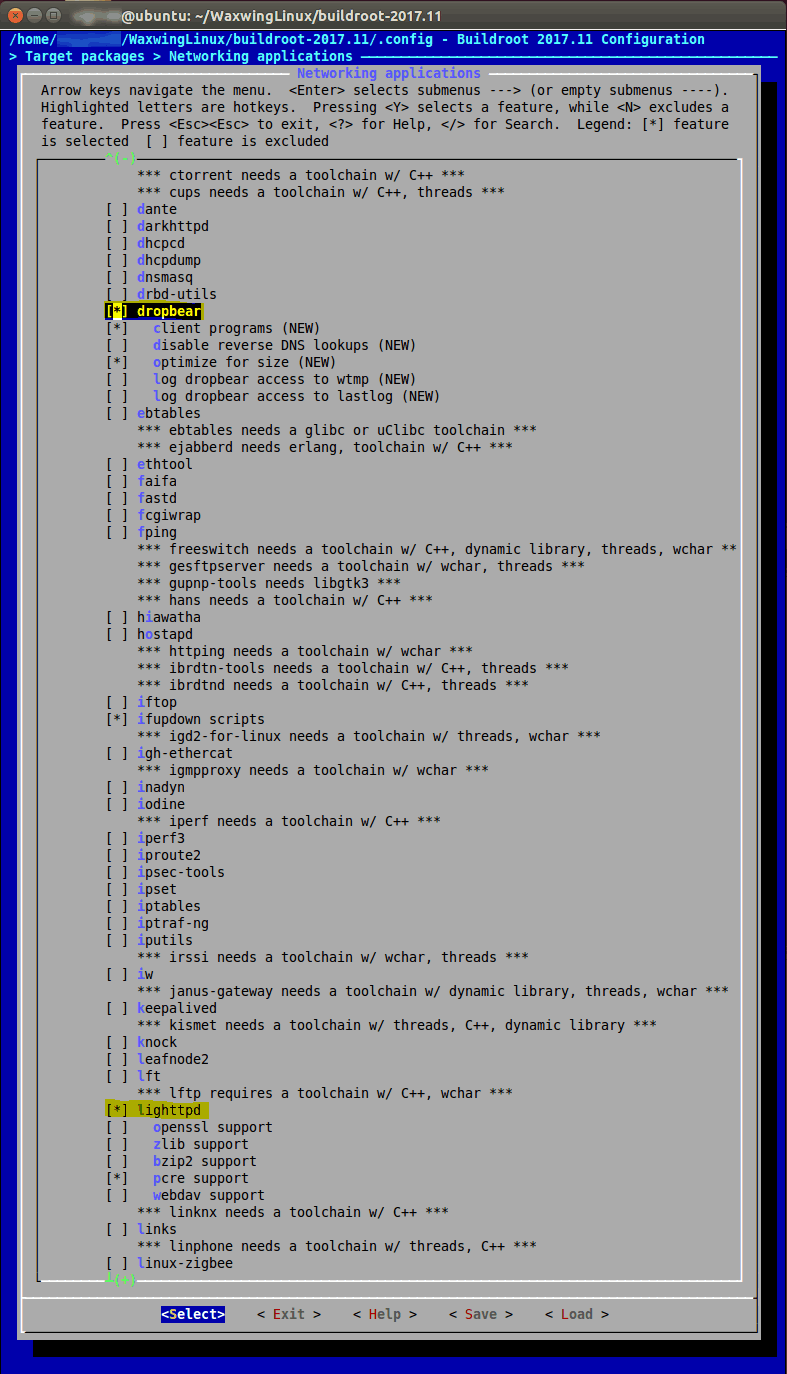
The “Buildroot 2017.11 Configuration” dialog will open. Go to Target packages -> Networking applications, and select the “dropbear” and “lighttpd” packages as shown below. Click “Exit” three consecutive times and click “Yes” to save the configuration.
The configuration file .config is updated with the lighttpd and dropbear packages. Next, type the following command:
make
This command will rebuild the kernel with dropbear and lighttpd. It will take some time to finish rebuilding the kernel image, from 10 to 15 minutes. Upon completion, “simpleImage.waxwinglx45” linux image is updated. We will use this file to boot Linux on Waxwing Spartan 6 FPGA Development Board.
Running Linux on Waxwing
Step 1: Copy the Linux kernel image and place it in a convenient location and open Xilinx SDK. Connect the Xilinx Platform Cable USB II JTAG hardware, Ethernet cable and power up the Waxwing Spartan 6 FPGA Development Board. Make sure the FT2232’s channel B is configured “Hardware” as “RS232 UART” and “Driver” as “Virtual COM Port”. Refer this article on how to configure it. Open any serial terminal like PuTTY, Tera Term etc.. and set the baud rate as 115200.
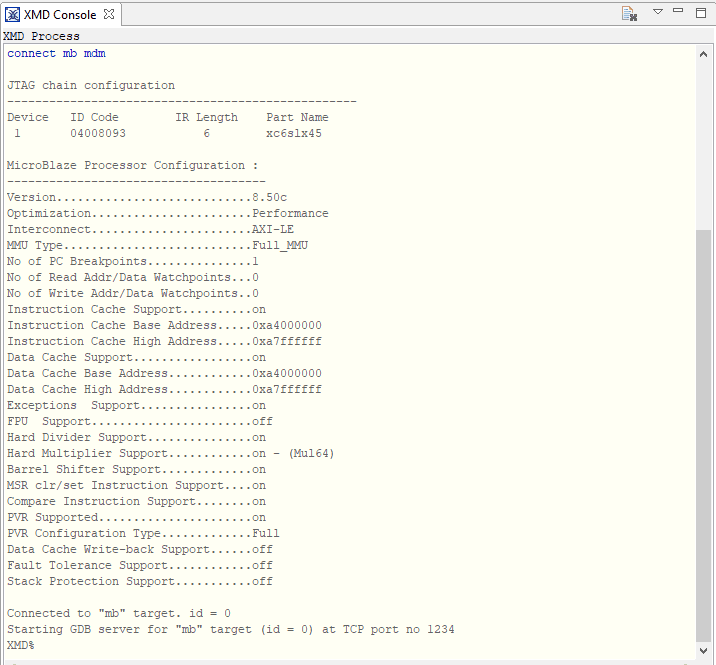
Step 2: Run the “Hello World” program in SDK to make sure everything is working properly. Go to Xilinx Tools -> XMD console and type the following command:
connect mb mdm
If the XMD connects successfully to the Microblaze running on Waxwing, you will be observed with the similar output like following.
Step 3: For downloading kernel image on to FPGA, use the cd command to change the directory to the correct folder where the image file is located. After changing it to the correct folder, type the following command
dow simpleImage.waxwinglx45
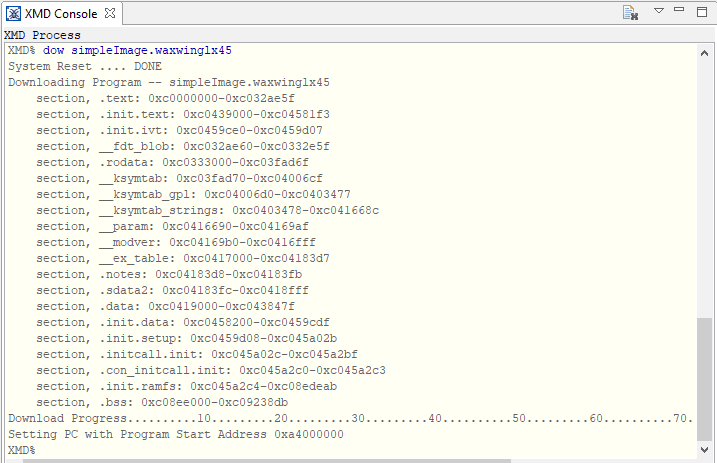
Step 4: Wait for some time to complete the download. Once the kernel image downloaded successfully, type the following command to continue the processor with LPDDR’s base address. In author’s case, it was 0xa4000000.
con 0xa4000000
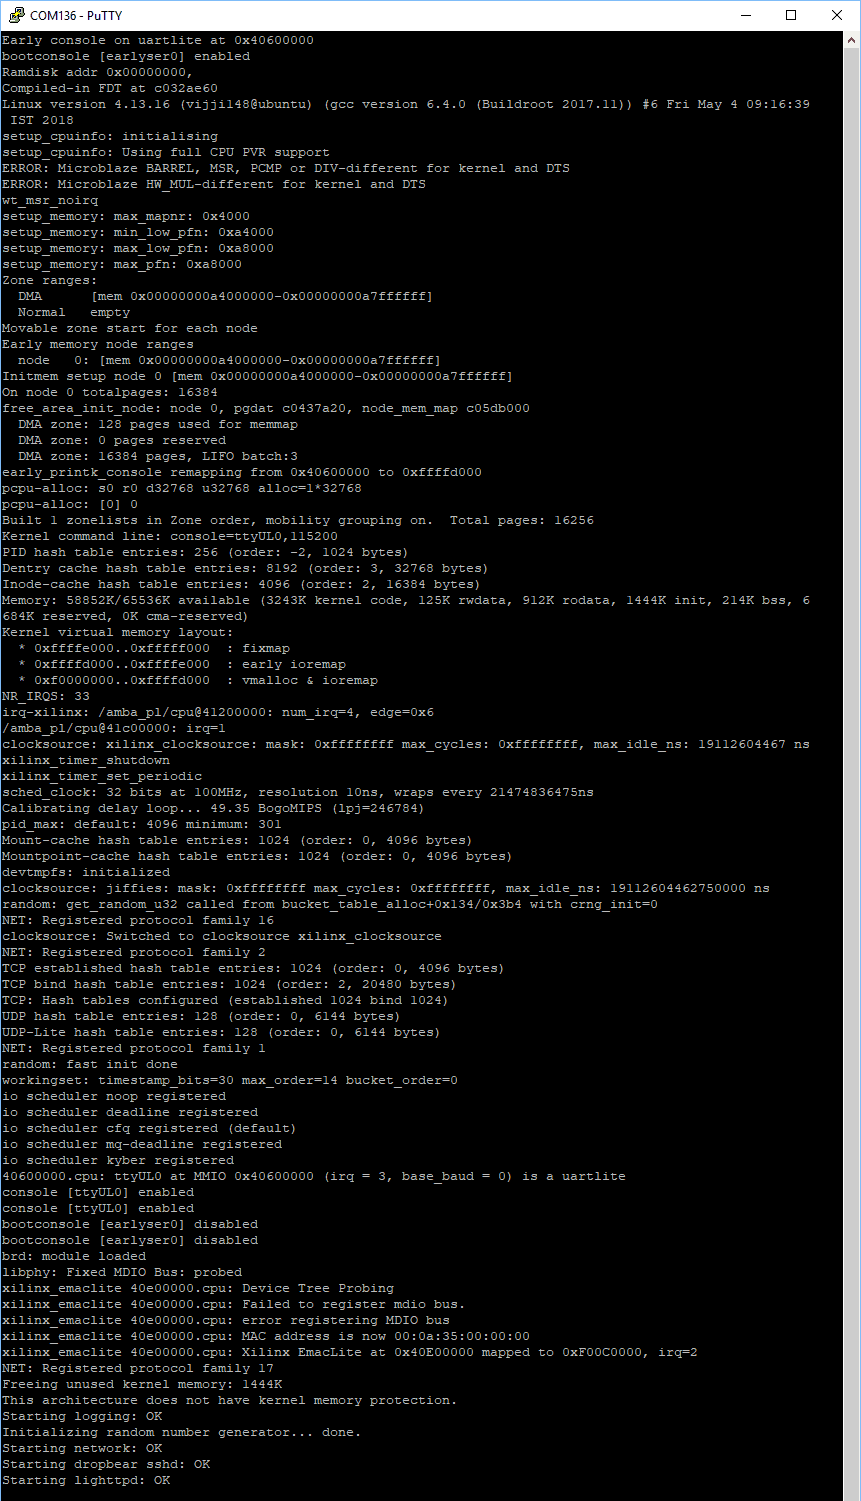
If all the steps so far were successful, you should see Linux booting in the serial terminal as shown below:
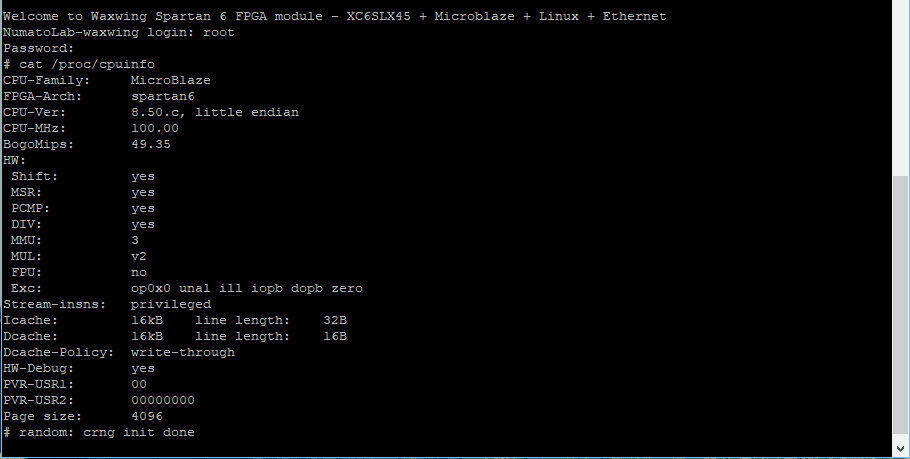
You can login to Linux with username “root” and password as “waxwing”
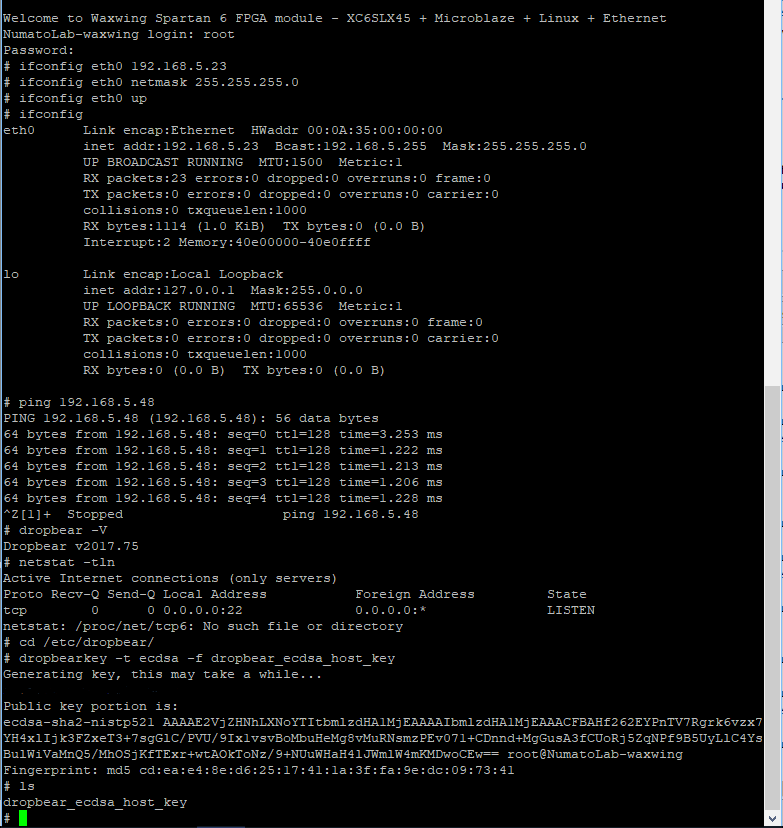
Step 5: After logging into Linux, activate the network interface using following commands
ifconfig eth0 192.168.5.23 #(This is FPGA Board IP address, you can change it to different one)
ifconfig eth0 netmask 255.255.255.0 #(change this IP address as per your Subnet Mask)
ifconfig eth0 up
After enabling the network interface, type the ifconfig command to check whether the network interface is activated or not and ping with the host interface to verify the IP address. If ping is successful, we need to test the dropbear SSH as well as lighttpd.
Dropbear SSH :
Dropbear SSH is an SSH server and client software package with a small memory footprint. It is useful for “embedded” systems that run Linux/Unix systems with low memory and processor resources. Follow the steps to test dropbear SSH.
Step 1: Check the version of dropbear with the following command
dropbear -V
Step 2: The dropbear starts automatically after Linux kernel boots. Verify that dropbear is listening on port 22 by typing the following command
netstat -tln
If dropbear is not started automatically, type the following command to start the dropbear.
/etc/init.d/S40dropbear start
Step 3: Change the directory to “/etc/dropbear” with cd command and generate the dropbear key with the following command
dropbearkey -t ecdsa -f dropbear_ecdsa_host_key
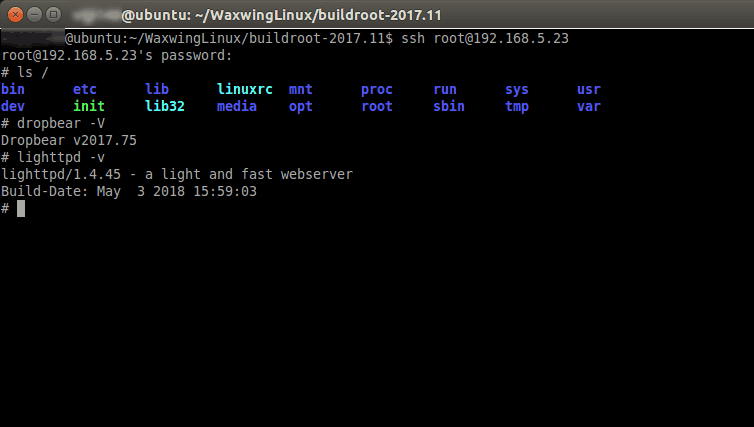
Step 4: Open Linux terminal on host system and type the below command to login into the Waxwing via dropbear SSH. It will take some time around one to two minutes. Login with password “waxwing”.
ssh root@192.168.5.23
Once logged in, the dropbear is verified to successfully installed and working.
Lighttpd Web Server:
Lighttpd is a fast, secure and efficient web server and advanced feature set. Lighttpd is configured using lighttpd.conf file set up with few variables to run the Web Server. Follow the steps to test lighttpd web server.
Step 1: Edit the lighttpd configuration file by using the following command:
vi /etc/lighttpd/lighttpd.conf
Change the following parameters in the ‘lighttpd.conf’ file and save it by typing the :wq!.
server.document-root = "var/www" -> Basic Configuration section of lighttpd.conf file
server.event-handler = "poll" -> Tuning/ performance section of lighttpd.conf file
Step 2: Copy the following code in a text editor and save it as ‘index.html’ in the directory ‘/var/www’. Type the following command to create the index.html fie
vi /var/www/index.html
<!DOCTYPE html>
<html>
<head>
<title>Numato Lab Linux Web Server Demo with Lighttpd!</title>
</head>
<img width:150px;height:150px;' id='base64image'
 src='data:image/png;base64,iVBORw0KGgoAAAANSUhEUgAAAJYAAACWCAMAAAAL34HQAAAAY1BMVEUAAAAAAAAAAAABAAAAAAADAAAAAAAAAAAAAAAAAAAAAAAAAAAAAAAAAAAAAAAOJjEaRlsziLA0i7VAq95BruFBruFBruFBruFBreFBreFBrOFBruFBreFBruFBreFBruEAAADKKhTKAAAAH3RSTlPt+v3+9fnO37iYcVQ6HAgOCgADDiRGapazyP7e/ffu8XPNMgAACRVJREFUeNrtnOmOpDoMRlM0zQ5SsyTQLFXv/5QXKIpOgh2HpTR9pc6vGWkGnbK/OE7shH39ysH+sP6wfiNWNo3fg5WlaRpHURQGQRD9AqwsS5M4DEPf993HONwgTv8xVpbFcRj4rus8luF4UfZvtZUmUei5zko0mypM/6XkszQOPaYQzaaKjabKi3GU1Tqmvxb5ZVhpHHjuYzNYhJoqL8uKc9GMo+3XMf21EZzzsizzs1hp5N0ewPCSDEGquGjb/o6PoW0Fr8riMFaehp4DQd2CFHRbxet2uNuMvm2MbMxoKRDq4QIOHM0kmr677xhd39Y834mVxbD7Hg9/q/WiEkbH4R5FuBhqKgZDjbLKN1D1cD84Br4HKwluKJX2T0ve9Pfjoy2tsfLYR6A2Yi94091PjbqwxMpQKkcL7HlV9/eToxe5HVaMycrRbFXy9n5+DJUNVp5Y2iqvzvpvGU1pgYVSfXipqqrhfs3otlFig5V4KJUyB8vzqjLMRh0rDRwrqqq5Xzg2qtewshCj+owVWbVXUm1Vr2JlkYtRKYloNdyvHXrwUrEShlGFClV7MdW9rwxYaYBRKZPweqqNuZgirBtCpQjrHVT3nqNYsZWwyndQ6eaSsFIPo5LXnKJ+C5U2GSWsCHWhFLEK0b0HSzUXI431Kc/CnF8S2/uBmIwrVh45FrPwAmHNuwvo18nmYsQKPbowuk5Y06Zi3u+UwNo1lFssbNVR9X7Ghd3QiHULlvMOSCS2WFh8V/ReHl+f+4Yru0JIDU2xwUKnoaz3o7NwaHilLXp5bRQ9o2JWfHaB7ltRAWcigBel/GbBijFjBdk5vQ91BZ+EQF78SQfZIvi3GKsboYolY9K3l5AXv1dzPbFSn07fc7EXqhWrylNvc5oCeXEVPTP58CGv0eWwE4pL3kvcW6T5sjJF+hkrw/Is/6ixJkvJGOPv9jU3Fg3kRRkLTUql6LBr2RlEpdomnHaZ6kEP+DtfXmQmH37EZilgIaHWoJ7uYAktrld6w5bfQvmwsA7w3021OexIZ3do5gLtz3+w0Fgqfafqrf0HnAw9sxPNXGAcXNIIZgoPsZRnWUodMNU6pXR1cXyDzQzS2u9D0FQ/v1ubjGCI4CtWhJw6SAuPVYT/biv4JPT1uzVzgeKq8wULi1oPKQDazMOuKZHT4RCwP7L+LF40YN1i8wc2p3oldjzsAZ+chkD31wyfiNJPo2Ppd8vRs//EhXSBTW+xYCXIrlVapsnwgMpqDovOA/Yi+NlZXAasyDyVtRBqqIZ4oDAwJ8ziwrGc2Do8fGNi324TlLkIfndef5hiY6U0l9hKy0ylppiKF+GZxBcsUvFmaX3XJiotPXETKs7PGT2OJSmeH7fVJh9XThXBD0/JDY4V2imeoNqEH/UArz+BZUpMKarNoZmSRoCinTRvg2WaiG1F1N/1JcSJKKzehHWzig8DQQWcMMpbDRiLG7CkKYNj9Zwo0gMbUHn9gb8sTmJ1oiCMBWxelGVRvAOLkjuYnCgBFcQaV8UzWJTc4bNrJaAKpDJ1AosUFpzJvRuLFBZ80P9mLFJYSH6pBK7LsXpO9u8gJ4whhTUGw8NYNelCrLockhVAMWHBpR4CiwzveMU0pFafJ1ZyAIuehXmE9Z1YWovEApJI2oXYCYKFthYsRmBt863+uAutsTJvNxZtLKzovQML3FW7MY5F6x3t8TiL5YR4qYc0Flb03oOFnNiE6DQmIylW9H7ml9GbsChjZQZhqaLNTVjwVAywU2ZyGqKNVhssZF8sDIeU8pk8R+pru+VuhTWKBD/SlbNIjlQjYbk7Riy6xvzMIJDFWt7QydvMtiRSPzOVksvDpwgvLHD5kvMi+VfV+eFJuMHidxMWvCrKpfPWMjqYJ6H+WQILFleQQRPZ6EMLKvngDTmSFflSIQspzQu8MU3pDGUUlfJVbJNgrCeCmjcthzZUD7nciZQoVyw4oEbABwxBK4ssqBRpwRNxORr5wnIb6ZxzNbc4oyv9HEncCazQUvP4wpOFNlRKMEUUvxy7oeIC4jw6D9PgZkNlsb+QscBlUc4EF3FhyQO14kCfxE6Keb5igamgnAku4oJjaZ54dlSqDwXSSiz32DjEOiFwaeGN7KZZhPnwVcX4QtcfX++RAqWVhsyWSvEhUgycQxAzHWPIC8X826ColViKXfch1rIj1LYywuazEsQZB2ppPBLi13qiIdP1NC+KEw7USwWYD0sFizy5G72oKz6LbWfg1ljIMt1xrcETmotyzXuMyRrWPlPZ1FXWvkVm7v5WvNgpWFkcOLuolJ4kTPBSe4a1F6WJmO81lW6sweRDqnlYDvR5vS49eRr5zk4qVVm1+VYGI06kFC++MlP82ttJZa25LzPWZ9T8qFj6/JLA3Q2lJlqYsYbKtl9ea9cZoXaLatvHgnX71gWABR7/qHeOxunHnANUatcP1u37s1FgUIsOtroec99T79kX3e37k80xsuzwsn6WjpZ6HByBRXCQd1UMazvRtJrGoX87CqW5sKXvRtH3fEaxZknkuY/jQ0mzCmFRYGZUDXf8qdFBmUM9hvgs7OT9OqNLbc7tcWp8KMJCXahU3JhFYfIklWcTG7TshNkf819BhTe3i8J8P/FiKl+Ve2dXjWdWhdwzVLkNlX6Yx77eaS6dqrdtqGBok+gFULZU2zMEZln4PkSlvBphoKKv5F6nro/PQJmDBqrK5hb6Ner6+FQuhxvuO0O9obsux++SlXqHF7+wPlSWd/ax6zX7HJjb3XeGH6pglu1NOyO7YqpCDDupYCxD/dsGiqlPDpR1d9+jKxSLqr0RCYPyFklhepwB7YRmSG+Fe9RSKpTxHYsO76NF3hpJj2xQJ/epz+4YTTUYOq3QB2PS3Xmy62lQZlM1hlZ24/M68fSIlOXudGSK9XdIDBNwusxlKgAa30jK0iQKfDJaMD+IklS7ilUSUObWIfJFqScathlzfABpCgrCNP8E+aaU1bNg2fyU2/SSW+C58/CnPwdRFANI87556ND7wvz8Q1cK3DTSZB4p8Qge+LhUN7SCl1Zvg73v3cC8LJfHwZrXk2A2D4K9G+vJVqwj3/P//h5//MP6w/rD+r9h/QfV6zihMktDFwAAAABJRU5ErkJggg==' />

<body BGCOLOR = #C8C8C8>
<div id="container">
<b class="rtop">
  <b class="r1"></b> <b class="r2"></b> <b class="r3"></b> <b class="r4"></b>
</b>
<h1>Numato Lab Linux Web Server Demo with Lighttpd!</h1>
<p>Hello, Lighttpd Linux web server is successfully installed and working on Waxwing Spartan 6 FPGA Development Board.</p>

<p><em>Thank you for using lighttpd.</em></p>
</div>
</body>
</html>
If everything went well, start the lighttpd by typing the following command
/etc/init.d/S50lighttpd start
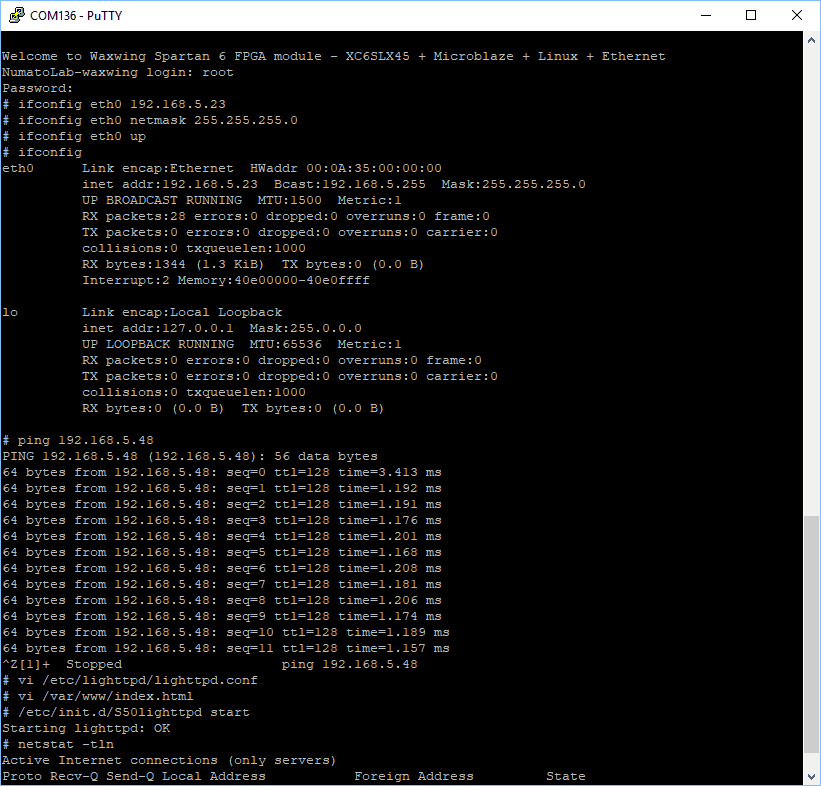
Step 3: Open the browser and navigate to Waxwing IP address
http://192.168.5.23
It will open the ‘index.html’ file from /var/www directory. The web browser will render the html file and show the output similar to the screenshot below.
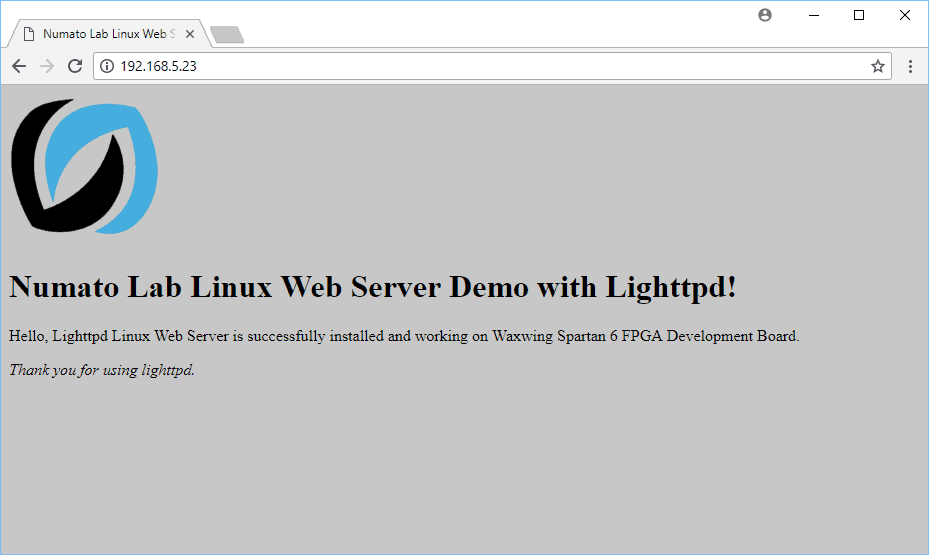
If the lighttpd returns the index.html, your Linux Lighttpd web server project worked successfully on Waxwing Spartan 6 FPGA Development Board. Congratulations, keep exploring further!