Introduction:
This tutorial will demonstrate an HTTP web server running over Ethernet on Waxwing Spartan 6 FPGA Development board. A web server is a hardware or software that serves web pages requested by clients (such as web browsers) via HTTP protocol. The HTTP is a stateless, request-response based protocol that responds to client’s commands and submits requests to HTTP server. The communication over HTTP is a sequence of request and response transactions over TCP. The client establishes TCP connection with server by initiating a request to a particular port (typically port 80) on server. Once a connection is established, server listens to client’s request messages. Whenever a request is received, the server sends response with status and/or the requested data. This article will use Ethernet as its Link Layer protocol. The MAC layer (data link layer) layer running on FPGA is interfaced with external Ethernet PHY (Physical layer) using RMII (Reduced Media-Independent Interface). The MAC Layer converts the packets into stream of data while the physical layer converts the stream of data into electrical signals. FPGA will run the lwIP TCP/IP stack, on top of which HTTP server will be running. This example will demonstrate how users can toggle LEDs on Waxwing board using their web browsers.
Prerequisites:
- Hardware:
- Waxwing Spartan 6 FPGA Development Board
- Xilinx Platform Cable USB II JTAG Debugger
- Ethernet cable
- Software:
- Xilinx ISE Design Suite with EDK/XPS 14.7
Users are also expected to be familiar with Xilinx ISE Design Suite, Xilinx Platform Studio and Embedded Development Kit. Familiarity with lwIP will help in understanding the code easily.
Let’s Get Started!
Step 1:
XPS Base System Builder (BSB) is used to simplify creating new projects. To make the process easier, download BSB Wizard files from here and extract it to the folder “C:\Xilinx\xx.xx\ISE_DS\EDK\board”. Once extracted, the complete path to the file should look like C:\Xilinx\xx.xx\ISE_DS\EDK\board\NumatoLab\ipxact\WaxwingDevBoardLX45_V3\data”.
Step 2:
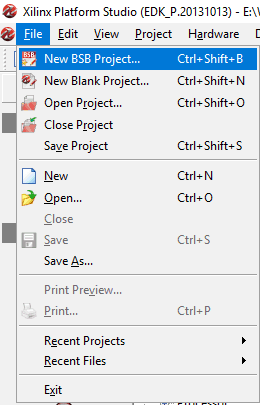
Open Xilinx Platform Studio from Start Menu. Go to ‘File’ and select ‘New BSB Project…’. It will open XPS new project wizard.
Step 3:
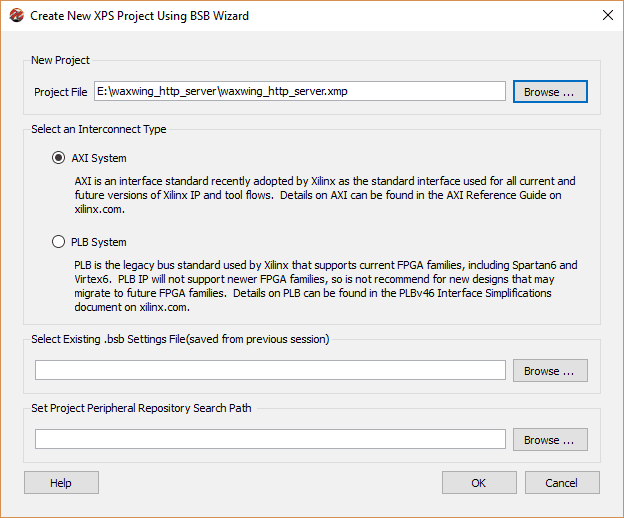
Browse to a convenient project location and enter a project name. Click OK. It will open ‘Base System Builder’ configuration window.
Step 4:
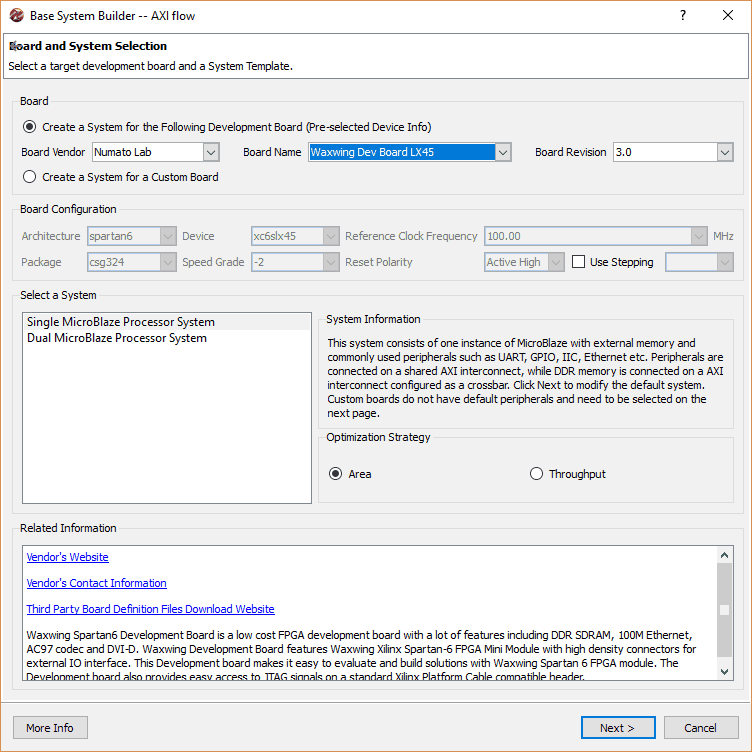
In ‘Board and System Selection’ page, select Board Vendor as ‘Numato Lab’ and Board Name as ‘Waxwing Dev Board LX45’. Click ‘Next’.
Step 5:
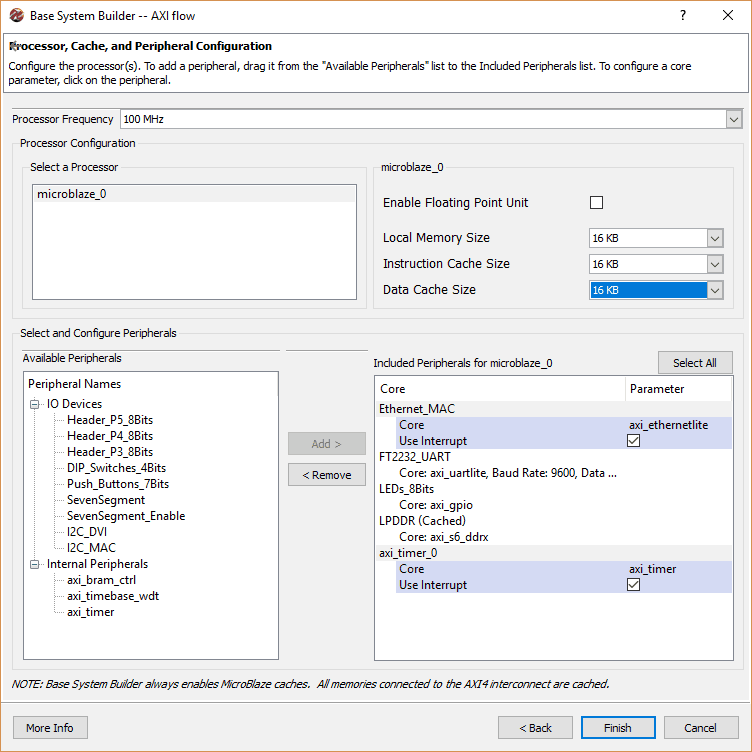
In ‘Processor, Cache and Peripheral Configuration’ page, select local memory size as 16 KB and include peripherals as shown below. Select ‘Use Interrupt’ for Ethernet_MAC and axi_timer IP cores and click Finish. It will create a new project with the selected settings.
Step 6:
Open the ‘<ProjectName>.ucf’ file from project files, delete all existing text and copy-paste the following constraints to the ucf file and save it.
NET CLK_100MHZ LOC = "V10" | IOSTANDARD = "LVCMOS33";
NET Ethernet_MAC_COL LOC = "U16" | IOSTANDARD = "LVCMOS33";
NET Ethernet_MAC_CRS LOC = "P17" | IOSTANDARD = "LVCMOS33";
NET Ethernet_MAC_MDC LOC = "T18" | IOSTANDARD = "LVCMOS33";
NET Ethernet_MAC_MDIO LOC = "V16" | IOSTANDARD = "LVCMOS33";
NET Ethernet_MAC_PHY_RST_N LOC = "P18" | IOSTANDARD = "LVCMOS33";
NET Ethernet_MAC_RXD[0] LOC = "U17" | IOSTANDARD = "LVCMOS33";
NET Ethernet_MAC_RXD[1] LOC = "U18" | IOSTANDARD = "LVCMOS33";
NET Ethernet_MAC_RXD[2] LOC = "M18" | IOSTANDARD = "LVCMOS33";
NET Ethernet_MAC_RXD[3] LOC = "M16" | IOSTANDARD = "LVCMOS33";
NET Ethernet_MAC_RX_CLK LOC = "T10" | IOSTANDARD = "LVCMOS33";
NET Ethernet_MAC_RX_DV LOC = "N14" | IOSTANDARD = "LVCMOS33";
NET Ethernet_MAC_RX_ER LOC = "P16" | IOSTANDARD = "LVCMOS33";
NET Ethernet_MAC_TXD[0] LOC = "N16" | IOSTANDARD = "LVCMOS33";
NET Ethernet_MAC_TXD[1] LOC = "N15" | IOSTANDARD = "LVCMOS33";
NET Ethernet_MAC_TXD[2] LOC = "V12" | IOSTANDARD = "LVCMOS33";
NET Ethernet_MAC_TXD[3] LOC = "T12" | IOSTANDARD = "LVCMOS33";
NET Ethernet_MAC_TX_CLK LOC = "R10" | IOSTANDARD = "LVCMOS33";
NET Ethernet_MAC_TX_EN LOC = "M14" | IOSTANDARD = "LVCMOS33";
NET LED[0] LOC = "F9" | IOSTANDARD = "LVCMOS33";
NET LED[1] LOC = "G9" | IOSTANDARD = "LVCMOS33";
NET LED[2] LOC = "C15" | IOSTANDARD = "LVCMOS33";
NET LED[3] LOC = "A15" | IOSTANDARD = "LVCMOS33";
NET LED[4] LOC = "U5" | IOSTANDARD = "LVCMOS33";
NET LED[5] LOC = "V5" | IOSTANDARD = "LVCMOS33";
NET LED[6] LOC = "V7" | IOSTANDARD = "LVCMOS33";
NET LED[7] LOC = "U7" | IOSTANDARD = "LVCMOS33";
NET uart1_sin LOC = "N11" | IOSTANDARD = "LVCMOS33";
NET uart1_sout LOC = "M11" | IOSTANDARD = "LVCMOS33";

NET "CLK_100MHZ" TNM_NET = sys_clk_pin;
TIMESPEC TS_sys_clk_pin = PERIOD sys_clk_pin 100000 kHz;
NET "RESET" LOC = "B6" | IOSTANDARD = LVCMOS33 | DRIVE = 8 | SLEW = FAST | PULLDOWN = TRUE;
Step 7:
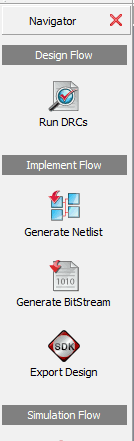
From the Navigator, click “Generate Bitstream” and wait for the process to get completed. Next, click “Export Design” and select “Export and Launch SDK”. Click ‘OK’. This should launch the Xilinx SDK window.
Step 8:
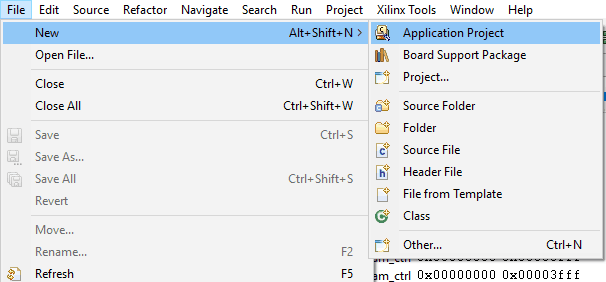
In Xilinx SDK, select File -> New -> Application Project.
Step 9:
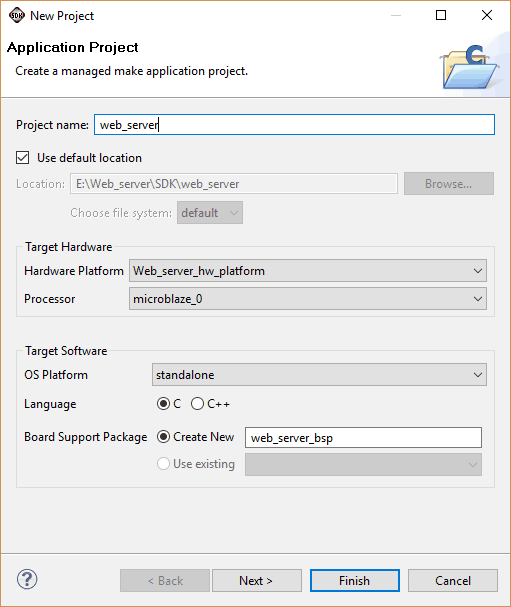
Enter project name as ‘web_server’ and click ‘Next’. It will open ‘Templates’ page. Select ‘lwIP Echo Server’ as template and click ‘Finish’.
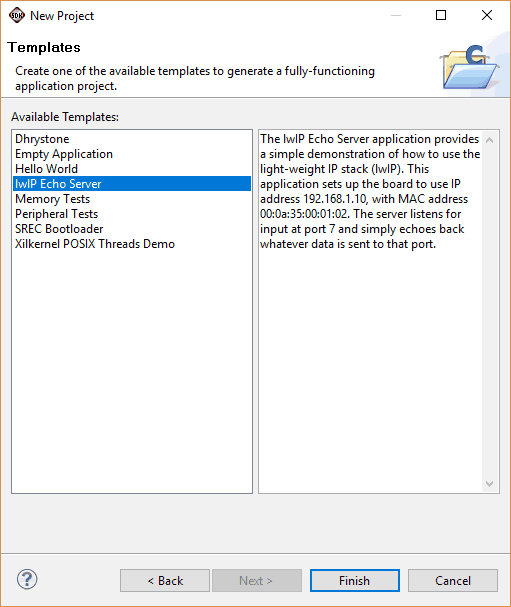
Step 10:
In the previous step, the Xilinx SDK created a sample TCP Echo Server using lightweight IP (lwIP) open-source TCP/IP stack. lwIP supports both BSD-style Socket API as well as RAW API using callbacks. The sample echo server created by Xilinx SDK uses RAW API. Readers are encouraged to take a look at the code to understand its working because the same lwIP stack will be used to implement HTTP web server also.
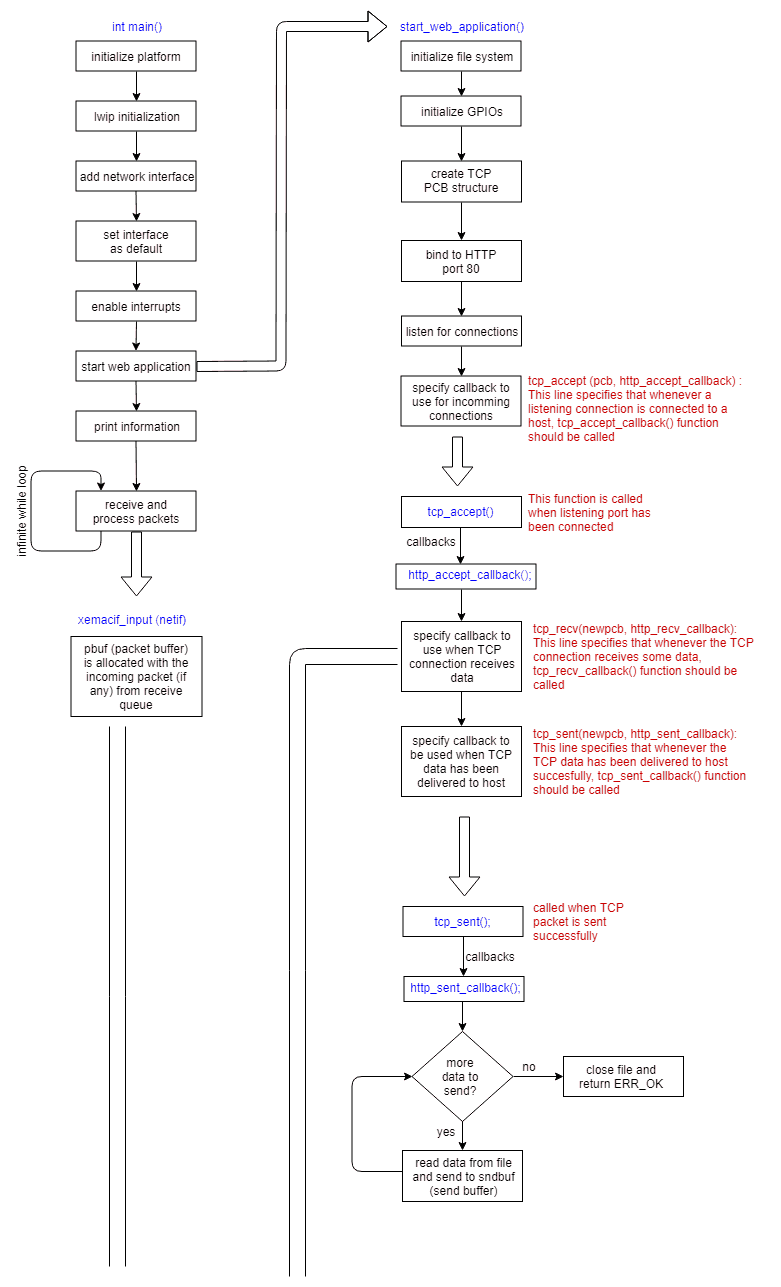
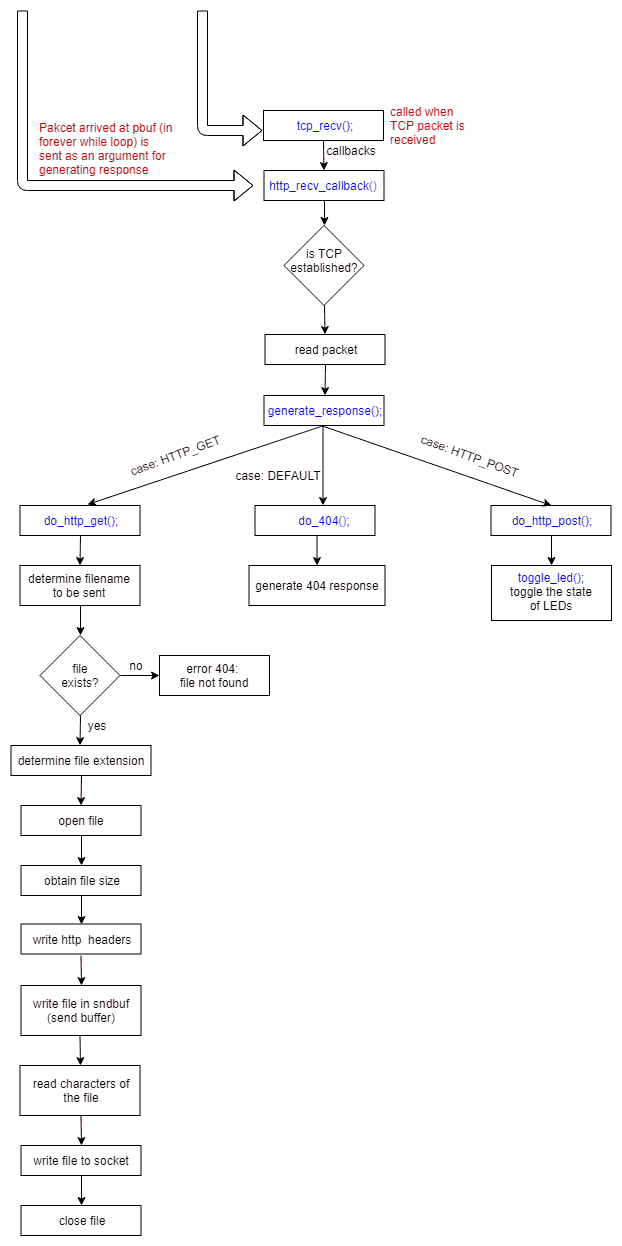
This article follows the Xilinx Application Note 1026 titled “LightWeight IP Application Examples”. In the following paragraph, a short description of the workflow of the code is explained.
Code execution starts from the main() function where ‘lwip’ and ‘platforms’ are initialized, after which start_web_application() is called. In this function, a TCP PCB (Protocol Control Block) structure is created and the TCP PCB is bound to port number 80. After binding, the port starts listening for connections. When client (web browser) makes an HTTP request, the TCP connection state changes from LISTEN to ESTABLISHED. The connection is then established with client. After this, the code checks for any incoming packets in an infinite while loop. In case of packet reception, the packet is stored in pbuf (packet buffer) and its payload is extracted.
The whole application works with 3 important callback functions:
http_accept_callback: This function is called bytcp_accept(), which is called when the listening connection changes to established state, i.e, client is now connected.http_recv_callback: This function is called bytcp_recv(), which is called whenever any TCP packet is received. Thepbufis passed tohttp_recv_callback(), the data is parsed as per HTTP protocol specification and response is generated accordingly.http_sent_callback: This function is called bytcp_sent(), which is called when a TCP packet has been sent successfully, it will check if there is any more data to be sent and sends the remaining data (if any).
The graphical flow of the code is illustrated below:
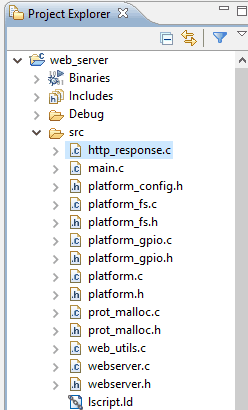
Download the source code for this project from here. Go to web_server -> src, remove all files except ‘lscript.ld’ and and add the downloaded source files to the project.
Step 11:
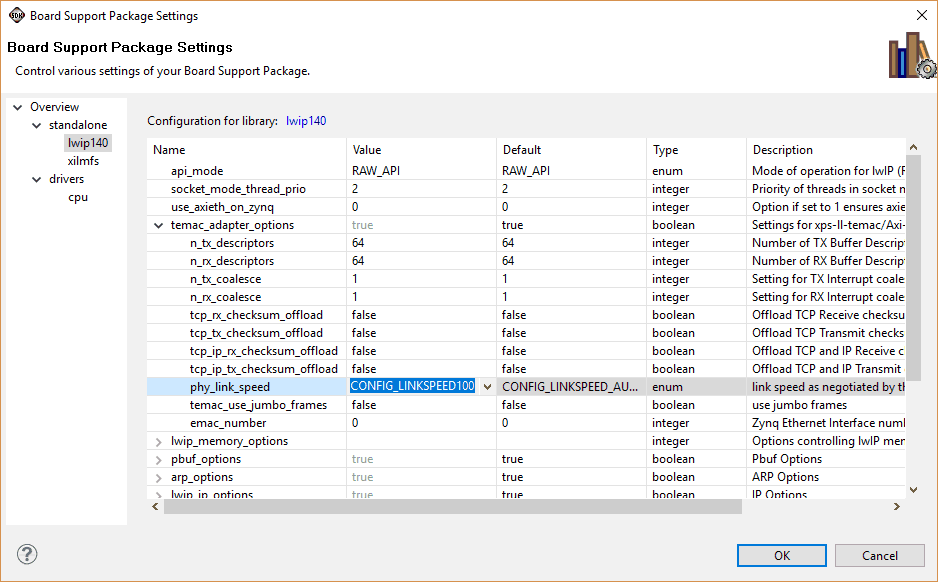
In ‘Project Explorer’, right-click on ‘web_server_bsp’ and select ‘Board Support Package Settings’. From the supported libraries list, select ‘lwip140’ and ‘xilmfs’.

Step 12:
Open ‘lwip140’ library configuration window, under ‘temac_adapter_options’ select phy_link_speed as ‘CONFIG_LINKSPEED100’.
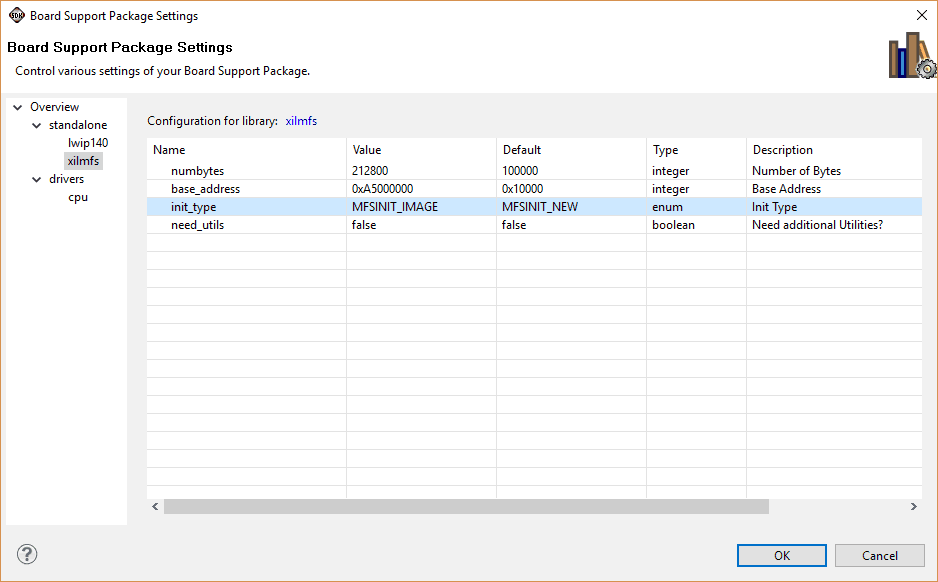
Step 13:
Open ‘xilmfs’ library configuration, and change the settings as shown below, ‘numbytes’ is the size of MFS image in bytes. Click ‘OK’ and build the project in case it is not built automatically.
Note: The base address of LPDDR is ‘0xA4000000’, where the code will be located. So ‘base_address’ for MFS image is configured to 0xA5000000 to avoid overwriting the code area.
Creating MFS Image:
Step 1:
Once the design is ready, MFS (Memory File System) image needs to be written to memory for testing the web server. The MFS image contains the index.html file which is opened and read when the web server receives GET command i.e. when a client requests a web page.
copy the following code in text editor and save it as ‘index.html’ in the project directory ‘/SDK/web_server/Debug’.
<HTML>
<HEAD>
<TITLE>Numato Lab Web Server Demo</TITLE>
</HEAD>
<img width:150px;height:150px;' id='base64image'
 src='data:image/png;base64,iVBORw0KGgoAAAANSUhEUgAAAJYAAACWCAMAAAAL34HQAAAAY1BMVEUAAAAAAAAAAAABAAAAAAADAAAAAAAAAAAAAAAAAAAAAAAAAAAAAAAAAAAAAAAOJjEaRlsziLA0i7VAq95BruFBruFBruFBruFBreFBreFBrOFBruFBreFBruFBreFBruEAAADKKhTKAAAAH3RSTlPt+v3+9fnO37iYcVQ6HAgOCgADDiRGapazyP7e/ffu8XPNMgAACRVJREFUeNrtnOmOpDoMRlM0zQ5SsyTQLFXv/5QXKIpOgh2HpTR9pc6vGWkGnbK/OE7shH39ysH+sP6wfiNWNo3fg5WlaRpHURQGQRD9AqwsS5M4DEPf993HONwgTv8xVpbFcRj4rus8luF4UfZvtZUmUei5zko0mypM/6XkszQOPaYQzaaKjabKi3GU1Tqmvxb5ZVhpHHjuYzNYhJoqL8uKc9GMo+3XMf21EZzzsizzs1hp5N0ewPCSDEGquGjb/o6PoW0Fr8riMFaehp4DQd2CFHRbxet2uNuMvm2MbMxoKRDq4QIOHM0kmr677xhd39Y834mVxbD7Hg9/q/WiEkbH4R5FuBhqKgZDjbLKN1D1cD84Br4HKwluKJX2T0ve9Pfjoy2tsfLYR6A2Yi94091PjbqwxMpQKkcL7HlV9/eToxe5HVaMycrRbFXy9n5+DJUNVp5Y2iqvzvpvGU1pgYVSfXipqqrhfs3otlFig5V4KJUyB8vzqjLMRh0rDRwrqqq5Xzg2qtewshCj+owVWbVXUm1Vr2JlkYtRKYloNdyvHXrwUrEShlGFClV7MdW9rwxYaYBRKZPweqqNuZgirBtCpQjrHVT3nqNYsZWwyndQ6eaSsFIPo5LXnKJ+C5U2GSWsCHWhFLEK0b0HSzUXI431Kc/CnF8S2/uBmIwrVh45FrPwAmHNuwvo18nmYsQKPbowuk5Y06Zi3u+UwNo1lFssbNVR9X7Ghd3QiHULlvMOSCS2WFh8V/ReHl+f+4Yru0JIDU2xwUKnoaz3o7NwaHilLXp5bRQ9o2JWfHaB7ltRAWcigBel/GbBijFjBdk5vQ91BZ+EQF78SQfZIvi3GKsboYolY9K3l5AXv1dzPbFSn07fc7EXqhWrylNvc5oCeXEVPTP58CGv0eWwE4pL3kvcW6T5sjJF+hkrw/Is/6ixJkvJGOPv9jU3Fg3kRRkLTUql6LBr2RlEpdomnHaZ6kEP+DtfXmQmH37EZilgIaHWoJ7uYAktrld6w5bfQvmwsA7w3021OexIZ3do5gLtz3+w0Fgqfafqrf0HnAw9sxPNXGAcXNIIZgoPsZRnWUodMNU6pXR1cXyDzQzS2u9D0FQ/v1ubjGCI4CtWhJw6SAuPVYT/biv4JPT1uzVzgeKq8wULi1oPKQDazMOuKZHT4RCwP7L+LF40YN1i8wc2p3oldjzsAZ+chkD31wyfiNJPo2Ppd8vRs//EhXSBTW+xYCXIrlVapsnwgMpqDovOA/Yi+NlZXAasyDyVtRBqqIZ4oDAwJ8ziwrGc2Do8fGNi324TlLkIfndef5hiY6U0l9hKy0ylppiKF+GZxBcsUvFmaX3XJiotPXETKs7PGT2OJSmeH7fVJh9XThXBD0/JDY4V2imeoNqEH/UArz+BZUpMKarNoZmSRoCinTRvg2WaiG1F1N/1JcSJKKzehHWzig8DQQWcMMpbDRiLG7CkKYNj9Zwo0gMbUHn9gb8sTmJ1oiCMBWxelGVRvAOLkjuYnCgBFcQaV8UzWJTc4bNrJaAKpDJ1AosUFpzJvRuLFBZ80P9mLFJYSH6pBK7LsXpO9u8gJ4whhTUGw8NYNelCrLockhVAMWHBpR4CiwzveMU0pFafJ1ZyAIuehXmE9Z1YWovEApJI2oXYCYKFthYsRmBt863+uAutsTJvNxZtLKzovQML3FW7MY5F6x3t8TiL5YR4qYc0Flb03oOFnNiE6DQmIylW9H7ml9GbsChjZQZhqaLNTVjwVAywU2ZyGqKNVhssZF8sDIeU8pk8R+pru+VuhTWKBD/SlbNIjlQjYbk7Riy6xvzMIJDFWt7QydvMtiRSPzOVksvDpwgvLHD5kvMi+VfV+eFJuMHidxMWvCrKpfPWMjqYJ6H+WQILFleQQRPZ6EMLKvngDTmSFflSIQspzQu8MU3pDGUUlfJVbJNgrCeCmjcthzZUD7nciZQoVyw4oEbABwxBK4ssqBRpwRNxORr5wnIb6ZxzNbc4oyv9HEncCazQUvP4wpOFNlRKMEUUvxy7oeIC4jw6D9PgZkNlsb+QscBlUc4EF3FhyQO14kCfxE6Keb5igamgnAku4oJjaZ54dlSqDwXSSiz32DjEOiFwaeGN7KZZhPnwVcX4QtcfX++RAqWVhsyWSvEhUgycQxAzHWPIC8X826ColViKXfch1rIj1LYywuazEsQZB2ppPBLi13qiIdP1NC+KEw7USwWYD0sFizy5G72oKz6LbWfg1ljIMt1xrcETmotyzXuMyRrWPlPZ1FXWvkVm7v5WvNgpWFkcOLuolJ4kTPBSe4a1F6WJmO81lW6sweRDqnlYDvR5vS49eRr5zk4qVVm1+VYGI06kFC++MlP82ttJZa25LzPWZ9T8qFj6/JLA3Q2lJlqYsYbKtl9ea9cZoXaLatvHgnX71gWABR7/qHeOxunHnANUatcP1u37s1FgUIsOtroec99T79kX3e37k80xsuzwsn6WjpZ6HByBRXCQd1UMazvRtJrGoX87CqW5sKXvRtH3fEaxZknkuY/jQ0mzCmFRYGZUDXf8qdFBmUM9hvgs7OT9OqNLbc7tcWp8KMJCXahU3JhFYfIklWcTG7TshNkf819BhTe3i8J8P/FiKl+Ve2dXjWdWhdwzVLkNlX6Yx77eaS6dqrdtqGBok+gFULZU2zMEZln4PkSlvBphoKKv5F6nro/PQJmDBqrK5hb6Ner6+FQuhxvuO0O9obsux++SlXqHF7+wPlSWd/ax6zX7HJjb3XeGH6pglu1NOyO7YqpCDDupYCxD/dsGiqlPDpR1d9+jKxSLqr0RCYPyFklhepwB7YRmSG+Fe9RSKpTxHYsO76NF3hpJj2xQJ/epz+4YTTUYOq3QB2PS3Xmy62lQZlM1hlZ24/M68fSIlOXudGSK9XdIDBNwusxlKgAa30jK0iQKfDJaMD+IklS7ilUSUObWIfJFqScathlzfABpCgrCNP8E+aaU1bNg2fyU2/SSW+C58/CnPwdRFANI87556ND7wvz8Q1cK3DTSZB4p8Qge+LhUN7SCl1Zvg73v3cC8LJfHwZrXk2A2D4K9G+vJVqwj3/P//h5//MP6w/rD+r9h/QfV6zihMktDFwAAAABJRU5ErkJggg==' />

<BODY BGCOLOR = #C8C8C8
<div id="container">
<b class="rtop">
 <b class="r1"></b> <b class="r2"></b> <b class="r3"></b> <b class="r4"></b>
</b>
<h1>Numato Lab Web Server Demo </h1>
<p>
Hello, This is a Simple Web Server application for Waxwing Spartan 6 Development board.
<h2>
</h2>
Thank You!!
</p>
<h3> Controlling the Embedded System </h3>
<p3>
This example is intended to illustrate how the functionality of the embedded system can be controlled from the browser.
Here, the LED's on the board can be switched on or off by clicking on the 'Toggle LEDs' button.

</p3>
<h4>
</h4>
<form class="forms" id="led_form" method="post">
<input type="submit" value="Toggle LEDs" enabled="true"></input>
</form>
</div>
</BODY>
</HTML>
Step 2:
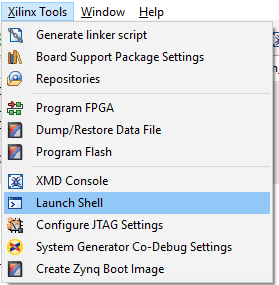
In Xilinx SDK, go to Xilinx Tools -> Launch Shell.
Step 3:
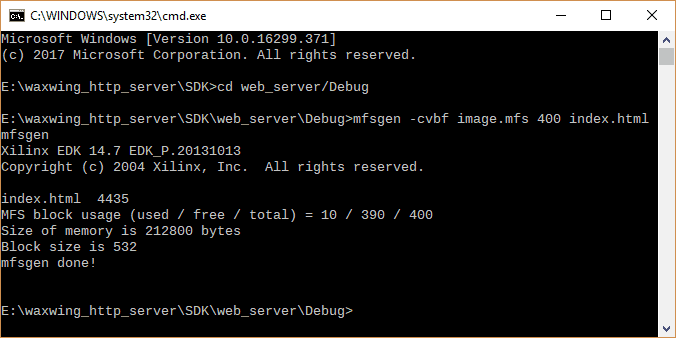
In command shell, go to the directory where ‘index.html’ is saved, and give the following command to create ‘image.mfs’ file
mfsgen -cvbf image.mfs 400 index.html
Running the Design on Hardware:
Step 1:
Set up the hardware by connecting JTAG, power supply and Ethernet cable.
Step 2:
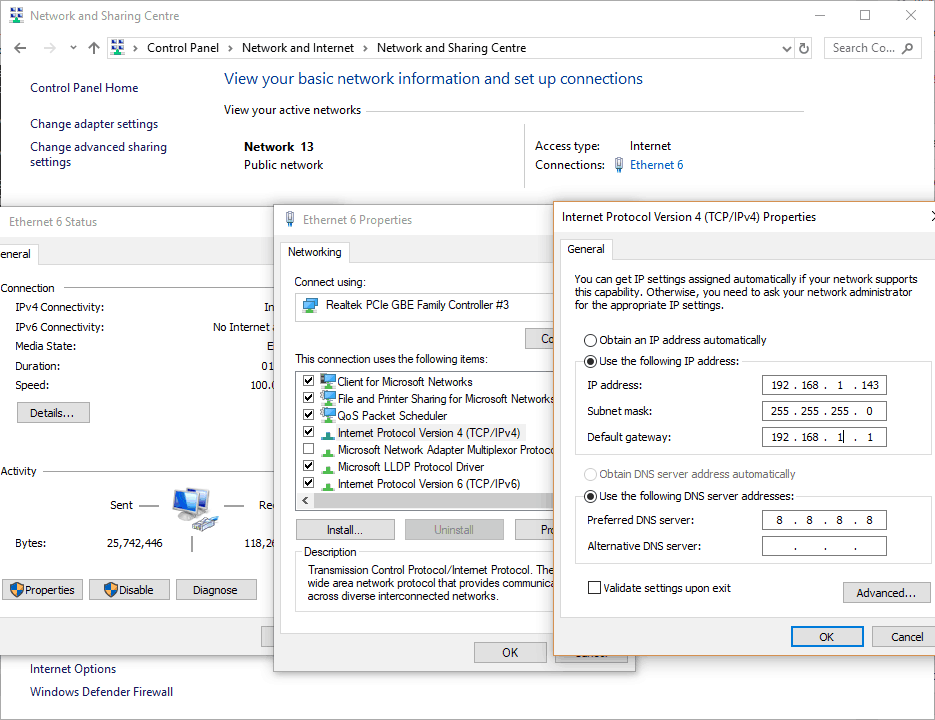
In Windows, go to Control Panel -> Network and Internet -> Network and Sharing Centre. Double-click on ‘Ethernet’ adapter, click on ‘Properties’, select IPv4 properties and change the IP address, Subnet mask and Default gateway as shown below. If you use any other host operating system, configure the network interface as applicable.
 Step 3:
Open the serial port of Waxwing in any serial terminal application (such as PuTTY) with the Baud-rate set as 9600.
Step 4:
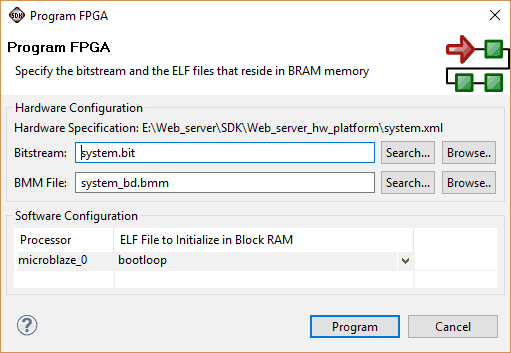
In SDK, go to Xilinx Tools -> Program FPGA and click ‘Program’.
Step 5:
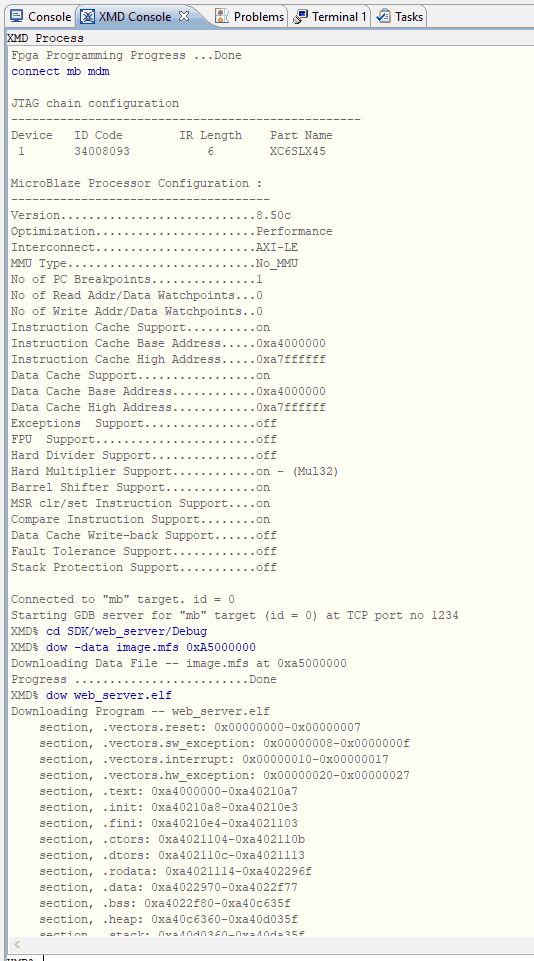
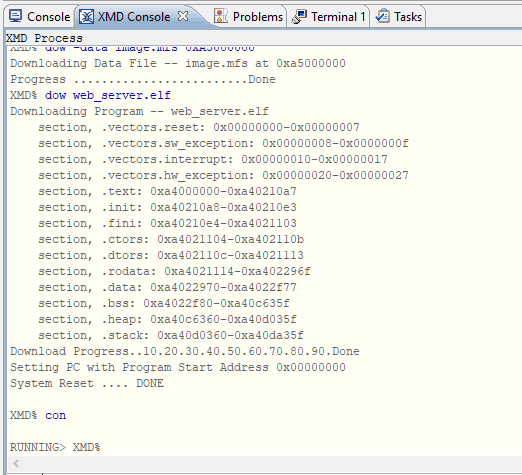
Go to Xilinx Tools -> XMD Console. Enter the following commands in XMD console
connect mb mdm
cd SDK/web_server/Debug
dow -data image.mfs 0xA5000000
dow web_server.elf
con
Step 6:
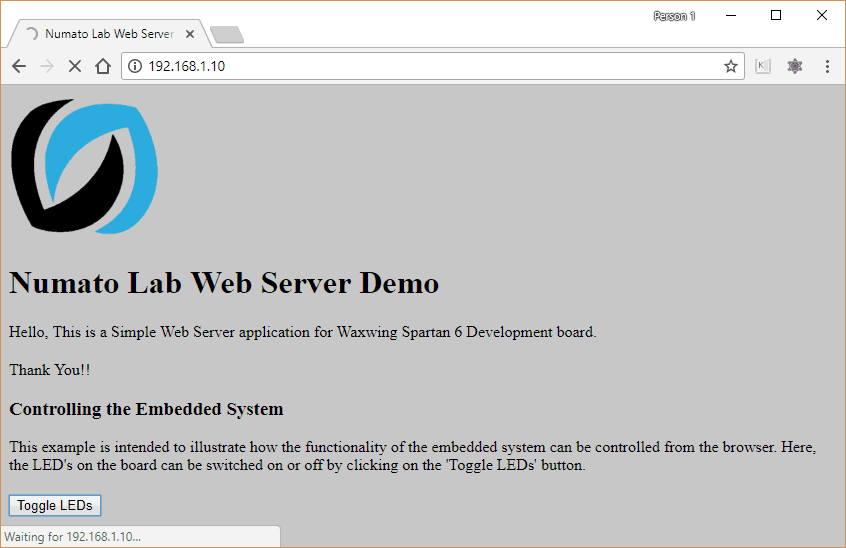
Open any web browser and enter the following url
http://192.168.1.10
It will open the ‘index.html’ file that was stored in MFS image. Click on ‘Toggle LEDs’, to turn on/off LEDs on Waxwing Board and notice the LEDs toggling their state on the Waxwing board.
Step 7:
The serial terminal will show important debug and status information.
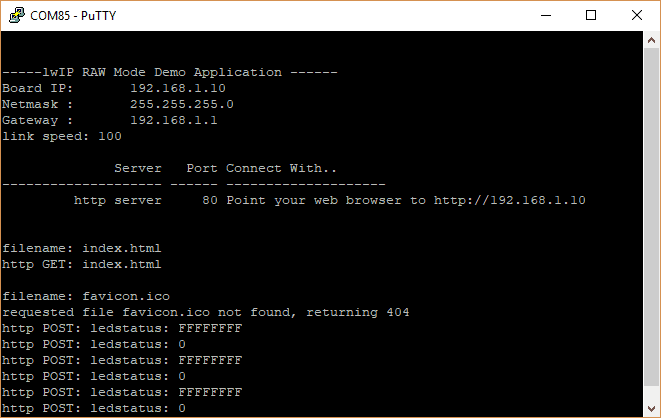
That was it! A simple web server running on Waxwing Spartan 6 Development board. You are encouraged to check out the source code and try to improvise it and add additional capabilities to this example design.
The server was initialized using the debugging console by tranfering index.html to memory. Is it possible to embed that within code or save index.html in flash/ sdcard. I hope it can be used as an independent module.
March 31, 2019 at 2:46 pm