Introduction
Welcome to SenzConnect, a smart, secure, scalable sensor monitoring solution designed for today’s connected world. Whether you’re tracking environmental parameters like temperature, humidity, and CO2 levels, or integrating your devices with cloud systems via MQTT or REST APIs, SenzConnect makes it simple.
This guide will walk you through the quick and easy setup process to connect your device to the AWS Cloud. In a few steps, you can configure your device, establish a secure connection, and start visualizing real-time sensor data online.
Prerequisites
Before we begin, make sure you have:
- Hardware: SenzConnect Module.
- Power source: USB-C cable.
- Internet Access: 2.4GHz Wi-Fi network access.
- Wi-Fi-enabled device (PC/laptop or Smartphone).
- Access to your Wi-Fi network.
- Modern web browser (Chrome, Safari, Edge, etc.).
- AWS Cloud Account (or any MQTT/MQTTs supported platform).
LED Indicators
| Color | State | Indication |
|---|---|---|
| Red | Solid (2 seconds) | Device is powered on |
| Purple | Blinking | AP Mode: Waiting for STA Device to get conneted |
| Purple | Solid | AP Mode: STA Device is connected |
| Green | Blinking | Station Mode: Trying to connect to Wi-Fi network |
| Green | Solid | Station Mode: Connected to Wi-Fi network |
| Blue | Blinking | Trying to connect to MQTT broker / Not connected |
| Blue | Solid | Connected to MQTT broker |
| Blue + White Blink | Solid Blue with White Blinking in the Background | MQTT publishing is active — white LED blinks at every publish interval |
| Yellow | Solid | Falling back to AP (Configuration mode) |
| Red | Blinking | Factory reset initialized |
Power the Device
The SenzConnect Module operates using a single standard 5V USB-C cable. Use any 5V, 1A USB-C adaptor or power source to power the board reliably. Once powered, the Power LED glows solid red for 2 seconds, signaling that the system has started properly.
Setting up – SenzConnect Module
The SenzConnect Module features a built-in Wi-Fi Access Point (AP) made for easy, direct configuration, no app or special software needed.
Step 1: Connect to the Access Point (Configuration Mode):
- On Power-On, the purple LED indicates the device is in AP mode.
- On your Wi-Fi-enabled device, open Wi-Fi settings and look for the network with the SSID like the module’s Default Hostname.
- Connect to the network using the default password.
- Once connected, the purple LED will turn solid, confirming successful connection.
Step 2: Accessing the Configuration Page:
- Open any web browser and access 192.168.4.1.
- Login using the default credentials when prompted, now you will be prompted to the device dashboard.
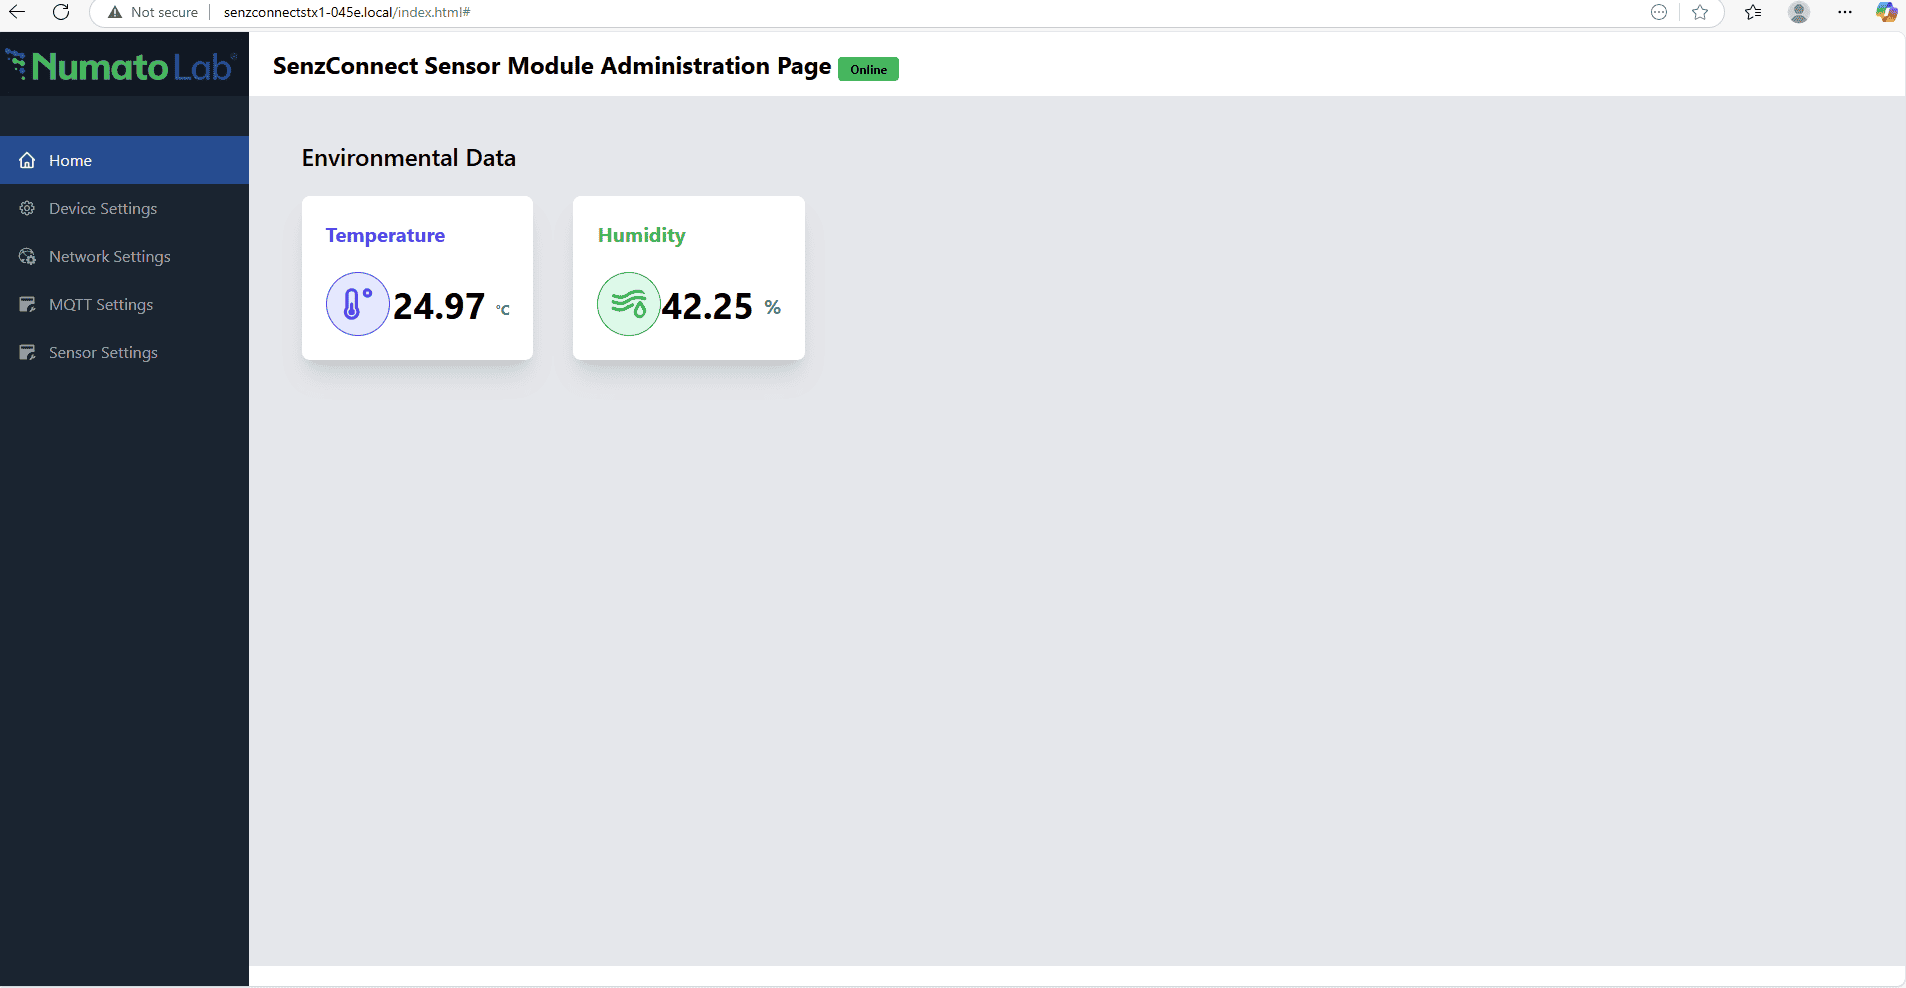
Step 3: Explore the Web Dashboard:
- Monitor live sensor readings (like temperature, humidity, CO2, and more).
- Configure the network settings.
- Configure MQTT/ MQTTs.

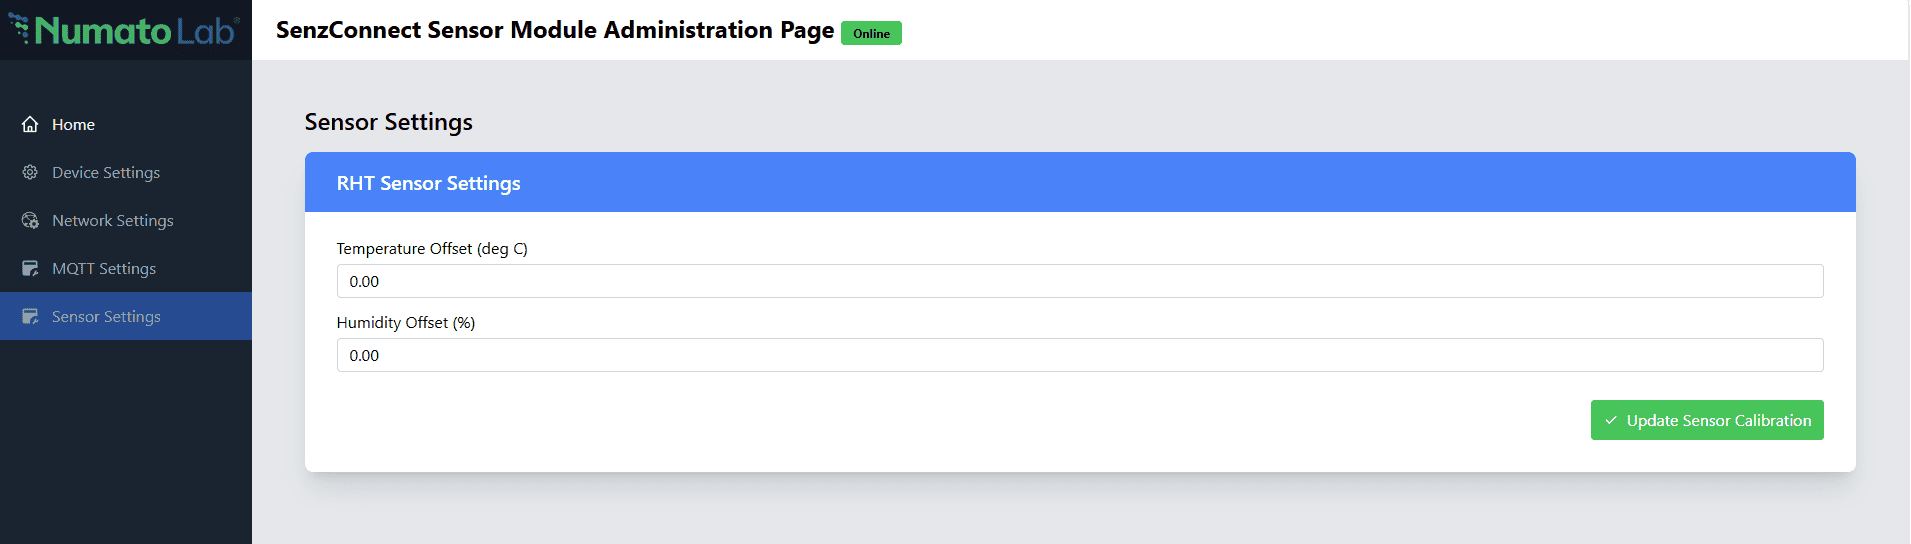
- Calibrate the sensor for better accuracy.
- Perform a reboot.

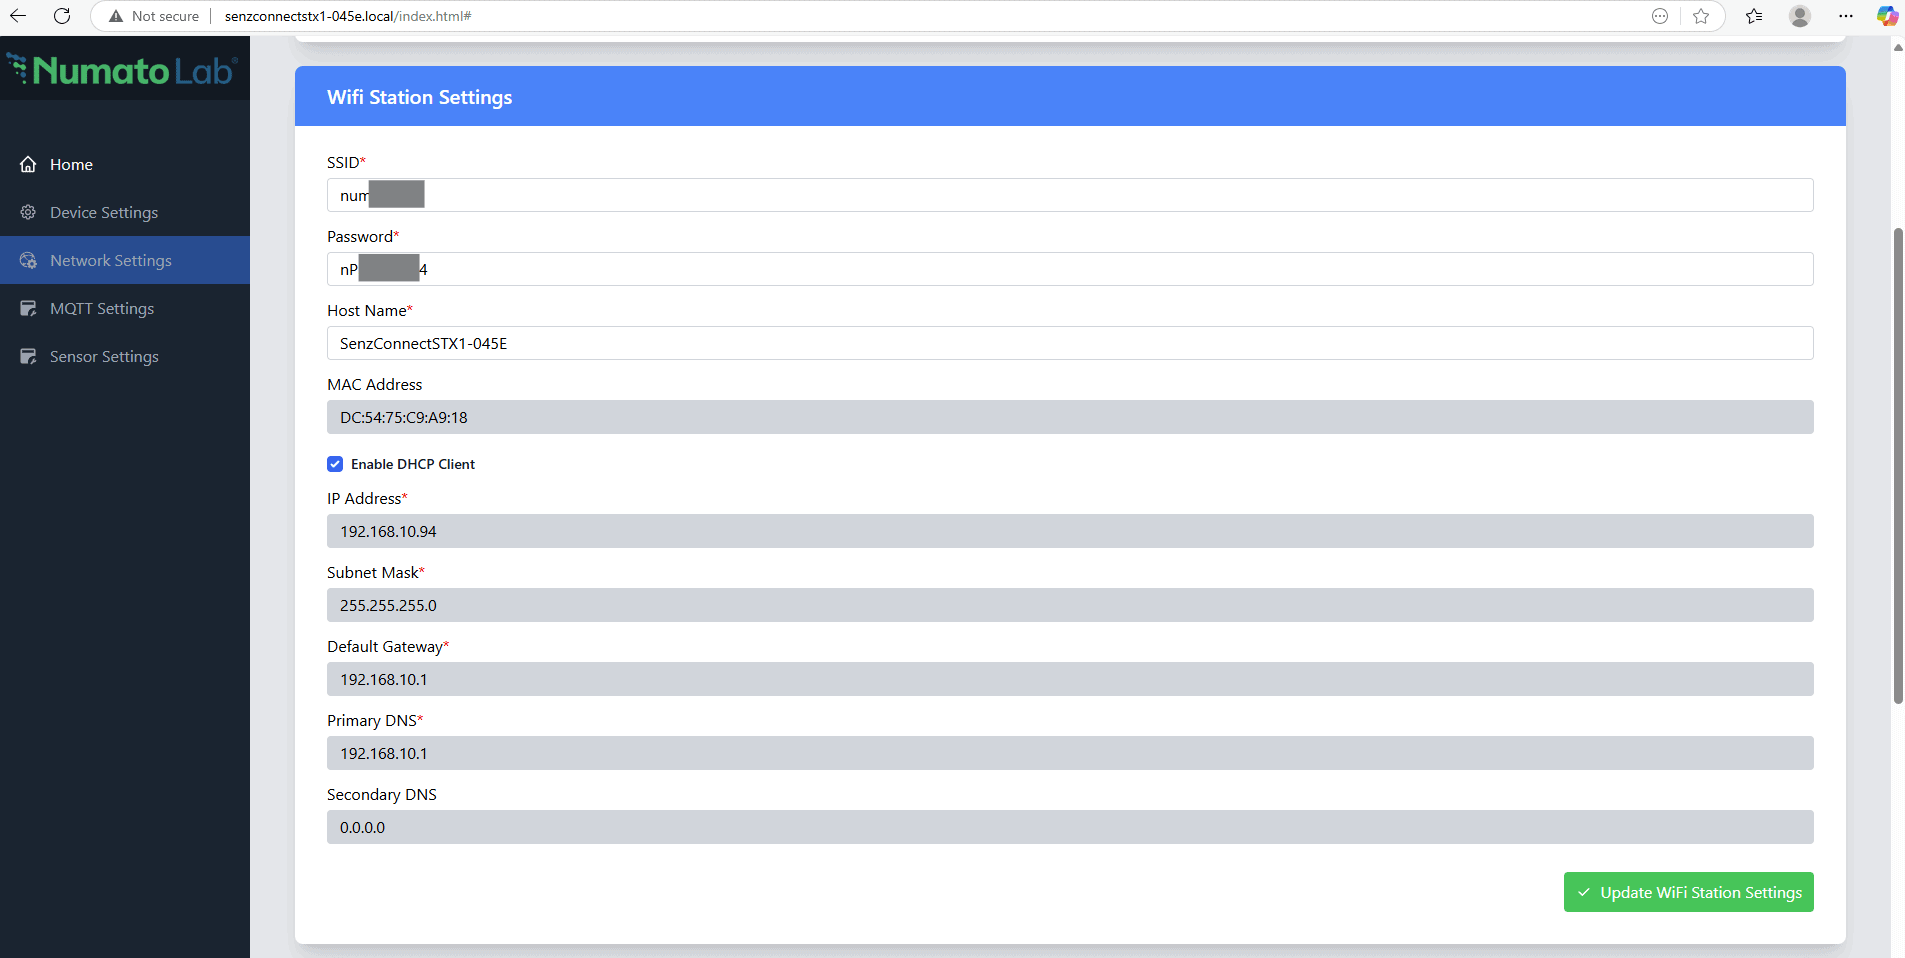
Step 4: Configure Network Settings:
The SenzConnect device allows you to configure the device’s connection to an existing Wi-Fi network. You can update the SSID, set the password, adjust the hostname, and configure the network settings according to your needs.
Step 5: Reboot:
Note: Once all the necessary settings are completed, reboot the device to enable the set changes.
- You can reboot the device in two ways:
- From the web Interface: Click Reboot on the Device settings page under the Device Management section.
- Using the Multi-Purpose Switch: A single click will reboot the device with the saved configuration.
Step 6: Application Mode – The Station Mode:
- Once the device network settings are configured and rebooted, the device enters Station Mode. The LED will blink green while connecting and turn solid green when connected to the network of your choice.
- It is essential for the device to be connected to the Wi-Fi network to establish a connection to the MQTT broker, allowing it to publish data.
Setting up the SenzConnect Module with AWS Cloud
This guide walks you through the steps to connect your SenzConnect module to AWS Cloud and start publishing real-time sensor data using MQTT.
Step 1: Create an AWS Cloud Account
-
-
- Visit AWS Cloud and sign up for an IoT Core account.
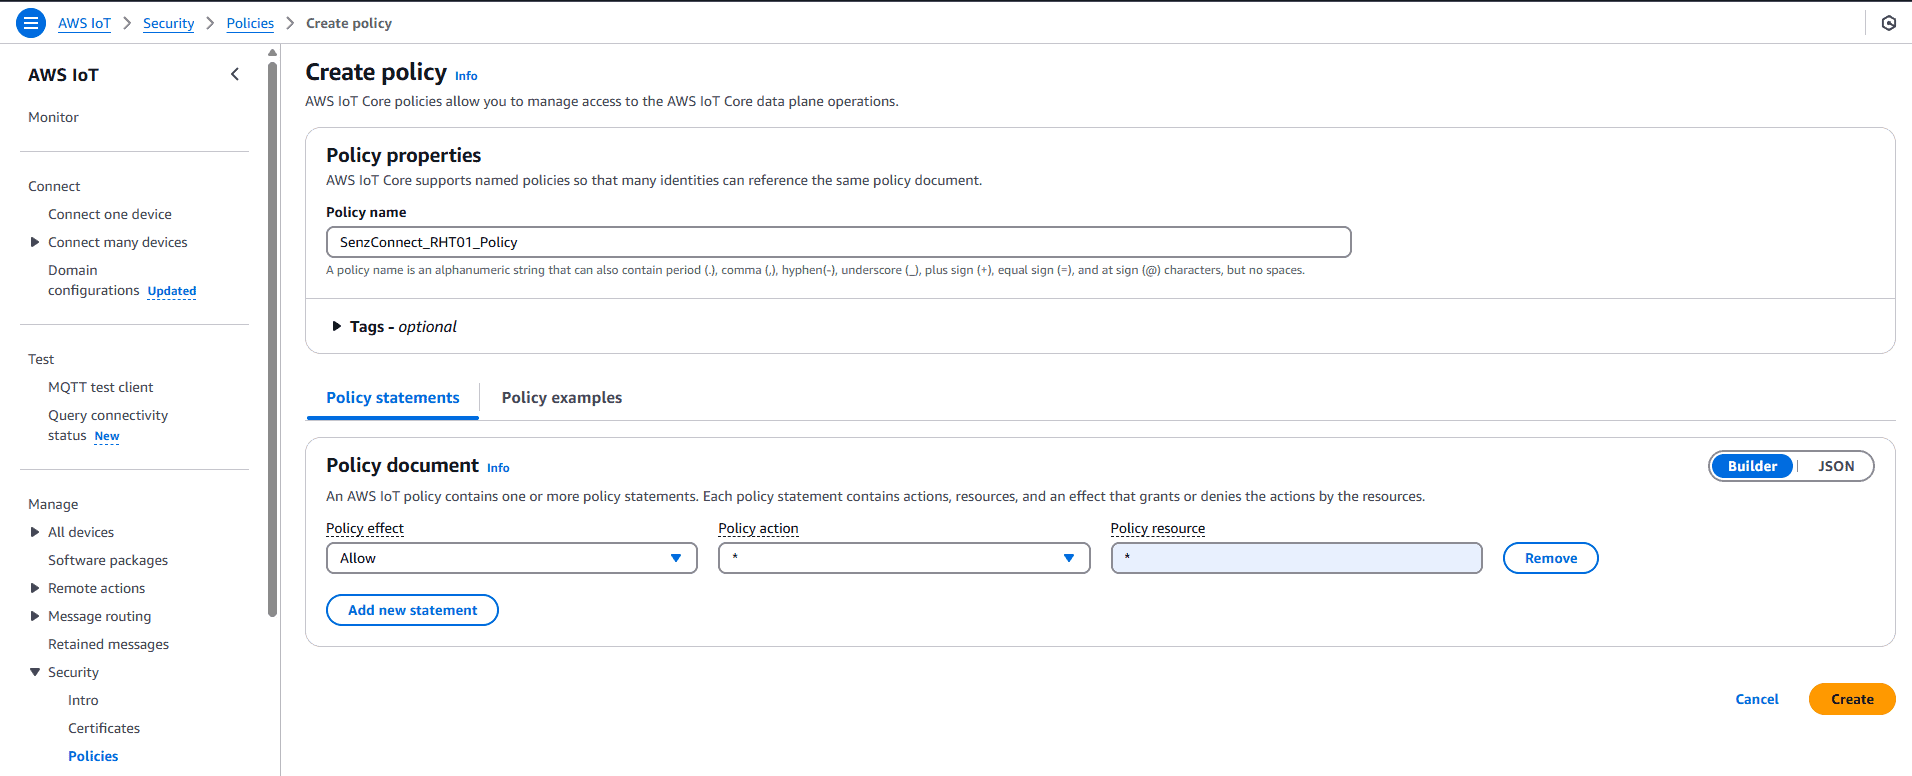
- Once logged in, navigate to “Policies” under “Security”.
- Create a policy to attach to the certificate.
- Under Create policy, enter the policy name of your choice. In the policy Document section,
-
- Set policy effect as “Allow”.
- Set policy action as “*”.
- policy resource as “*”.
-
- Once the policy is created navigate to “Things” under “All devices”.

- Create Device Things.
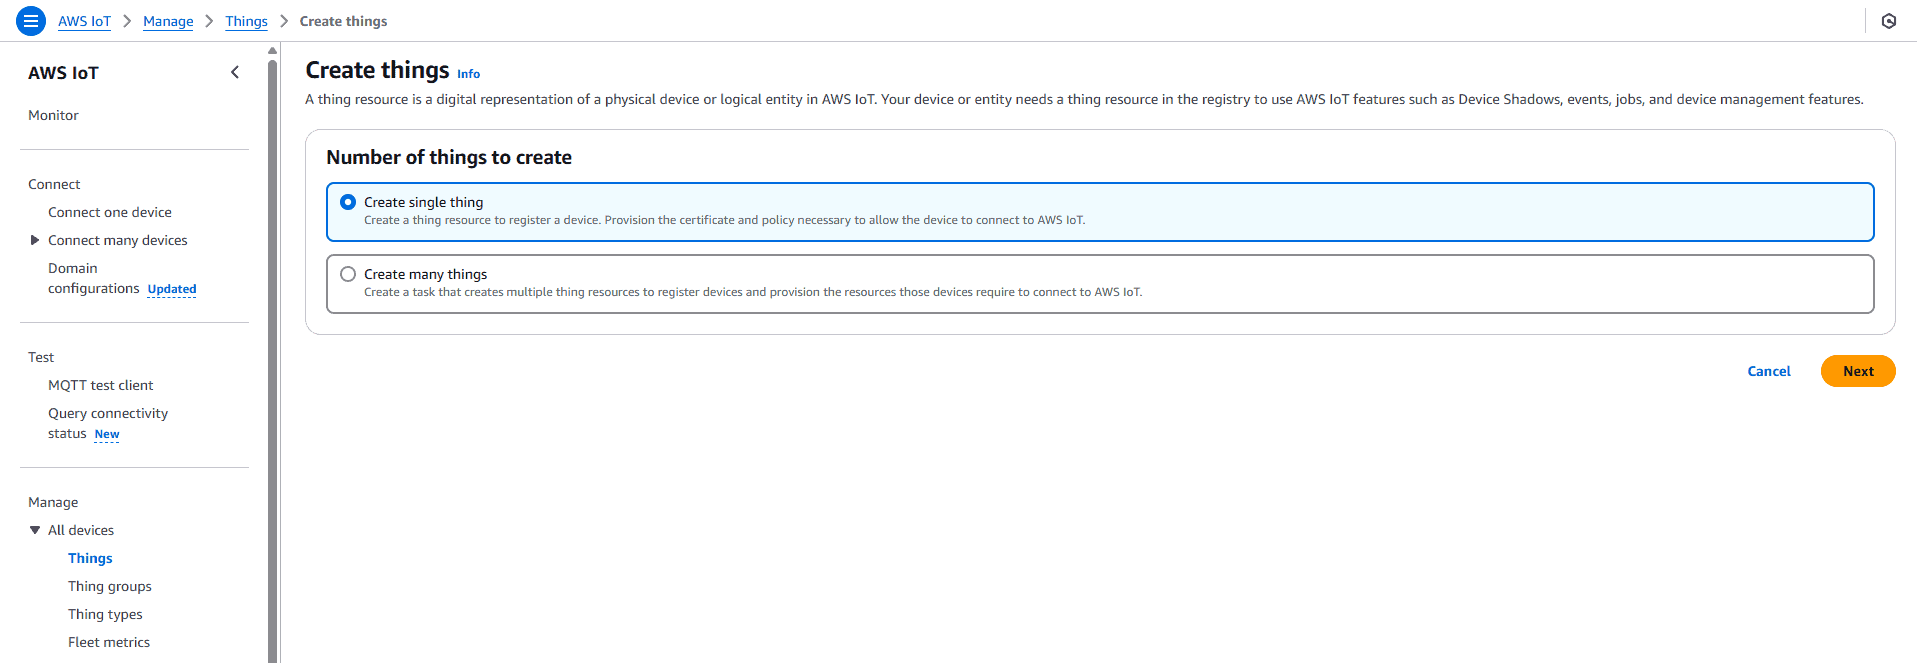
- Select “Create single thing” and enter the “Thing name”.
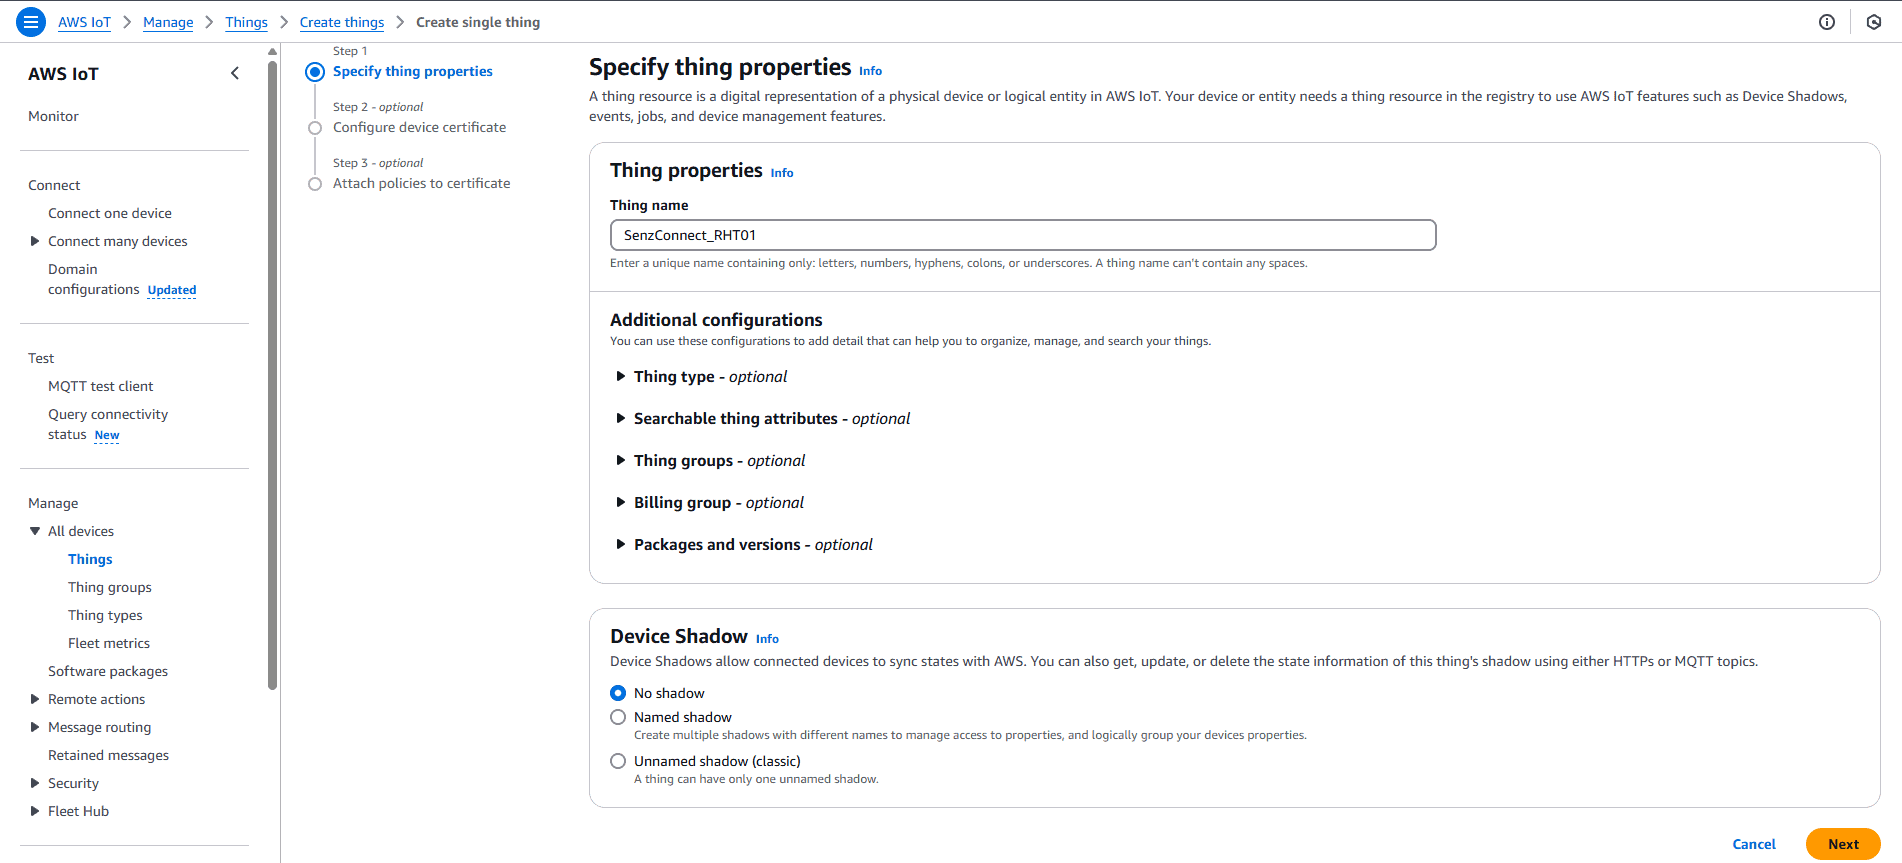
- Choose “Auto-generate a new certificate” under “Device certificate”.
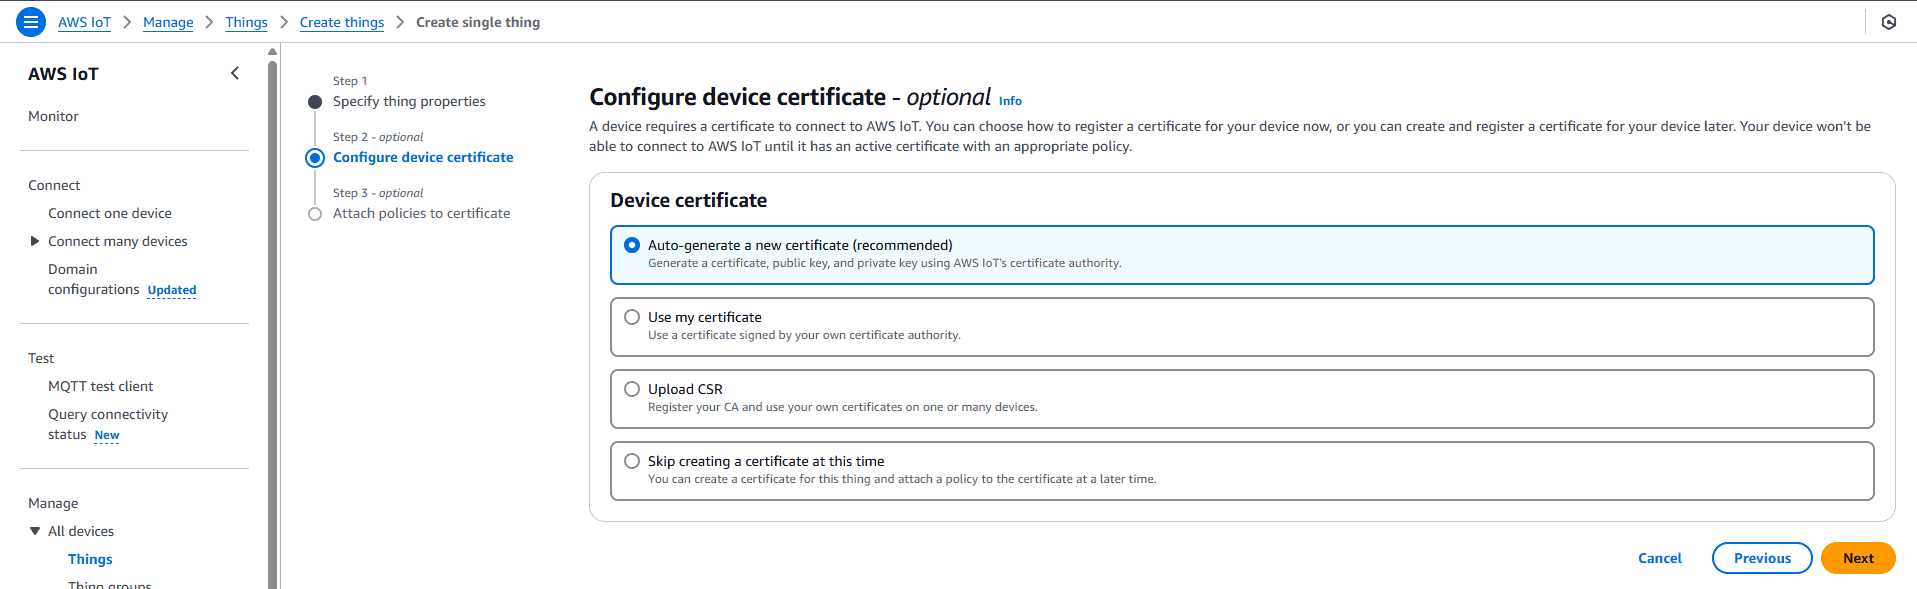
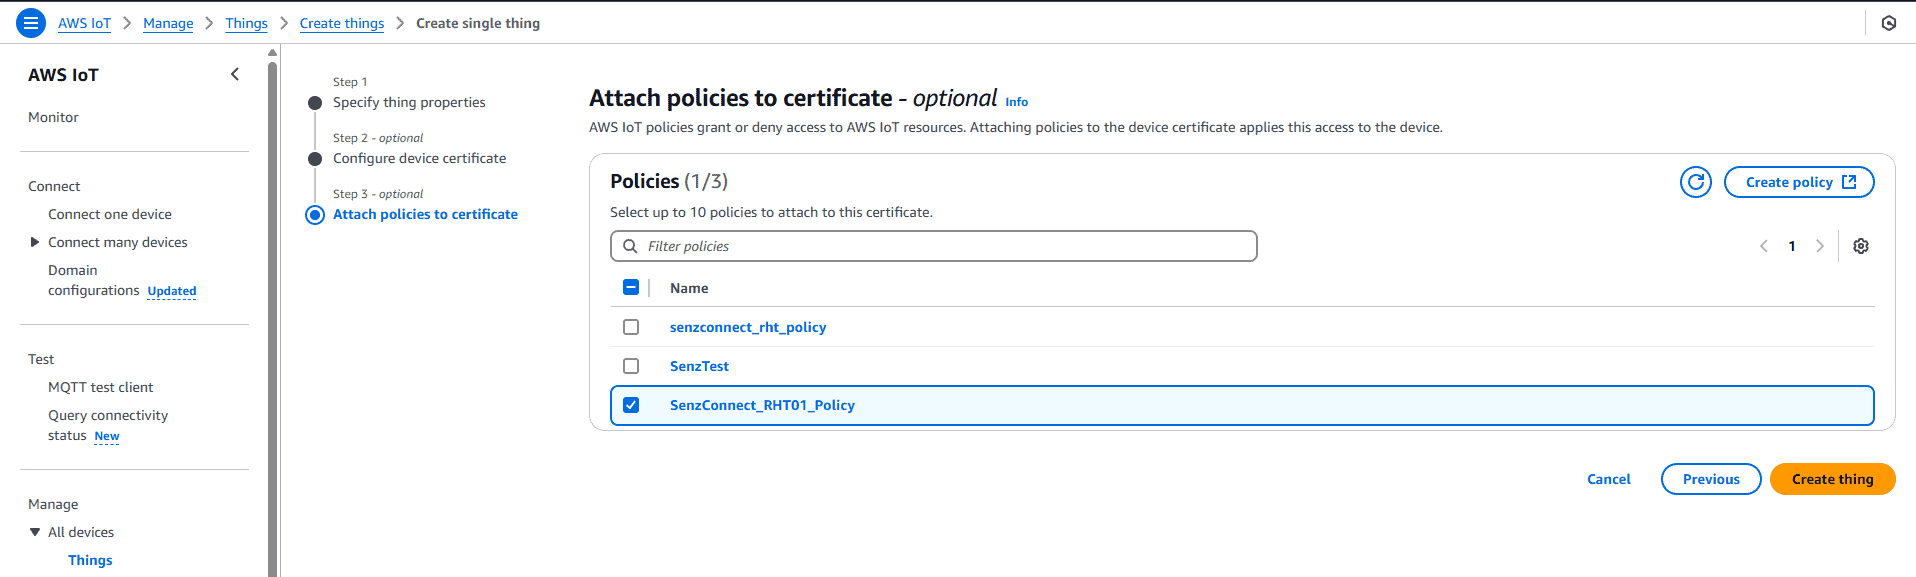
- Attach your respective policy to the certificate and “create thing”.
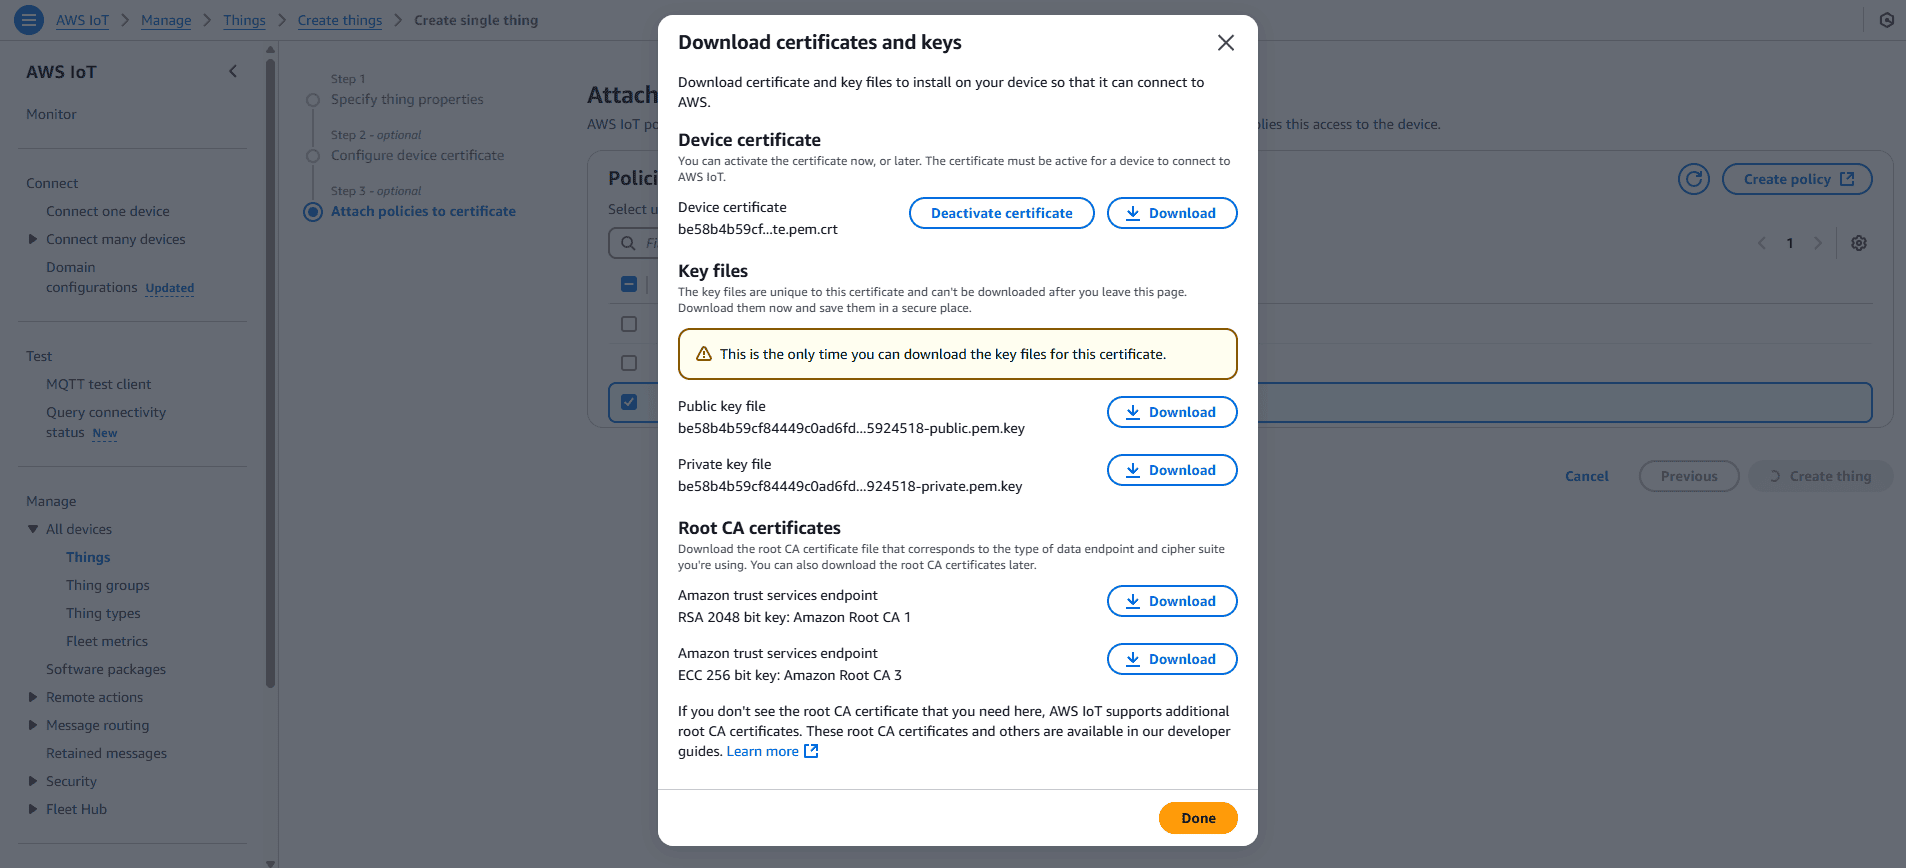
- Download the Auto-generated Certificates.
- The device certificate is the client certificate.
- The private key is the client key.
- The Root CA certificate “RSA 2048 bit key: Amazon Root CA1” is the CA certificate.
Note: Please ensure that the certificate names are fewer than 32 characters.
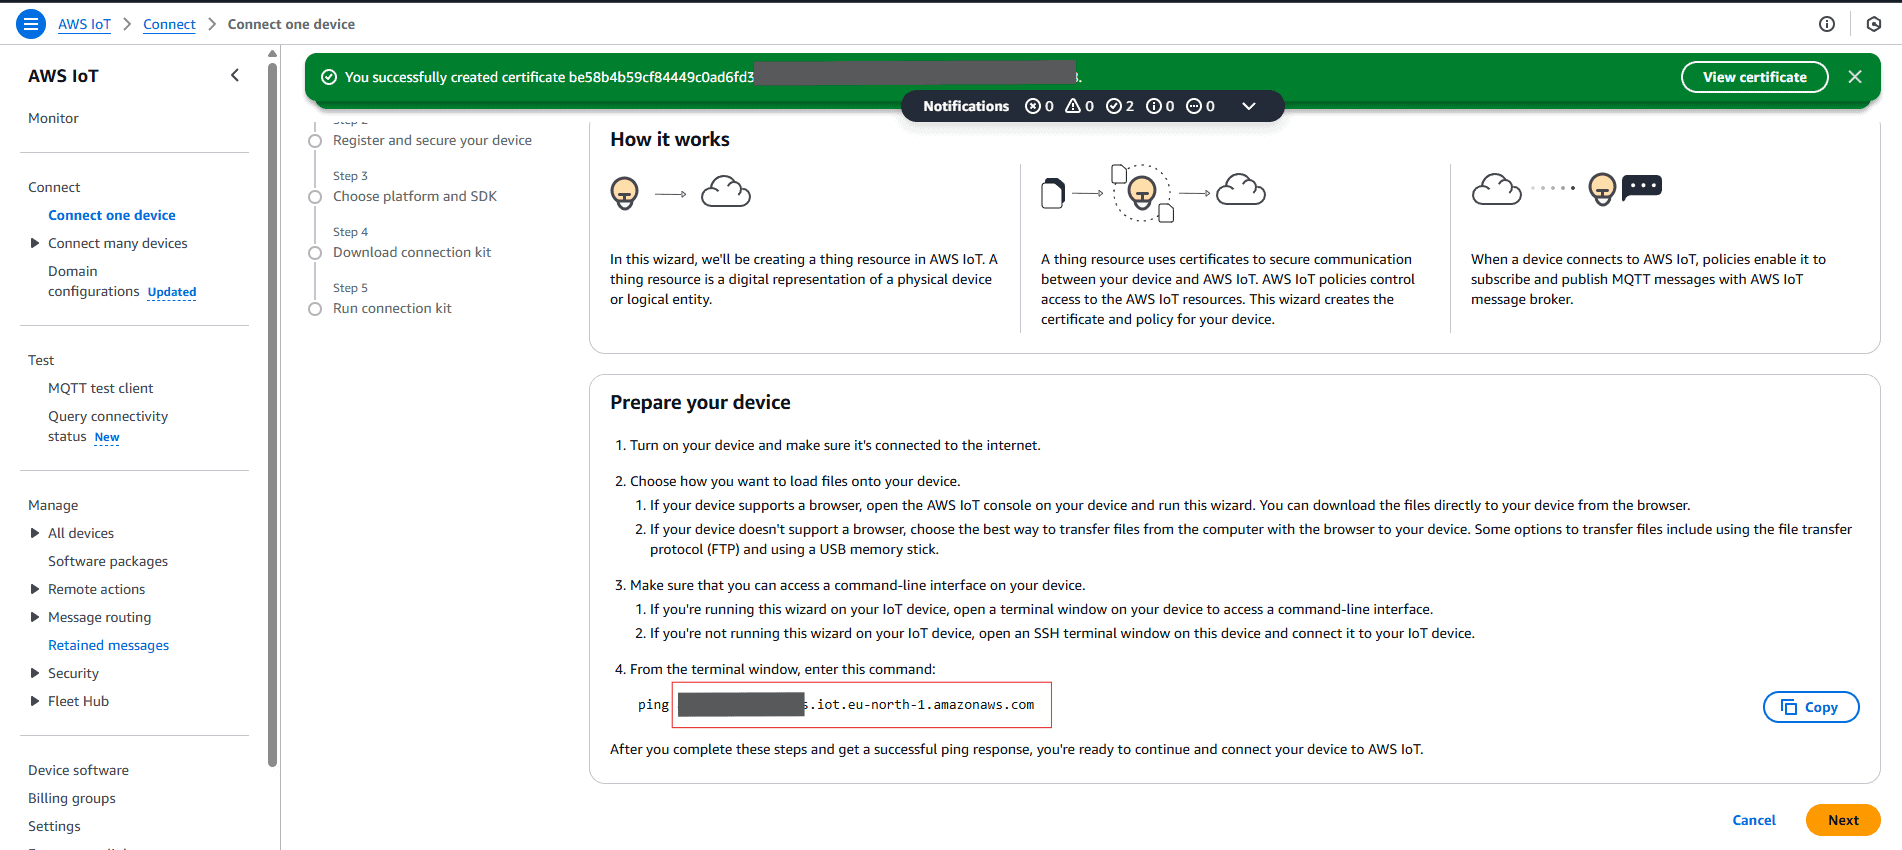
- Under “Connect one device”, find the Device Endpoint, which serves as the MQTT Broker URL.
-
Step 2: Configure the SenzConnect Module
- Power on your SenzConnect device.
- Connect to the Configuration mode over the AP.
- Open a browser and go to the device dashboard at http://192.168.4.1 to access the configuration portal.
- Navigate to Network Settings and configure to the Network (This is required for the device to connect to the Cloud Broker).
- Navigate to the MQTT Settings section.
Configure the following details:Settings Value Broker URL mqtts://your-AWS_end_point-iot.eu-north-1.amazonaws.com Client ID Set a MQTT Client ID. Topic Set a topic of your choice Publish Interval Minimum 500ms Message Format Example:
{Temperature: ~t0_val~, Humidity: ~h0_val~, CO2: ~co2_val~}
Live sensor data will replace the placeholders (t0_val, etc.)
Note: See the user manual for comprehensive setup and troubleshooting instructions.
Security - Username: Leave blank.
- Password: Leave blank.
Note: UPLOAD THE SECURITY CERTIFICATES
- Client certificate: Device certificate from AWS IoT Core.
- Client Key: Private Key from AWS IoT Core.
- CA certificate: Root CA certificate from AWS IoT Core.
- Click “Update MQTT Settings”.
- Reboot the device.
Step 3: Start Streaming Data
- After reboot, the device connects to the configured Wi-Fi network.
- It will automatically begin publishing real-time data to AWS Cloud via MQTT.
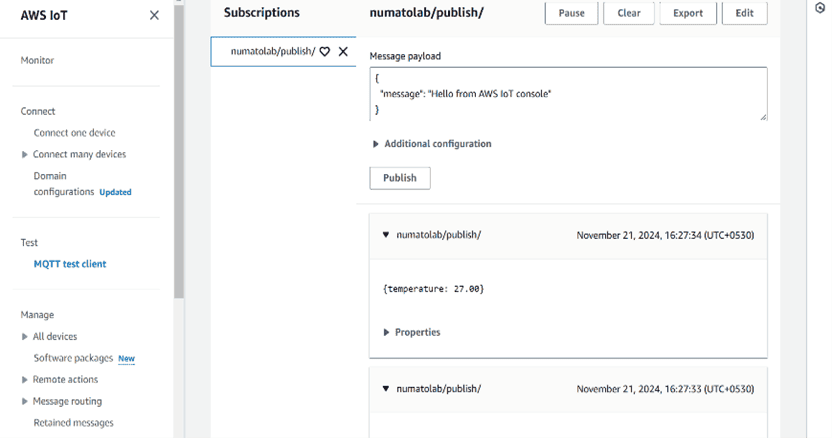
- To verify, go to your device in AWS IoT Core dashboard and open the “MQTT test client” tab, subscribe to the topic you configured you should see live data incoming.
Troubleshooting Tips
If no data in AWS IoT Core, double-check:
-
- Wi-Fi credentials and connectivity.
- Verify the LED Indication and know the device status.
- AWS endpoint (Broker URL) and certificates.
- Correct MQTT.
- Check the pre-fix in broker URL (mqtts:// for AWS – Broker URL).