1.Introduction
Waxwing Carrier Board is a helpful product to evaluate and work with Waxwing Spartan 6 Mini Module. Waxwing is an easy to use FPGA module featuring Xilinx Spartan-6 FPGA with high-density connectors for external IO interface. The carrier board makes it easy to access the IOs of the FPGA without the hassles of working with high-density connectors. On the carrier board, IOs are broken out into 100mil standard headers for easy access. The carrier board also provides easy access to JTAG signals on a standard Xilinx Platform Cable compatible header. Customization services are available for OEM customers. Please contact us for more details. For more details about the Waxwing Mini Module, please see the product page at www.numato.com.
Board features
- Three 2×6 pin 100mil expansion headers
- Onboard voltage regulator
- JTAG Connector for configuration
- LED for power indication
2.How to Use Waxwing Spartan 6 Mini Module With Carrier
2.1.Components/Tools Required
Along with the module, you may need the items in the list below for easy and fast installation.
1. Waxwing Spartan6 Mini Module.
2. DC Power supply.
3. Xilinx Platform JTAG cable
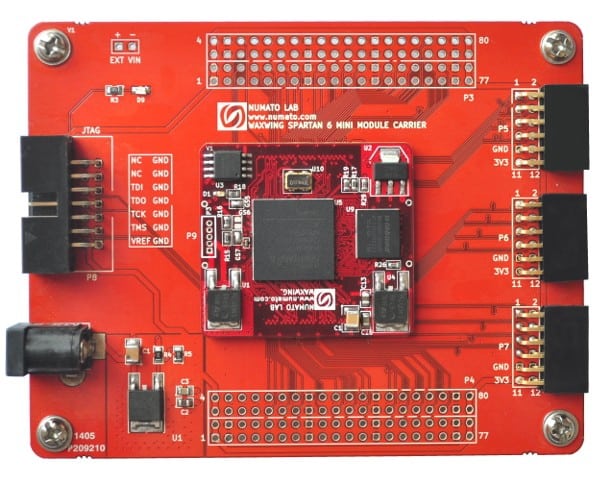
2.2.Connection Diagram
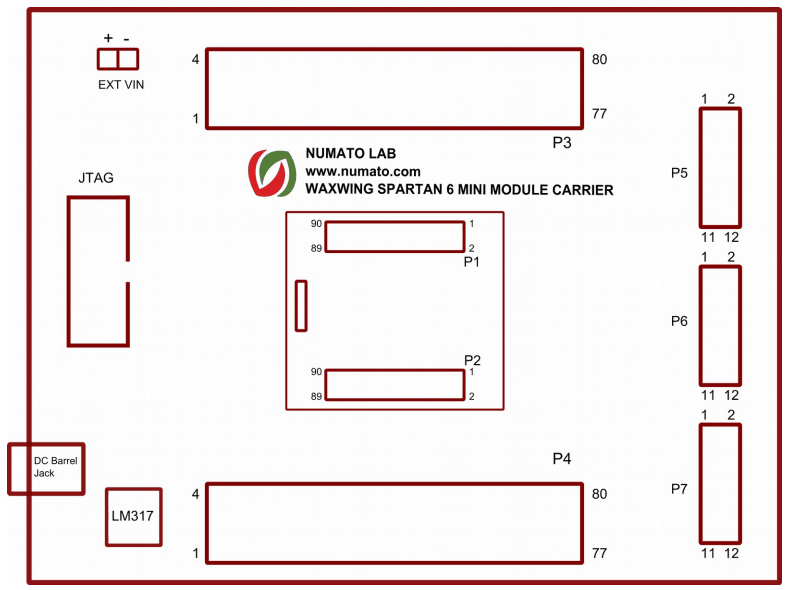
This diagram should be used as a reference only. For detailed information, see Waxwing schematics at the end of this document. The details of individual connectors are as below.
2.3.DC Power Supply
This module uses a +5V power supply to function properly, can be powered with a 5V-7.5V DC power supply and can be given through the DC jack on the board. The current requirement for this board largely depends on your application. Please consult the FPGA datasheet for more details on power requirements.
2.4.JTAG Connector
A JTAG connector provides access to FPGA’s JTAG pins. A Xilinx platform cable can be used for JTAG programming.
2.5.GPIOs
All 134 GPIOs available on the Waxwing Mini Module can be accessed using different 100mil headers available on this board. All differential pairs are length matched or better signal integrity. Please see the table below for more details.
Header P3
| Header Pin No. | Spartan-6 (CSG324) Pin No. | Pin Description |
|---|---|---|
| 1 | VCCIN | VCCIN |
| 2 | VCCIN | VCCIN |
| 3 | VCCIN | VCCIN |
| 4 | VCCIN | VCCIN |
| 5 | PROGB | PROGB |
| 6 | INITB | INITB |
| 7 | GND | GND |
| 8 | GND | GND |
| 9 | T13 | SDI |
| 10 | R13 | SDO |
| 11 | R15 | SCK |
| 12 | V3 | CS |
| 13 | U16 | IO_L2P_CMPCLK_2 |
| 14 | V16 | IO_L2N_CMPMOSI_2 |
| 15 | T18 | IO_L51N_M1DQ13_1 |
| 16 | T17 | IO_L51P_M1DQ12_1 |
| 17 | P17 | IO_L49P_M1DQ10_1 |
| 18 | P18 | IO_L49N_M1DQ11_1 |
| 19 | V15 | IO_L5N_2 |
| 20 | U15 | IO_L5P_2 |
| 21 | M16 | IO_L47P_FWE_B_M1DQ0_1 |
| 22 | M18 | IO_L47N_LDC_M1DQ1_1 |
| 23 | V13 | IO_L14N_D12_2 |
| 24 | U13 | IO_L14P_D11_2 |
| 25 | U18 | IO_L52N_M1DQ15_1 |
| 26 | U17 | IO_L52P_M1DQ14_1 |
| 27 | V11 | IO_L23N_2 |
| 28 | U11 | IO_L23P_2 |
| 29 | GND | GND |
| 30 | GND | GND |
| 31 | GND | GND |
| 32 | GND | GND |
| 33 | P15 | IO_L74P_AWAKE_1 |
| 34 | P16 | IO_L74N_DOUT_BUSY_1 |
| 35 | N18 | IO_L48N_M1DQ9_1 |
| 36 | N17 | IO_L48P_HDC_M1DQ8_1 |
| 37 | N15 | IO_L50P_M1UDQS_1 |
| 38 | N16 | IO_L50N_M1UDQSN_1 |
| 39 | T14 | IO_L12P_D1_MISO2_2 |
| 40 | V14 | IO_L12N_D2_MISO3_2 |
| 41 | T12 | IO_L19P_2 |
| 42 | V12 | IO_L19N_2 |
| 43 | N11 | IO_L15N_2 |
| 44 | M11 | IO_L15P_2 |
| 45 | M14 | IO_L53P_1 |
| 46 | N14 | IO_L53N_VREF_1 |
| 47 | L12 | IO_L40P_GCLK11_M1A5_1 |
| 48 | L13 | IO_L40N_GCLK10_M1A6_1 |
| 49 | GND | GND |
| 50 | GND | GND |
| 51 | GND | GND |
| 52 | GND | GND |
| 53 | R10 | IO_L29P_GCLK3_2 |
| 54 | T10 | IO_L29N_GCLK2_2 |
| 55 | N10 | IO_L20P_2 |
| 56 | P11 | IO_L20N_2 |
| 57 | R11 | IO_L16P_2 |
| 58 | T11 | IO_L16N_VREF_2 |
| 59 | V8 | IO_L41N_VREF_2 |
| 60 | U8 | IO_L41P_2 |
| 61 | N8 | IO_L40N_2 |
| 62 | M8 | IO_L40P_2 |
| 63 | V7 | IO_L43N_2 |
| 64 | U7 | IO_L43P_2 |
| 65 | V6 | IO_L45N_2 |
| 66 | T6 | IO_L45P_2 |
| 67 | N7 | IO_L44P_2 |
| 68 | P8 | IO_L44N_2 |
| 69 | T5 | IO_L48N_RDWR_B_VREF_2 |
| 70 | R5 | IO_L48P_D7_2 |
| 71 | P7 | IO_L47N_2 |
| 72 | N6 | IO_L47P_2 |
| 73 | GND | GND |
| 74 | GND | GND |
| 75 | GND | GND |
| 76 | GND | GND |
| 77 | VCCIN | VCCIN |
| 78 | VCCIN | VCCIN |
| 79 | VCCIN | VCCIN |
| 80 | VCCIN | VCCIN |
Header P4
| Header Pin No. | Spartan-6 (CSG324) Pin No. | Pin Description |
|---|---|---|
| 1 | VCCIN | VCCIN |
| 2 | VCCIN | VCCIN |
| 3 | VCCIN | VCCIN |
| 4 | VCCIN | VCCIN |
| 5 | GND | GND |
| 6 | GND | GND |
| 7 | V9 | IO_L32N_GCLK28_2 |
| 8 | T9 | IO_L32P_GCLK29_2 |
| 9 | T8 | IO_L31N_GCLK30_D15_2 |
| 10 | R8 | IO_L31P_GCLK31_D14_2 |
| 11 | F18 | IO_L35N_A10_M1A2_1 |
| 12 | F17 | IO_L35P_A11_M1A7_1 |
| 13 | B14 | IO_L62P_0 |
| 14 | A14 | IO_L62N_VREF_0 |
| 15 | C18 | IO_L29N_A22_M1A14_1 |
| 16 | C17 | IO_L29P_A23_M1A13_1 |
| 17 | L14 | IO_L61P_1 |
| 18 | M13 | IO_L61N_1 |
| 19 | L15 | IO_L42P_GCLK7_M1UDM_1 |
| 20 | L16 | IO_L42N_GCLK6_TRDY1_M1LDM_1 |
| 21 | L17 | IO_L46P_FCS_B_M1DQ2_1 |
| 22 | L18 | IO_L46N_FOE_B_M1DQ3_1 |
| 23 | K12 | IO_L34P_A13_M1WE_1 |
| 24 | K13 | IO_L34N_A12_M1BA2_1 |
| 25 | F15 | IO_L1P_A25_1 |
| 26 | F16 | IO_L1N_A24_VREF_1 |
| 27 | G16 | IO_L38P_A5_M1CLK_1 |
| 28 | G18 | IO_L38N_A4_M1CLKN_1 |
| 29 | GND | GND |
| 30 | GND | GND |
| 31 | GND | GND |
| 32 | GND | GND |
| 33 | F14 | IO_L30P_A21_M1RESET_1 |
| 34 | G14 | IO_L30N_A20_M1A11_1 |
| 35 | H14 | IO_L36N_A8_M1BA1_1 |
| 36 | H13 | IO_L36P_A9_M1BA0_1 |
| 37 | B12 | IO_L41P_0 |
| 38 | A12 | IO_L41N_0 |
| 39 | D17 | IO_L31P_A19_M1CKE_1 |
| 40 | D18 | IO_L31N_A18_M1A12_1 |
| 41 | C15 | IO_L64P_SCP5_0 |
| 42 | A15 | IO_L64N_SCP4_0 |
| 43 | B16 | IO_L66P_SCP1_0 |
| 44 | A16 | IO_L66N_SCP0_0 |
| 45 | C13 | IO_L50P_0 |
| 46 | A13 | IO_L50N_0 |
| 47 | E16 | IO_L33P_A15_M1A10_1 |
| 48 | E18 | IO_L33N_A14_M1A4_1 |
| 49 | GND | GND |
| 50 | GND | GND |
| 51 | GND | GND |
| 52 | GND | GND |
| 53 | C9 | IO_L34N_GCLK18_0 |
| 54 | D9 | IO_L34P_GCLK19_0 |
| 55 | F13 | IO_L63P_SCP7_0 |
| 56 | E13 | IO_L63N_SCP6_0 |
| 57 | A11 | IO_L39N_0 |
| 58 | B11 | IO_L39P_0 |
| 59 | C14 | IO_L65N_SCP2_0 |
| 60 | D14 | IO_L65P_SCP3_0 |
| 61 | G9 | IO_L38P_0 |
| 62 | F9 | IO_L38N_VREF_0 |
| 63 | C10 | IO_L37P_GCLK13_0 |
| 64 | A10 | IO_L37N_GCLK12_0 |
| 65 | A9 | IO_L35N_GCLK16_0 |
| 66 | B9 | IO_L35P_GCLK17_0 |
| 67 | H16 | IO_L37N_A6_M1A1_1 |
| 68 | H15 | IO_L37P_A7_M1A0_1 |
| 69 | A7 | IO_L10N_0 |
| 70 | C7 | IO_L10P_0 |
| 71 | B8 | IO_L33P_0 |
| 72 | A8 | IO_L33N_0 |
| 73 | GND | GND |
| 74 | GND | GND |
| 75 | GND | GND |
| 76 | GND | GND |
| 77 | VCCIN | VCCIN |
| 78 | VCCIN | VCCIN |
| 79 | VCCIN | VCCIN |
| 80 | VCCIN | VCCIN |
Header P5
| Header Pin No. | Spartan-6 (CSG324) Pin No. | Pin Description |
|---|---|---|
| 1 | V4 | IO_L63N_2 |
| 2 | T4 | IO_L63P_2 |
| 3 | T3 | IO_L62N_D6_2 |
| 4 | R3 | IO_L62P_D5_2 |
| 5 | R7 | IO_L46P_2 |
| 6 | T7 | IO_L46N_2 |
| 7 | U5 | IO_L49P_D3_2 |
| 8 | V5 | IO_L49N_D4_2 |
| 9 | GND | GND |
| 10 | GND | GND |
| 11 | VCC3V3 | VCC3V3 |
| 12 | VCC3V3 | VCC3V3 |
Header P6
| Header Pin No. | Spartan-6 (CSG324) Pin No. | Pin Description |
|---|---|---|
| 1 | A4 | IO_L5N_0 |
| 2 | B4 | IO_L5P_0 |
| 3 | A5 | IO_L6N_0 |
| 4 | C5 | IO_L6P_0 |
| 5 | A3 | IO_L4N_0 |
| 6 | B3 | IO_L4P_0 |
| 7 | A2 | IO_L2N_0 |
| 8 | B2 | IO_L2P_0 |
| 9 | GND | GND |
| 10 | GND | GND |
| 11 | VCC3V3 | VCC3V3 |
| 12 | VCC3V3 | VCC3V3 |
Header P7
| Header Pin No. | Spartan-6 (CSG324) Pin No. | Pin Description |
|---|---|---|
| 1 | C8 | IO_L11N_0 |
| 2 | D8 | IO_L11P_0 |
| 3 | C6 | IO_L3N_0 |
| 4 | D6 | IO_L3P_0 |
| 5 | A6 | IO_L8N_VREF_0 |
| 6 | B6 | IO_L8P_0 |
| 7 | C11 | IO_L36N_GCLK14_0 |
| 8 | D11 | IO_L36P_GCLK15_0 |
| 9 | GND | GND |
| 10 | GND | GND |
| 11 | VCC3V3 | VCC3V3 |
| 12 | VCC3V3 | VCC3V3 |
No Connect Pins In LX9(CSG324)
| SL No. | Header No. | Pin No On The Header | Spartan-6 (CSG324) |
|---|---|---|---|
| 1 | P3 | 71 | P7 |
| 2 | P3 | 72 | N6 |
| 3 | P3 | 67 | N7 |
| 4 | P3 | 68 | P8 |
| 5 | P3 | 61 | N8 |
| 6 | P3 | 62 | M8 |
| 7 | P3 | 55 | N10 |
| 8 | P3 | 56 | P11 |
| 9 | P3 | 41 | T12 |
| 10 | P3 | 42 | V12 |
| 11 | P3 | 43 | N11 |
| 12 | P3 | 44 | M11 |
| 13 | P3 | 19 | V15 |
| 14 | P3 | 20 | U15 |
| 15 | P4 | 45 | C13 |
| 16 | P4 | 46 | A13 |
3.Configuring Waxwing Using JTAG
Waxwing Spartan6 module Carrier features an onboard JTAG connector that facilitates easy reprogramming of SRAM and onboard SPI flash through JTAG programmer like “Xilinx Platform-cable usb”. Programming Waxwing using JTAG requires “Xilinx ISE iMPACT” software which is bundled with Xilinx ISE Design Suite. To program the SPI flash we need a “.mcs” file that needs to be generated from the “.bit” file. Steps for generating the “.mcs” file are as below. Programming FPGA SRAM does not require a “.mcs” file to be generated.
Generating “.mcs” file for Waxwing
Step 1: Open ISE iMPACT. Click on “Create PROM file(PROM file formatter)”. In the dialog box, select “Configure Single FPGA” in the storage device type. Then click the green arrow on the right side.

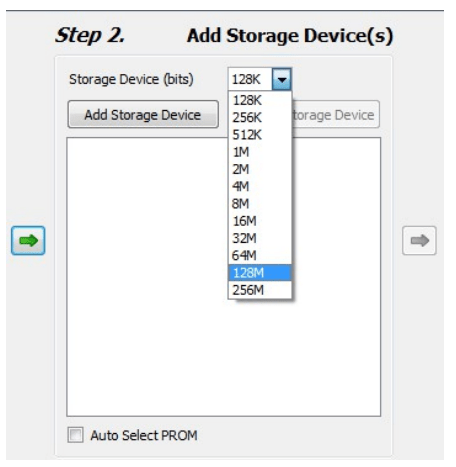
Step 2: Select 128M in Storage Device (bits).Now click on “Add Storage Device”, then the green arrow on the right side.
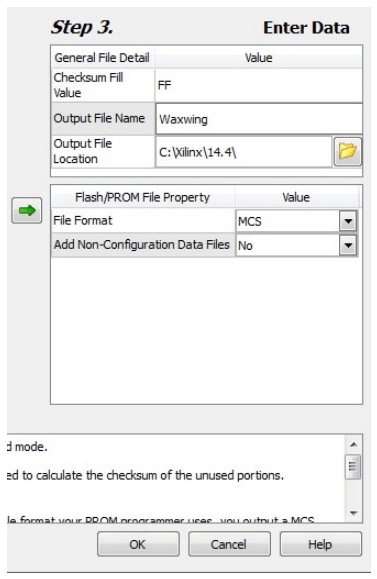
Step 3: Set an output file name and the output file location (the “.mcs” file will be generated at this location which will be required later for programming the FPGA), then click OK twice, then select the “.bit” file we already generated then click Open and click NO when it prompts to add another device file.
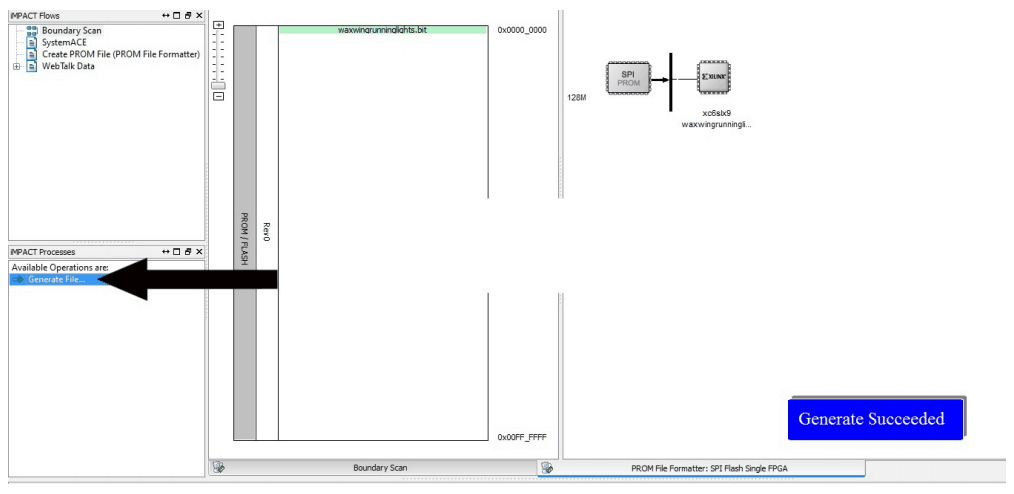
Step 4: Double click on “Generate File”. “Generate Succeeded” will be displayed as shown in fig below if the “.mcs” the file is generated successfully.
4.Programming FPGA Using ISE iMPACT
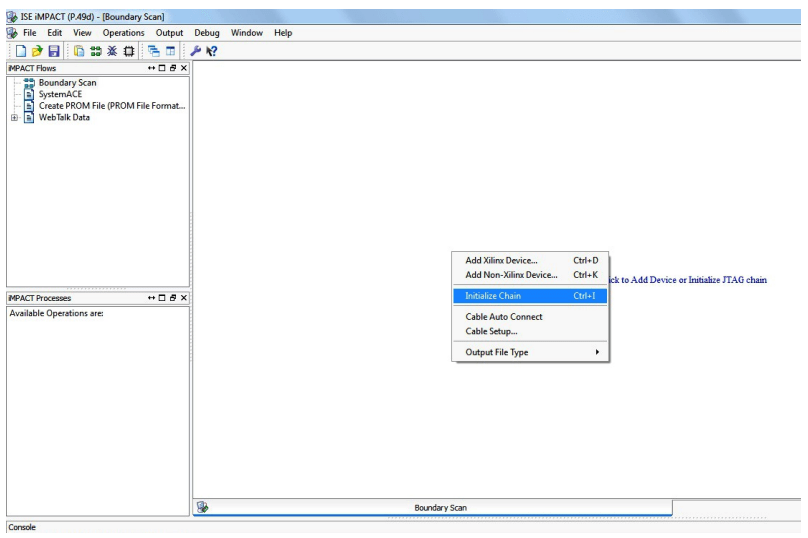
Step 1: Open ISE iMPACT. Click on “Boundary Scan” in the iMPACT flows window on the left top corner. Then right-click on the window panel on the right. Select “Initialize Chain”.
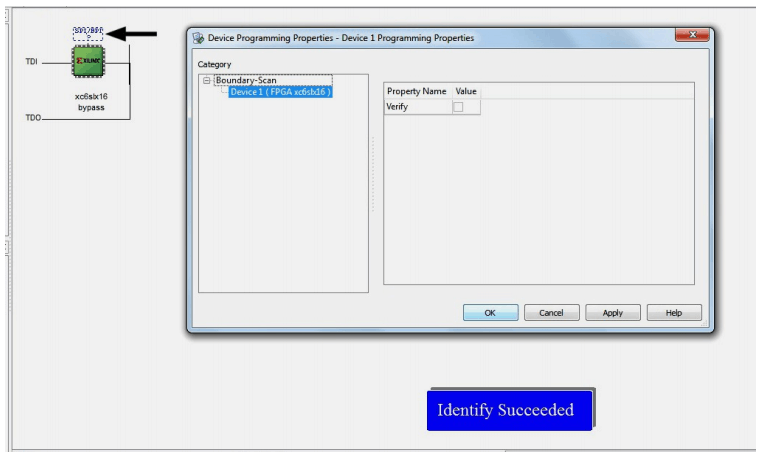
Step 2: If the device is detected properly you will get a pop-up window as shown below, Click OK. Then right-click on the SPI/BPI (next to the black arrow in the below fig.), select Add SPI/BPI Flash.
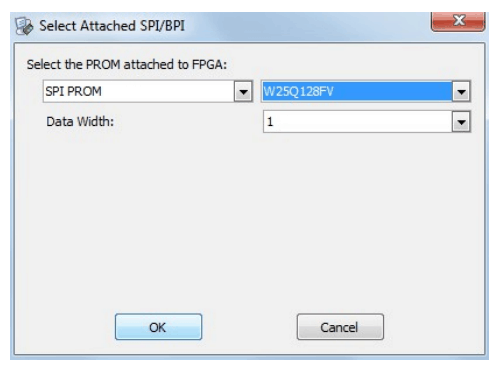
Step 3: Select the “.mcs” file we already created and click OK. Now choose appropriate options in the dialogue box appeared, then click OK.
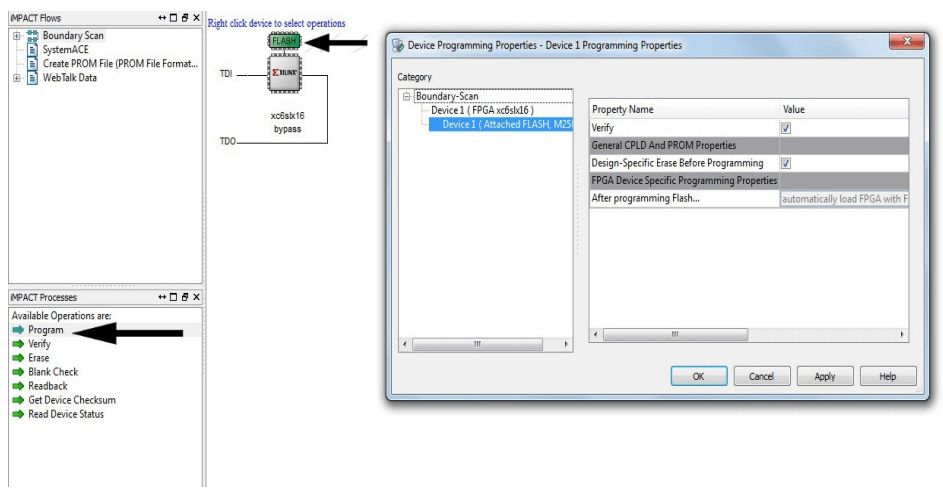
Step 4: Click on “Flash”, Double Click on Program, select OK. If the programming is successful, a confirmation message will be displayed.
5.Technical Specifications
| Parameter * | Value | Unit |
|---|---|---|
| Basic Specifications | ||
| Number of GPIOs | 134 (Max) | |
| On-board oscillator frequency (FXO-HC536R) | 100 | MHz |
| LPDDR: 166MHz | 512 | Mb |
| SPI Flash Memory (N25Q128A13ESE40E) | 128 | Mb |
| Power supply voltage (External) | 5 - 7 | V |
| FPGA Specifications | ||
| Internal supply voltage relative to GND | –0.5 to 1.32 | V |
| Auxiliary supply voltage relative to GND | –0.5 to 3.75 | V |
| Output drivers supply voltage relative to GND | –0.5 to 3.75 | V |
| Hirose Connector Specifications | ||
| Number of Positions | 90 | |
| Number of Rows | 2 | |
| Pitch | 0.4 | mm |
| Height | 1.5 | mm |
| Mated Stacking Heights | 1.5,3,4 | mm |
| Current Rating(Amps)(Max.) | 0.3 | Amp |
| Receptacles | DF40HC(4.0)-90DS-0.4V(51) DF40HC(3.0)-90DS-0.4V(51) DF40C-90DS-0.4V(51) | |
| Mated Header on the Module | (DF40C-90DP-0.4V(51)) |
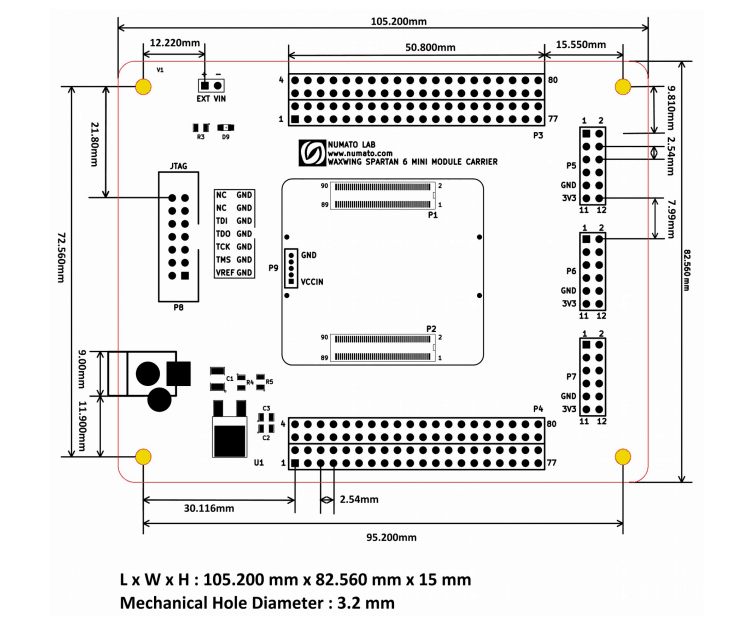
6.Mechanical Dimensions