Introduction
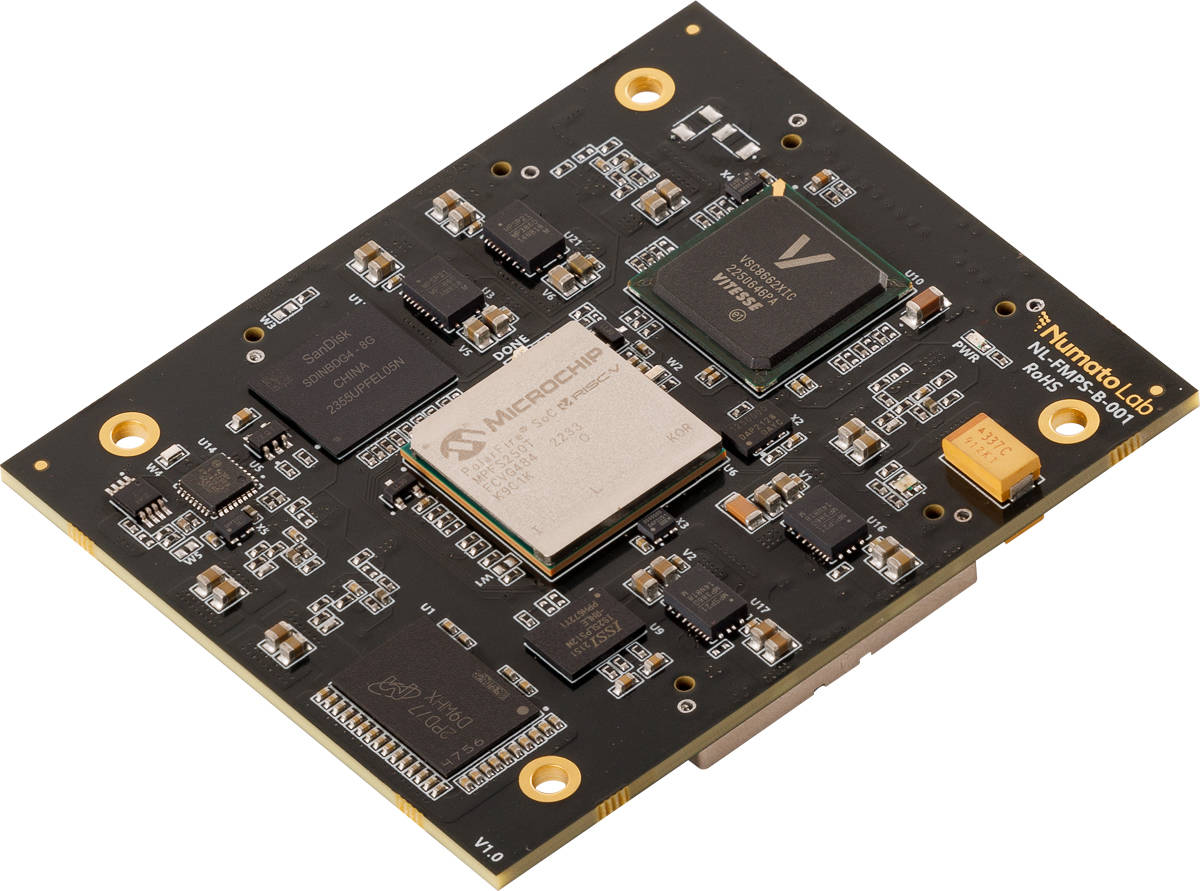
Embrace the epitome of embedded computing with our EagleCore PolarFire SoC SOM. This exceptional SOM harnesses the full power and groundbreaking capabilities of the revolutionary PolarFire SoC, setting a new standard as the world’s first System-on-Chip (SoC) FPGA with a deterministic, coherent RISC-V CPU cluster and a deterministic L2 memory subsystem. This game-changing combination empowers you to create Linux and real-time applications with unmatched determinism, performance, and energy efficiency, revolutionizing the way you approach embedded projects
Equipped with an extensive range of peripherals, including LPDDR4 for high-speed memory, eMMC for reliable storage, Ethernet for seamless networking, versatile OTG functionality, etc. The EagleCore PolarFire SoC SOM empowers you with comprehensive connectivity and expansion options. Combined with other advanced peripherals, this SOM provides enhanced capabilities for a broad spectrum of applications, giving you the freedom to bring your innovative ideas to life.
Experience the future of embedded computing and unlock a world of possibilities with the EagleCore PolarFire SoC SOM. Accelerate your development process, push the boundaries of embedded innovation, and embark on a transformative journey of creativity and success.
Board Features
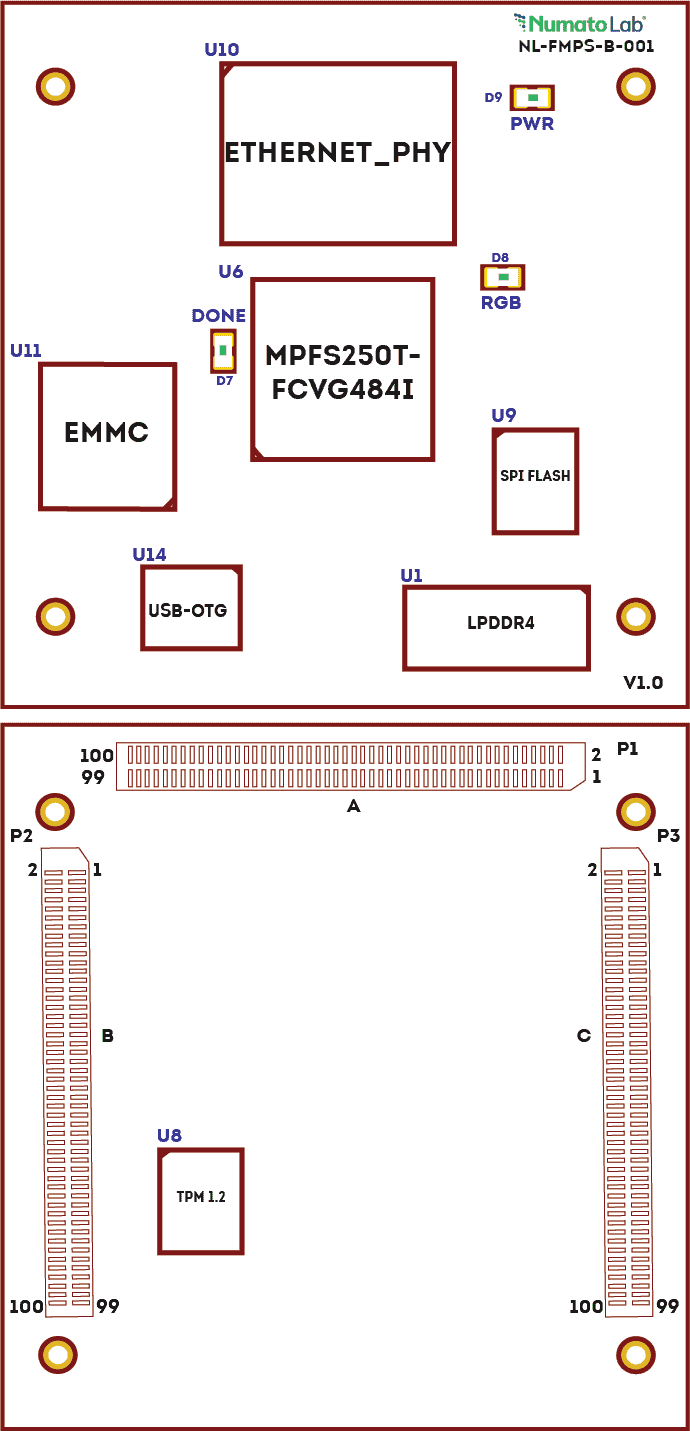
- Device: PolarFire SoC FPGA (MPFS250T-FCVG484)
- LPDDR4
- eMMC: 8 GB Storage (SDINBDG4-8G)
- Flash Memory: 1 Gb SPI flash memory (MT25QL01GBBB8E12-0SIT TR)
- 2 x Gigabit Ethernet PHY
- OTG PHY
- 50 MHz CMOS oscillator
- 3x Razor Beam LSHM Series Samtec Connectors
- Programming & Debugging: JTAG programming and USB programming
- 1 RGB LED for custom use
- IOs for user-defined purposes
- HSIO – 58 IOs
- GPIO – 50 IOs
- MSSIO – 10 IOs
- x4 SERDES
Application
- Artificial Intelligence (AI)
- Industrial Automation
- Embedded Vision
- High-Performance Computing (HPC)
- Aerospace and Defense
- Communication and Networking
How to use EagleCore PolarFire SoC SOM
The following sections describe in detail how to use this module.
Hardware Accessories Required
Along with the module, you may need the accessories listed below for easy and fast installation:
- EagleCore PolarFire SoC Carrier Board.
- 12 V DC Power Supply.
- USB A to USB-C cable.
- USB A to USB-B cable – OTG communication.
- FlashPro 5/6 JTAG programmer.
Connection Diagram
Please note that the diagram provided is intended solely as a reference. For comprehensive information, please refer to the schematics and mechanical dimensions of EagleCore PolarFire SoC SOM located at the end of this page. Additionally, detailed specifications of each connector can be found below.
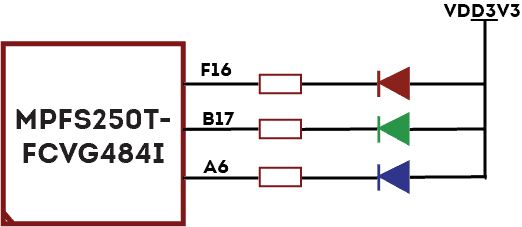
RGB LED
EagleCore PolarFire SoC SOM features an RGB LED which can be used for customizing or debugging purposes. The LED is wired in the active-low configuration.
eMMC
eMMC, short for embedded MultiMediaCard, is a type of non-volatile flash storage commonly used in electronic devices. It combines flash memory chips and a controller into a single package, providing a compact and integrated solution for data storage.
The SDINBDG4-8G is a specific eMMC module utilized in the FPGA board. With a storage capacity of 8GB, it offers reliable and high-speed data storage capabilities within the FPGA system. The SDINBDG4-8G eMMC module, with its integrated controller and compact design, enables seamless integration of storage functionality into the FPGA board, facilitating efficient storage and retrieval of data.
| Signal Name | PolarFire SoC Pin |
|---|---|
| eMMC CLK | J1 |
| eMMC CMD | K5 |
| eMMC DATA0 | H1 |
| eMMC DATA1 | J4 |
| eMMC DATA2 | K4 |
| eMMC DATA3 | J7 |
| EM_STRB | K3 |
| eMMC_RST_n | H4 |
| eMMC DATA4 | J6 |
| eMMC DATA5 | H6 |
| eMMC DATA6 | J3 |
| eMMC DATA7 | H2 |
OTG PHY
A USB3340 Hi-Speed USB 2.0 Transceiver is utilized for OTG communication. It uses MSS BANK 2 for the USB interface and has a 26 MHz onboard crystal for reference clock.
Jumper selection:
- To select PolarFire SoC as the Host:
- Jumper W4 Closed
- To select PolarFire SoC as the Device:
- Jumper W4 Open
Pin Mapping
| Signal Name | PolarFire SoC Pin |
|---|---|
| USB_CLK | G2 |
| USB_DIR | F1 |
| USB_NXT | G5 |
| USB_STP | G4 |
| USB_DATA0 | F2 |
| USB_DATA1 | E1 |
| USB_DATA2 | G3 |
| USB_DATA3 | F5 |
| USB_DATA4 | D1 |
| USB_DATA5 | D2 |
| USB_DATA6 | F6 |
| USB_DATA7 | F3 |
| RESET_USB | A5 |
HSIOS, GPIOs and Transceivers
Connector P1
| Pin No. on Connector | Pin Name | PolarFire SoC | Pin No. on Connector | Pin Name | PolarFire SoC |
|---|---|---|---|---|---|
| 1 | VDD2V5 | 2 | VDD3V3 | ||
| 3 | VDD2V5 | 4 | VDD3V3 | ||
| 5 | GND | 6 | GND | ||
| 7 | XCVR_0B_REFCLK_P | N19 | 8 | XCVR_0C_REFCLK_P | J19 |
| 9 | XCVR_0B_REFCLK_N | N20 | 10 | XCVR_0C_REFCLK_N | J20 |
| 11 | GND | 12 | GND | ||
| 13 | XCVR_0_RX0_P | G20 | 14 | XCVR_0_TX0_P | F22 |
| 15 | XCVR_0_RX0_N | G19 | 16 | XCVR_0_TX0_N | F21 |
| 17 | GND | 18 | GND | ||
| 19 | XCVR_0_RX1_P | K22 | 20 | XCVR_0_TX1_P | H22 |
| 21 | XCVR_0_RX1_N | K21 | 22 | XCVR_0_TX1_N | H21 |
| 23 | GND | 24 | GND | ||
| 25 | XCVR_0_RX2_P | M22 | 26 | XCVR_0_TX2_P | P22 |
| 27 | XCVR_0_RX2_N | M21 | 28 | XCVR_0_TX2_N | P21 |
| 29 | GND | 30 | GND | ||
| 31 | XCVR_0_RX3_P | R20 | 32 | XCVR_0_TX3_P | T22 |
| 33 | XCVR_0_RX3_N | R19 | 34 | XCVR_0_TX3_N | T21 |
| 35 | GND | 36 | GND | ||
| 37 | NC | 38 | NC | ||
| 39 | NC | 40 | NC | ||
| 41 | GND | 42 | GND | ||
| 43 | NC | 44 | NC | ||
| 45 | NC | 46 | NC | ||
| 47 | GND | 48 | GND | ||
| 49 | NC | 50 | NC | ||
| 51 | NC | 52 | NC | ||
| 53 | GND | 54 | GND | ||
| 55 | NC | 56 | NC | ||
| 57 | NC | 58 | NC | ||
| 59 | GND | 60 | GND | ||
| 61 | NC | 62 | NC | ||
| 63 | NC | 64 | NC | ||
| 65 | GND | 66 | GND | ||
| 67 | NC | 68 | NC | ||
| 69 | NC | 70 | NC | ||
| 71 | GND | 72 | GND | ||
| 73 | TXVA_0_P | A14 | 74 | TXVA_1_P | A10 |
| 75 | TXVA_0_N | B14 | 76 | TXVA_1_N | B10 |
| 77 | GND | 78 | GND | ||
| 79 | TXVB_0_P | A15 | 80 | TXVB_1_P | A11 |
| 81 | TXVB_0_N | B15 | 82 | TXVB_1_N | B11 |
| 83 | GND | 84 | GND | ||
| 85 | TXVC_0_P | C16 | 86 | TXVC_1_P | A12 |
| 87 | TXVC_0_N | C15 | 88 | TXVC_1_N | B12 |
| 89 | GND | 90 | GND | ||
| 91 | TXVD_0_P | D16 | 92 | TXVD_1_P | A13 |
| 93 | TXVD_0_N | D15 | 94 | TXVD_1_N | B13 |
| 95 | ETH_PHY_LED0_0 | G3 | 96 | ETH_PHY_LED1_0 | H3 |
| 97 | ETH_PHY_LED0_1 | G4 | 98 | ETH_PHY_LED1_1 | H4 |
| 99 | GND | 100 | GND |
Connector P2
| Pin No. on Connector | Pin Name | PolarFire SoC | Pin No. on Connector | Pin Name | PolarFire SoC |
|---|---|---|---|---|---|
| 1 | VIN | 2 | VIN | ||
| 3 | VIN | 4 | VIN | ||
| 5 | VIN | 6 | VIN | ||
| 7 | GND | 8 | GND | ||
| 9 | GND | 10 | GND | ||
| 11 | VDD1V8 | 12 | VDD3V3 | ||
| 13 | VDD1V8 | 14 | VDD3V3 | ||
| 15 | GND | 16 | GND | ||
| 17 | HSIO_B0_CC_IO0_P | W22 | 18 | HSIO_B0_CC_IO2_P | W21 |
| 19 | HSIO_B0_CC_IO0_N | V22 | 20 | HSIO_B0_CC_IO2_N | V21 |
| 21 | HSIO_B0_CC_IO1_P | AA21 | 22 | HSIO_B0_IO3_P | AB21 |
| 23 | HSIO_B0_CC_IO1_N | AA22 | 24 | HSIO_B0_IO3_N | AA20 |
| 25 | GND | 26 | GND | ||
| 27 | HSIO_B0_CC_IO4_P | V20 | 28 | HSIO_B0_CC_IO6_P | Y20 |
| 29 | HSIO_B0_CC_IO4_N | V19 | 30 | HSIO_B0_CC_IO6_N | Y21 |
| 31 | HSIO_B0_IO5_P | AB19 | 32 | HSIO_B0_CC_IO7_P | U19 |
| 33 | HSIO_B0_IO5_N | AB20 | 34 | HSIO_B0_CC_IO7_N | U18 |
| 35 | GND | 36 | GND | ||
| 37 | HSIO_B0_IO8_P | W19 | 38 | HSIO_B0_IO10_P | W16 |
| 39 | HSIO_B0_IO8_N | W18 | 40 | HSIO_B0_IO10_N | W17 |
| 41 | HSIO_B0_IO9_P | AB17 | 42 | HSIO_B0_IO11_P | AA16 |
| 43 | HSIO_B0_IO9_N | AA17 | 44 | HSIO_B0_IO11_N | Y16 |
| 45 | GND | 46 | GND | ||
| 47 | HSIO_B0_CC_IO12_P | Y19 | 48 | HSIO_B0_CC_IO14_P | AB18 |
| 49 | HSIO_B0_CC_IO12_N | Y18 | 50 | HSIO_B0_CC_IO14_N | AA18 |
| 51 | HSIO_B0_CC_IO13_P | T17 | 52 | HSIO_B0_CC_IO15_P | Y15 |
| 53 | HSIO_B0_CC_IO13_N | U17 | 54 | HSIO_B0_CC_IO15_N | AA15 |
| 55 | GND | 56 | GND | ||
| 57 | HSIO_B0_CC_IO16_P | AB14 | 58 | HSIO_B0_CC_IO18_P | Y14 |
| 59 | HSIO_B0_CC_IO16_N | AB15 | 60 | HSIO_B0_CC_IO18_N | W14 |
| 61 | HSIO_B0_CC_IO17_P | AA13 | 62 | HSIO_B0_CC_IO19_P | V14 |
| 63 | HSIO_B0_CC_IO17_N | AB13 | 64 | HSIO_B0_CC_IO19_N | V15 |
| 65 | GND | 66 | GND | ||
| 67 | HSIO_B0_IO20_P | V17 | 68 | HSIO_B0_CC_IO22_P | U12 |
| 69 | HSIO_B0_IO20_N | V16 | 70 | HSIO_B0_CC_IO22_N | T12 |
| 71 | HSIO_B0_IO21_P | AA12 | 72 | HSIO_B0_IO23_P | W13 |
| 73 | HSIO_B0_IO21_N | AB12 | 74 | HSIO_B0_IO23_N | Y13 |
| 75 | GND | 76 | GND | ||
| 77 | HSIO_B0_CC_IO24_P | R12 | 78 | HSIO_B0_CC_IO26_P | U15 |
| 79 | HSIO_B0_CC_IO24_N | T13 | 80 | HSIO_B0_CC_IO26_N | T15 |
| 81 | HSIO_B0_CC_IO25_P | T16 | 82 | HSIO_B0_CC_IO27_P | U14 |
| 83 | HSIO_B0_CC_IO25_N | R16 | 84 | HSIO_B0_CC_IO27_N | U13 |
| 85 | GND | 86 | GND | ||
| 87 | HSIO_B0_IO28_P | R15 | 88 | MSS_B4_IO0 | H5 |
| 89 | HSIO_B0_IO28_N | R14 | 90 | MSS_B4_IO1 | J2 |
| 91 | MSS_B2_IO0 | E5 | 92 | MSS_B2_IO1 | E4 |
| 93 | MSS_B2_IO2 | B2 | 94 | MSS_B2_IO3 | A2 |
| 95 | MSS_B2_IO4 | B3 | 96 | MSS_B2_IO5 | A3 |
| 97 | MSS_B2_IO6 | E3 | 98 | MSS_B2_IO7 | D4 |
| 99 | GND | 100 | GND |
Connector P3
| Pin No. on Connector | Pin Name | PolarFire SoC | Pin No. on Connector | Pin Name | PolarFire SoC |
|---|---|---|---|---|---|
| 1 | VIN | 2 | VIN | ||
| 3 | VIN | 4 | VIN | ||
| 5 | VIN | 6 | VIN | ||
| 7 | GND | 8 | GND | ||
| 9 | GND | 10 | GND | ||
| 11 | VDD3V3 | 12 | VDD_GPIO | ||
| 13 | VDD3V3 | 14 | VDD_GPIO | ||
| 15 | GND | 16 | GND | ||
| 17 | GPIO_B1_CC_IO0_P | E19 | 18 | GPIO_B1_IO2_P | C22 |
| 19 | GPIO_B1_CC_IO0_N | D19 | 20 | GPIO_B1_IO2_N | D22 |
| 21 | GPIO_B1_CC_IO1_P | G17 | 22 | GPIO_B1_IO3_P | A20 |
| 23 | GPIO_B1_CC_IO1_N | H17 | 24 | GPIO_B1_IO3_N | A21 |
| 25 | GND | 26 | GND | ||
| 27 | GPIO_B1_IO4_P | D21 | 28 | GPIO_B1_IO6_P | G15 |
| 29 | GPIO_B1_IO4_N | D20 | 30 | GPIO_B1_IO6_N | H15 |
| 31 | GPIO_B1_IO5_P | C19 | 32 | GPIO_B1_IO7_P | B21 |
| 33 | GPIO_B1_IO5_N | C20 | 34 | GPIO_B1_IO7_N | B22 |
| 35 | GND | 36 | GND | ||
| 37 | GPIO_B1_IO8_P | C14 | 38 | GPIO_B1_IO10_P | E13 |
| 39 | GPIO_B1_IO8_N | C15 | 40 | GPIO_B1_IO10_N | F13 |
| 41 | GPIO_B1_IO9_P | A16 | 42 | GPIO_B1_IO11_P | G13 |
| 43 | GPIO_B1_IO9_N | A17 | 44 | GPIO_B1_IO11_N | H13 |
| 45 | GND | 46 | GND | ||
| 47 | GPIO_B1_CC_IO12_P | A15 | 48 | GPIO_B1_CC_IO14_P | C10 |
| 49 | GPIO_B1_CC_IO12_N | B15 | 50 | GPIO_B1_CC_IO14_N | C9 |
| 51 | GPIO_B1_CC_IO13_P | B13 | 52 | GPIO_B1_CC_IO15_P | A7 |
| 53 | GPIO_B1_CC_IO13_N | B14 | 54 | GPIO_B1_CC_IO15_N | B7 |
| 55 | GND | 56 | GND | ||
| 57 | GPIO_B1_IO16_P | F15 | 58 | GPIO_B1_CC_IO18_P | D7 |
| 59 | GPIO_B1_IO16_N | G14 | 60 | GPIO_B1_CC_IO18_N | D6 |
| 61 | GPIO_B1_CC_IO17_P | C6 | 62 | GPIO_B1_IO19_P | B10 |
| 63 | GPIO_B1_CC_IO17_N | C7 | 64 | GPIO_B1_IO19_N | B9 |
| 65 | GND | 66 | GND | ||
| 67 | GPIO_B1_IO20_P | H12 | 68 | GPIO_B1_IO22_P | A8 |
| 69 | GPIO_B1_IO20_N | G12 | 70 | GPIO_B1_IO22_N | B8 |
| 71 | GPIO_B1_IO21_P | F12 | 72 | GPIO_B1_CC_IO23_P | C4 |
| 73 | GPIO_B1_IO21_N | F11 | 74 | GPIO_B1_CC_IO23_N | B4 |
| 75 | GND | 76 | GND | ||
| 77 | GPIO_B1_CC_IO24_P | D9 | 78 | GPIO_B1_CC_IO25_P | E10 |
| 79 | GPIO_B1_CC_IO24_N | D8 | 80 | GPIO_B1_CC_IO25_N | F10 |
| 81 | GND | 82 | GND | ||
| 83 | SPI_SCK | B2 | 84 | SPI_SS | C2 |
| 85 | SPI_SDO | D3 | 86 | SPI_SDI | D2 |
| 87 | D_N | 88 | USB_ID | ||
| 89 | D_P | 90 | USB_5V | ||
| 91 | JTAG_TDI | G9 | 92 | JTAG_TDO | E8 |
| 93 | JTAG_TMS | F8 | 94 | JTAG_TCK | E9 |
| 95 | JTAG_RSTn | G8 | 96 | DEVRST_n | H7 |
| 97 | PG_ALL | 98 | NC | ||
| 99 | GND | 100 | GND |
Bitstream generation for EagleCore PolarFire SoC SOM
The Libero SoC Design Suite is responsible for generating the programming bitstream used in different programming modes. These bitstreams can consist of various components, depending on the specific requirements. These components may include:
- FPGA fabric logic
- sNVM data
- eNVM data
- User security settings:
Programming Modes and Associated Bitstream formats
| Programming Mode | Interface | Master | Bitstream Format |
|---|---|---|---|
| JTAG programming | System controller’s dedicated JTAG | FlashPro programmer | STP |
| SPI slave programming | System controller’s dedicated SPI | FlashPro programmer | DAT |
| SPI master programming | System controller’s dedicated SPI S | System controller | SPI |
Basic Bitstream Generation flow

Configuring Bitstream
You may choose the components you want to program using the Configure Bitstream dialogue box. Right-click Generate Bitstream in the “Design Flow” window and select Configure Options to bring up the dialogue box.

Configuring EagleCore PolarFire SoC SOM
JTAG Programming
In order to configure the EagleCore PolarFire SoC SOM using JTAG, it is necessary to have a carrier board, such as <Numato Lab’s carrier board>, which is equipped with a JTAG connector. The JTAG controller communicates with the system controller by sending the JTAG instruction to be executed and a 128-bit data buffer that conveys any accompanying data. EagleCore PolarFire SoC SOM can be programmed via the specific JTAG interface with a Microchip FlashPro programmer (version 5 or later). This can be done either using the Libero SoC or a standalone FlashPro Express.
JTAG Programming using Libero SoC
Step 1: Connect the Microchip FlashPro programmer to the EagleCore PolarFire SoC SOM and power it up.
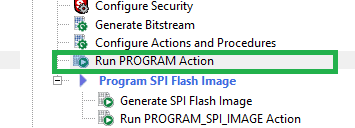
Step 2: In Libero SoC, double-click the Run PROGRAM Action under “Program Design” to program the specific component that was selected while generating the bitstream (Fabric, sNVM, eNVM, etc.).
Flash programming using Libero SoC
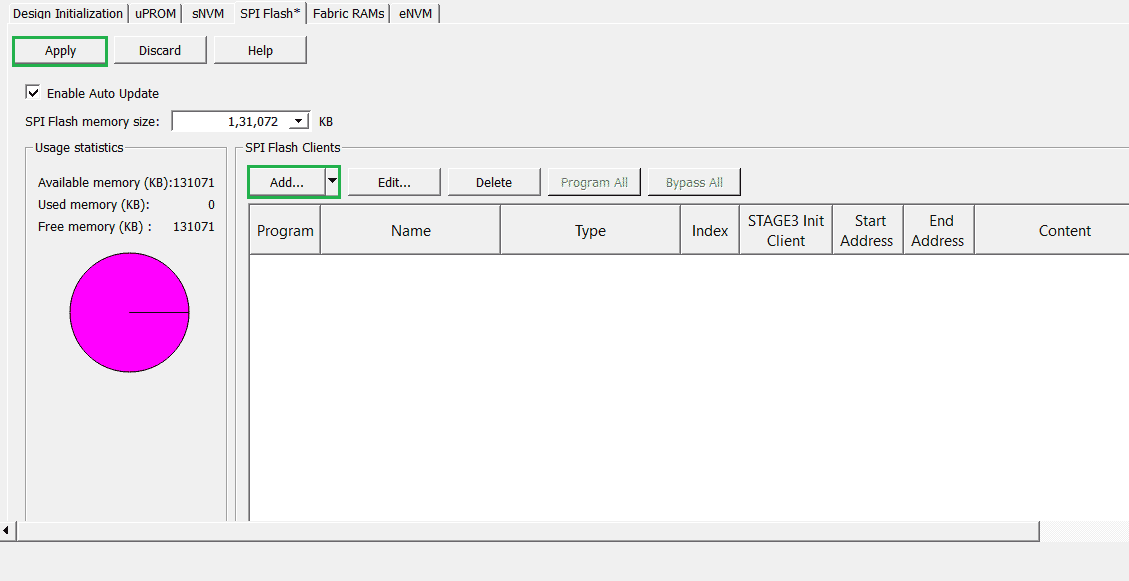
Step 1:
Go to Design Flow > Program and Debug Design > Configure Design Initialization Data and Memories, and choose the SPI Flash tab. Add the required programming images under the SPI Flash Clients section and then click on the “Apply” button to save the changes.
Step 2:
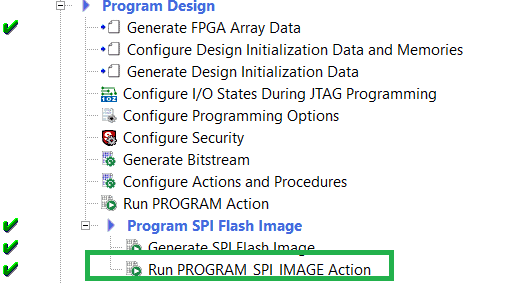
To program the SPI flash with the SPI directory and the programming images, simply double-click on the Run PROGRAM_SPI_IMAGE Action.
JTAG programming using FlashPro Express Software
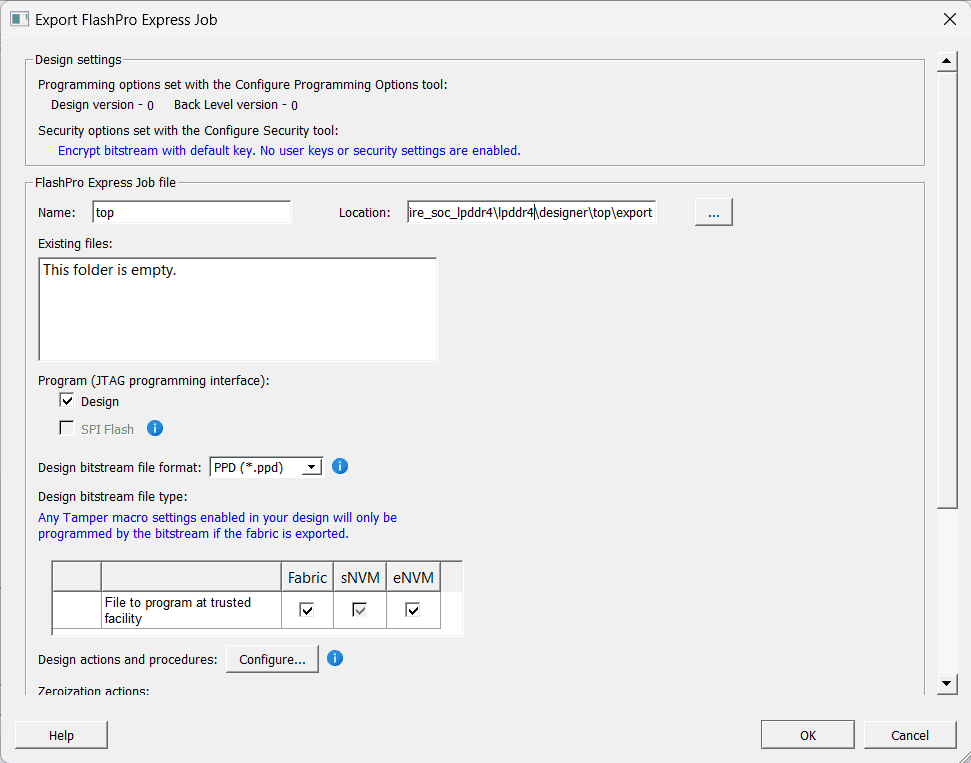
Step 1:
Run the Export FlashPro Express Job command in Libero to create a container for the programming configuration data, including programming files, to be sent to the production programming tool FlashPro Express.
Step 2:
Select New Job Project from the Project menu in FlashPro Express. In the Create New Job Project window provide the file path where you exported the Programming Job file from Libero, as well as the preferred location where you intend to store the FlashPro Express job project.

Step 3:
Connect the Microchip FlashPro programmer to the EagleCore PolarFire SoC SOM and power it up.
Step 4:
Once the Job project is open, make sure the Programmer is listed.
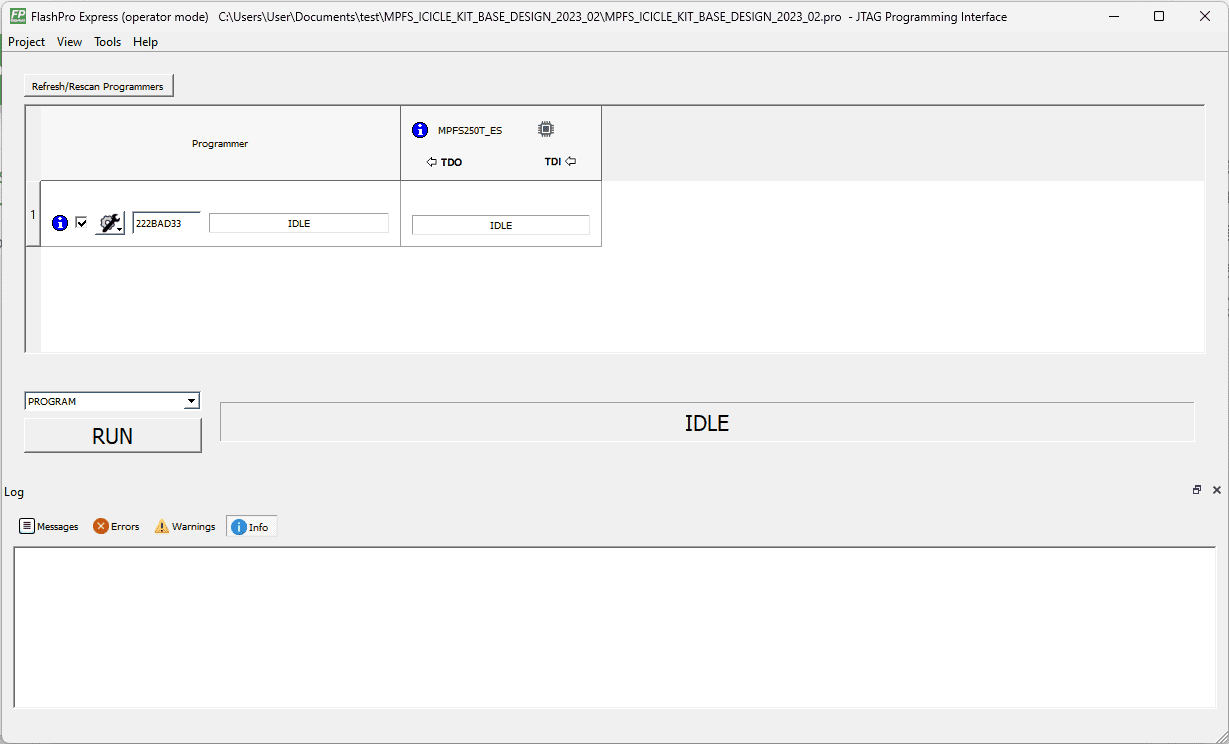
Set PROGRAM as the Programming Action from the drop-down menu.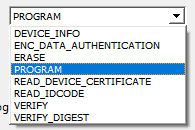
Click on RUN.
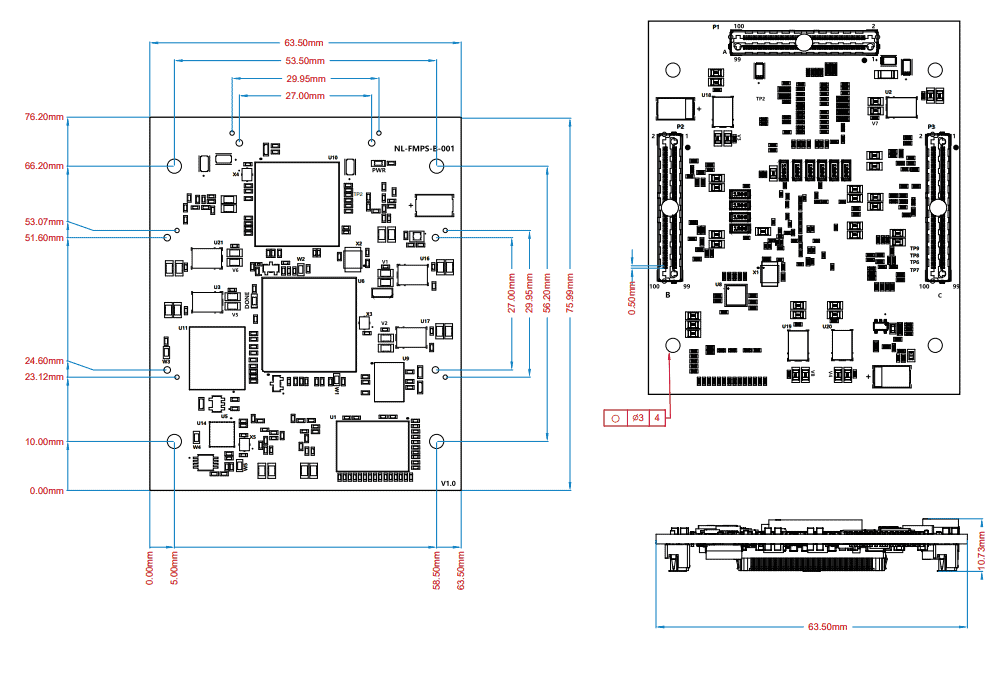
Mechanical Dimensions