What This Demo Shows
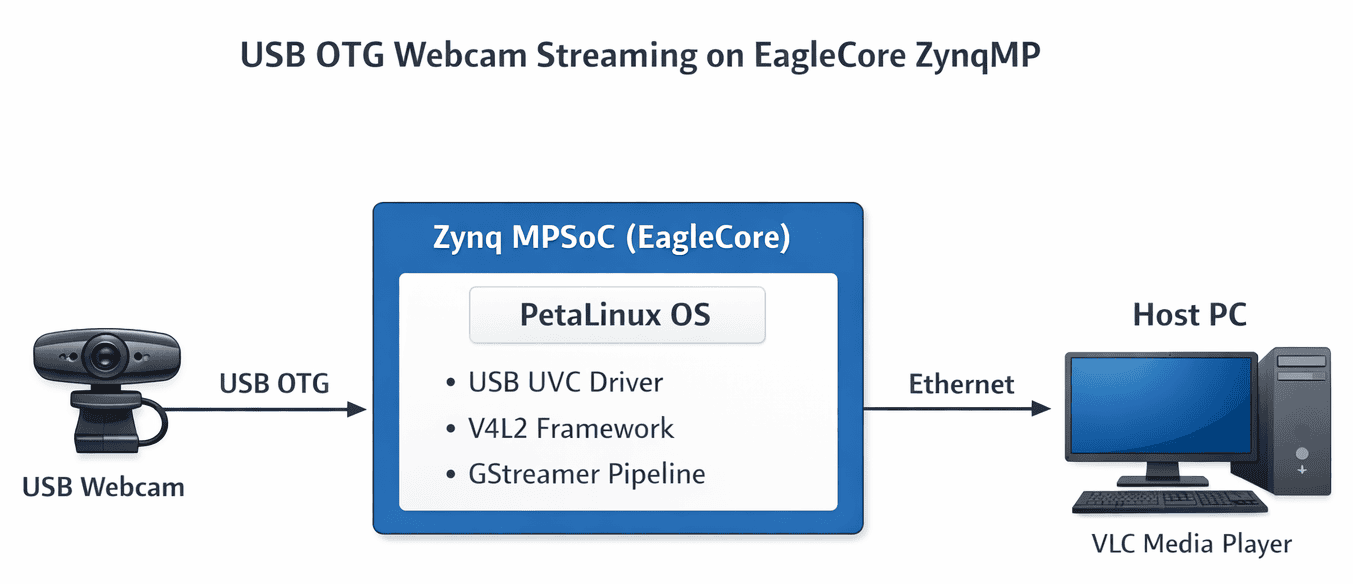
This project highlights how the EagleCore ZU-Plus can be used as a compact multimedia edge device. In this demo, the board:
-
Acts as a USB OTG host for a standard webcam
-
Runs PetaLinux on the Zynq MPSoC Processing System
-
Captures video using the UVC (USB Video Class) driver
-
Streams MJPEG video over Ethernet using GStreamer
-
Displays the live stream on a PC using VLC
The result?
A working, low-latency camera streaming setup driven by an FPGA-based SoC.
Hardware Setup
The following connections are required:
-
Insert the SD card (with the PetaLinux image->Download it from here) into the EagleCore carrier board
-
Connect a USB webcam to the USB-OTG port
-
Connect a USB-C cable to the host PC for UART debugging
-
Connect an Ethernet cable between the EagleCore board and the host PC
-
Power the board using a 12 V DC adapter
Booting PetaLinux from SD Card
Ensure the board’s boot mode is set to SD boot.
Open a serial terminal (PuTTY / TeraTerm) with:
-
Baud rate: 115200
-
Interface: USB-UART
Power on the board and observe the PetaLinux boot sequence.
After the boot process stops, the system drops into the ZynqMP U-Boot prompt.
Configuring USB for Webcam Stability (U-Boot)
USB webcams can misbehave if USB autosuspend is enabled. To prevent this, we permanently disable autosuspend via U-Boot environment variables:
This ensures the USB webcam remains powered and responsive after Linux boots.
Booting Linux Manually from U-Boot
The Linux image (image.ub) is loaded from the SD card and booted manually:
After this, the system boots into PetaLinux and automatically logs in as root.
Ethernet Configuration on PetaLinux
To stream video to a PC, the Ethernet interface is configured with a static IP.
First, reset the Ethernet interface:
Then assign a static IP address to the board:
The host PC is configured on the same subnet (for example, 192.168.1.20).
Streaming the Webcam Over Ethernet
Once the USB webcam is detected as /dev/video0, GStreamer is used to capture and stream video.
At this point, the webcam LED turns on—always a satisfying confirmation.
Viewing the Stream on the Host PC
1.Download and install VLC Media player for streaming the camera
2.Download the streaming file for VLC from here and save it in a convenient folder
3.Open VLC Media Player
4.Select Media → Open File
Open camera.sdp
You should now see the live video captured by the webcam and streamed directly from the FPGA board.
This project shows that an FPGA board is no longer limited to blinking LEDs or generating test patterns. With PetaLinux and GStreamer, the EagleCore ZU-Plus becomes a compact embedded video streaming system, capable of real-world multimedia tasks.
If you’ve ever wanted to mix FPGA hardware, Linux, and live video streaming into one project—this is a great place to start.
Happy coding, and enjoy making your FPGA do unexpected things